Here’s something you probably never think about: your faucet’s aerator!
If you’ve ever tried to look into (or put your finger into) where water streams out of your faucet and found a little screen instead, you’ve encountered an aerator.
Why would you want to remove this thing and clean it? Maybe …
- You recently turned water off to your house and dredged up a bunch of grime from your hot water tank and/or repaired water line
- Your faucet is really grungy (and perhaps old) on the outside – maybe it’s gross inside, too?
- Your faucet’s water pressure (flow) is lacking
- You’re simply grossed out reading this post and now you need to clean it right. now.
I was inspired to clean mine out when the water pressure suddenly dropped for no particular reason. I thought perhaps we had another water main leak, but my dad suggested seeing if the aerator was blocked. That seemed simple enough, so removing and cleaning the aerator is where I started. I was able to do this whole process without any tools, but you may need a wrench if yours is particularly stuck on (be careful, don’t force or break anything).
Step 1: Put a towel or something over the drain of your sink. If you do the towel step, you won’t drop anything. If you skip the towel step, your chances of dropping something increase by about 1000%.
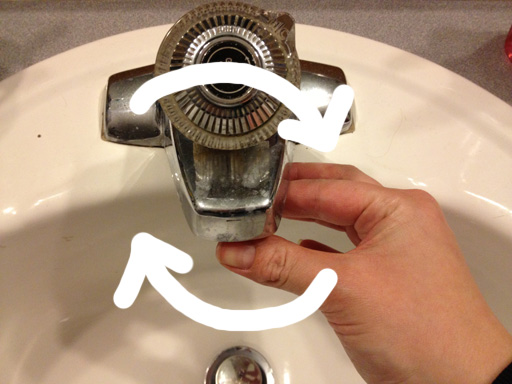
Step 2: Unscrew the aerator by turning it clockwise
Step 3: If there are multiple pieces to your aerator, take note of what order they go in. When you reassemble your aerator, you’ll need to put it back exactly as it was.
Here you can see mine is loaded up with tiny rocks and metal bits. This is pretty gross, but what’s even grosser is this is my favorite faucet to get drinking water from. All my drinking water has been passing through these little pebbles and this filthy plastic piece! Eww!! This ends RIGHT NOW!
Step 4: Clean your aerator pieces! There are multiple approaches here depending on how dirty your aerator is and how much time/money you want to invest in this project:
- Shake and scrape the dirt off with your fingers
- Scrub the dirt off with a toothbrush or similar
- Soak the parts in a calcium / lime-dissolving solution
- Replace it entirely
In the interest of not spending more than a few minutes on this project, I opted for the first option. I knocked the pebbles out of the aerator and scrubbed the white plastic part under running water at another sink.
OMG, I’VE BEEN DRINKING WATER FILTERED THROUGH THIS SHIT!!
Step 5: Reassemble the aerator and screw it (counterclockwise) back into the faucet
There, now you have one more thing to be obsessive and compulsive about. You’re welcome.


