This week I completed a very tedious important project: making a home inventory document and video set.
I’ve been working on this bit by bit over the last two months. It’s a lot to do, but breaking it up into smaller tasks makes it much less overwhelming.
Why Make an Inventory?
Bad things happen – earthquakes, fires, hurricanes, floods, tornadoes. Chances are, you live near at least one nightmare-fuel hazard or another.
How much stuff do you have? Of what quality? In what quantity?
Knowing the answers to these questions will help you determine how much insurance to buy and help prove to your insurance company what you had. Some additional reasons:
1. Something’s better than nothing – it doesn’t matter if your house is messy or undecorated. Messy proof > no proof.
2. You have more stuff than you realize. Silverware, clothing, underwear, off-season clothing, tools, cleaning supplies – I’d wager that in most homes, it’s not the big ticket items like the TV or the computers that represents most of the expenditures. It’s the day to day stuff.
3. The condition of your stuff is worth documenting. If your car is 10 years old but rust-free without a dent on it, wouldn’t you want your insurance company to know that?
4. A major appliance inventory is just plain useful, for warranties and especially when you go to sell
5. Disaster can strike ANY TIME! Luck favors the prepared.
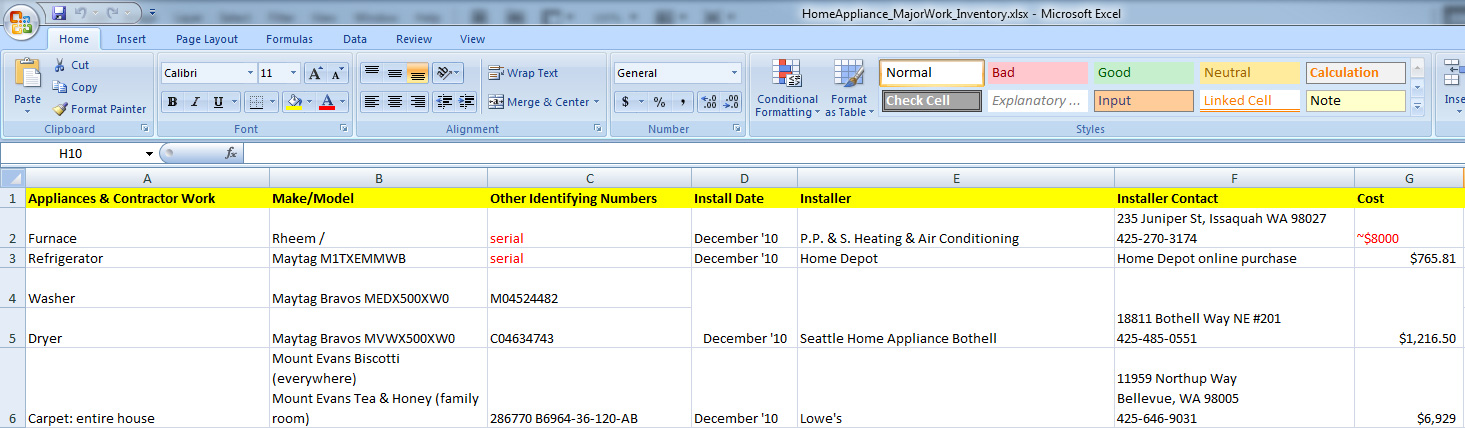
Making a Major Appliance Spreadsheet
This step is easy but time consuming. The idea here is to document every major appliance in your house in a spreadsheet (or on paper if you’re oldschool like that).
Your document should include:
- purchase/install date
- purchase price
- serial number
- model name/number
- installer
I also included carpeting, flooring, blow-in insulation, and other similarly major work done on the house.
This sheet may seem like tedious work now, but it’ll be a huge help when it’s time to sell (your realtor will want to know how old things are) and it will help prove the quality and age of the stuff in your home to your insurance company should anything happen to your home.
This is how I structured my spreadsheet. I’ve flagged data I don’t know in red as a reminder to go get that information next time I work on the spreadsheet.
Making Inventory Videos
This video part was simple, especially once I got started. I don’t know why I dreaded this task so much. I set my camera to video recording mode and repeated these steps for each room:
1. Standing in the door, I started the video and panned from left to right to get the full room recorded.
2. I verbally stated the date and the room I was standing in.
3. Keeping the video recording, I walked around the perimeter of the room (counterclockwise if you’re above the equator, clockwise if you’re below it of course)
4. I opened drawers, cabinets, closets, etc, and used my free hand to point out objects and talk about their value and when I acquired them.
I did this room by room so that as rooms change and get new stuff, I can remake the video for just that room rather than redo the entire house. For best visual results, I did this during the daytime with lights turned on.
Organizing the Videos
I brought all the videos onto my local hard drive and named them by room. All in all, the files total about 18GB (!).

Storing (Backing Up) the Videos
I took two approaches to backing up the videos:
Backup 1: Physical Media in a Fire Resistant Safe
I copied the videos to a flash drive (or multiples, depending on video size and drive size) and put the drive inside a small fire resistant safe like this one.
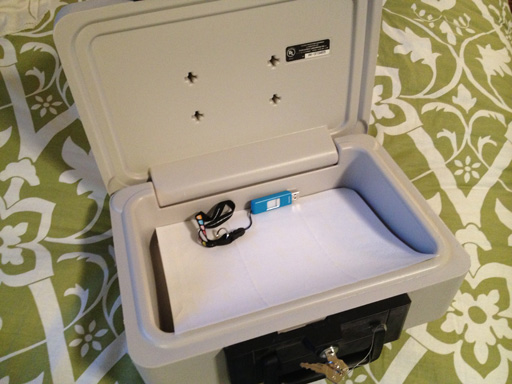
We already use this box to hold things like birth and marriage certificates. In event of fire, the box’s thick plastic should basically melt and form a seal protecting the contents inside.
Please note that this is not a foolproof plan – digital media and other contents of the safe aren’t guaranteed to survive if the box is heated to extremes (over 135 or so). I wouldn’t go tossing this box into a fire just to see what happens. However, fire is not the only hazard we’re up against here: if the house were significantly damaged, the box could be exposed to smoke, rain, snow, or even just heavy impact. Tossing the videos onto a drive and putting it inside this safe is better than doing absolutely nothing, but as with all data backup, the best plan is redundancy.
Backup 2: Online cloud backup
I am already a subscriber to Mozy backup. It’s worth every penny, but they also have a free plan for up to 2 GB. If your videos are not as extensive as mine, 2GB might be plenty. (Of course, there may be better services available. Search Google for free online backup and see what you find.) Heck, you could put them on YouTube as private videos, or hand them out to friends/family.
No matter what online backup service provider you use, the end goal is the same: get your videos copied to a server somewhere outside your home.
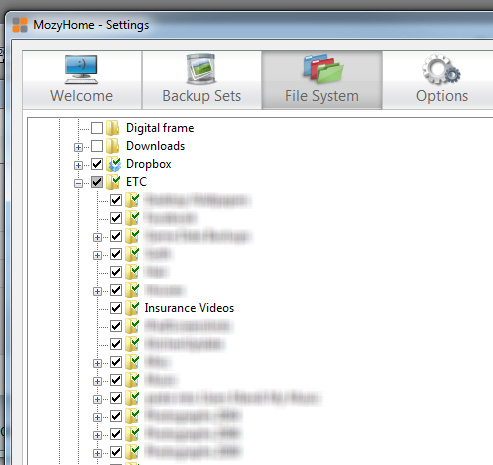
This is Mozy’s interface for choosing which folders get backed up to their server:
This is what Mozy backup looks like when it’s busy backing up your stuff:

Cheap but Effective Alternative: Photos
Making videos can be pretty overwhelming, especially in terms of data storage. For years, I documented my belongings by photographing them instead. Put the photos online in some way or another, or if you’re truly oldschool you can have them developed and store them somewhere other than your home.
The Moral of the Story?
It doesn’t matter how you document your stuff, it matters that you do document it. Get started today – once you get the process going, you’ve already done the hardest step!