Our new range hood vent is smaller than the hole used by our old microwave’s exhaust duct. Here’s the problem: a 5” wide x 2” deep gap adjacent to the range hood’s ventilation duct.
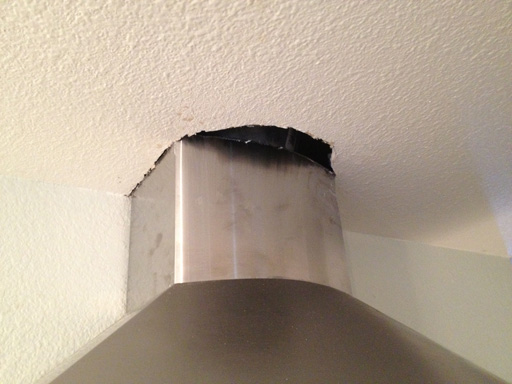
Funny how the crappy microwave needed a larger vent hole than our awesome range hood.
Here’s what didn’t work
Bad Idea #1): Curved piece for curved hole

Here’s my crescent-moon stencil, same shape as the ceiling hole

And here’s the drywall piece I ended up with after 20 minutes of cutting and shaving.

The piece fits! …but what will keep it up there?
I wish I’d thought to try this before I cut the darn piece out: the anchor wood won’t fit into the hole with enough space for my fingers to hold it down while I drill it into place.
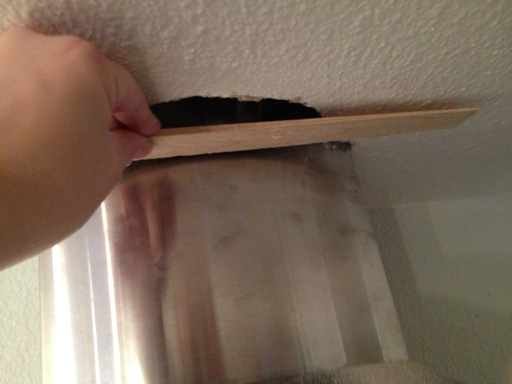
This strip of wood has to straddle the hole – and my fingers need to hold it down. There’s no room for my fingers.
Solution: I made the hole bigger (and rectangular).

Obviously, the solution is to make my ceiling hole even larger. (I did this when no one else was home to question my methodology, which was smart because this must have looked insane.)
Anyway, I was trucking along with this bigger/more rectangular hole. I even found a thicker “anchor strip” of wood (if there’s a technical term for this, I don’t know it) to use.

This bar of wood will give the new drywall piece something to hang from.

New “wood bar” screwed into place. The new drywall will also screw onto the wood bar.
And that’s about when Bad Idea #2 revealed itself: The new patch piece? Yeah, it’s 1/4” thicker than the ceiling’s drywall. There’s no way to “gloss over” this – I need to find thinner drywall, and cut another freaking piece (~20 minutes of cutting and shaving).

Derp, the drywall I chose for the second patch was too thick.
I can’t believe it didn’t occur to me that the piece I was making was hella thick:

Like, a lot thicker.
Anyway, I found a thinner scrap and cut another piece. This time, it was the right thickness, the right shape, and I was able to anchor it to my “anchor wood”.

Patch in place and screwed into the anchor wood.
Sweet! I began smoothing everything over with a few layers of spackle. Texture and painting will come later, once this has dried.

Spackling the ceiling patch.
Something that isn’t obvious from these photos is the absolutely awkward angle I was working at. The range hood is large, and the ceiling is low once I’m on the ladder, so I did most of this work bent at the waist with my head pressed against the ceiling, sideways, while standing on a stepladder. Glad this one’s done!


