At 6’4″, my husband Jim is too tall for most commercial standing desk designs. And at $1500+, most commercial standing desks are too expensive for our budget.
The solution was obvious: build our own extra tall DIY standing desk! We’re definitely not carpenters, but this simple DIY standing desk design should be doable by anyone with a decent plan and a saw (for home cutting – many stores that sell lumber will also cut the boards for you). My diy standing desk was easier than this one thanks to IKEA’s VIKA BYSKE legs being able to extend to just the right height for me (my desk is 42″ tall).
But Jim’s desk needed to be 46″ tall – and those 4″ were tough to figure out. The VIKA BYSKE legs only go to 42″. We were stuck here for several weeks as we considered various designs, but the ultimate solution was actually very cheap and simple: bed risers! A $20 set of heavy duty bed risers from Amazon gave us the 4″ we needed.
Wondering how to determine the right height for your own standing desk? It’s easy: stand up normally and bend your elbows at a 90 degree angle (as if you’re using an invisible keyboard right in front of you). The distance between the floor and your elbow, minus an inch or two, is the ideal height of your standing desk.
DIY Standing Desk Parts Shopping
Here’s what we bought for this very large DIY standing desk:
IKEA
From IKEA, we got a GALANT table corner piece and two rounded ends. The GALANT table comes in at least four colors and several configurations, so you can get whatever combo of pieces works best for your space. We also got 4 VIKA BYSKE extension legs – these are the only legs IKEA sells that go to 42″.
We like GALANT because it’s huge and because mine’s been very durable.
Amazon.com
To get the remaining 4″ of height we needed, we bought one set of these these heavy duty $20 bed risers. (Update: 8 months later, I’m pleased to report the bed risers have held up perfectly. No cracks or problems!)

Heavy duty bed risers from Amazon.com added the height that the VIKA BYSKE legs fell a little short on
Hardware Store
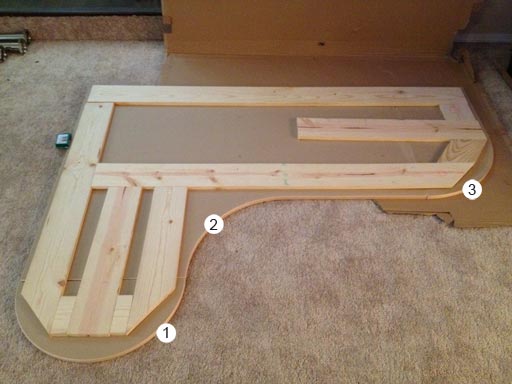
We purchased 18 feet of plain, flat narrow boards 3/4” thick and 5” wide.
The boards are for building a supportive network on the underside of the desk, since we won’t be using the metal frame IKEA sells. The legs and wall brackets will attach to these boards.
Why not use the IKEA frame? Well, we need flexibility on the leg positioning and we also need something to anchor the wall brackets to, and a metal frame would get in the way.
Assembling the Desk
The circular saw made short work of the boards (The Home Depot is able to cut for you in the store if you lack the tools or confidence with a saw).
Below: laying out the support network on the desk’s underside.
Since this desk is going to be heavy and awkward once assembled, we built it in the room we’d be using it in.
Fastening the support boards to the desk was surprisingly straightforward: first, drill a “pilot hole” through the board and into the desk (be sure your screw isn’t long enough to poke out the top side of the desk). The pilot hole helps prevent the screw from changing course as you’re screwing it in. Line up a screw and screw the board to the desk surface (also using the drill – yes, you’ll swap bits a lot unless you have two drills). We just worked our way from one end of the desk to the other.
For our desk’s thickness, we used one 30 count box of the 1 1/4” screws pictured below.
They look like this from underneath:
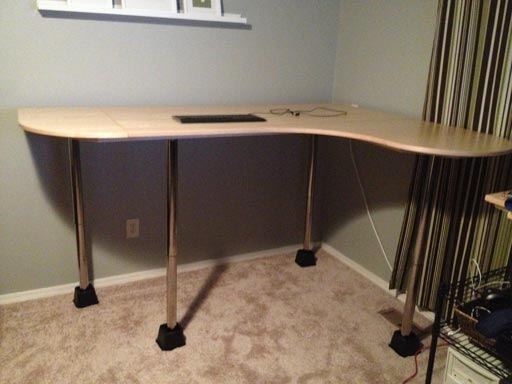
Next, we attached the four VIKA BYSKE legs to the desk and stood it up. We’ll re-configure the legs later, once the desk is anchored to the wall.
Testing the Desk
It’s wobbly, but it’s usable. Jim’s going to try it out and we’ll probably adjust it a few times before we permanently anchor it to the walls.
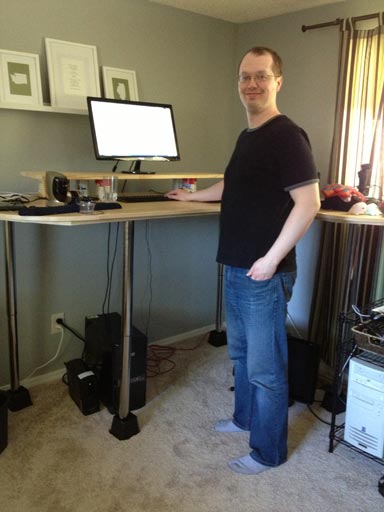
Here’s Jim at his new desk!
Wait, what about a chair?
You’re right, even standing desk aficionados have to sit once in a while. A helpful term to search for is “drafting chair” – drafting chairs tend to rise much higher than ordinary office chairs. Before you buy a chair for your standing desk, measure as best you can where you’ll need your butt to be for your forearms to lay parallel to the desktop.
I shopped for the right chair for a long time (over a month!) before settling on the Boss Caressoft Drafting Stool B16425-BK. This chair is great because after a year, it’s still looking brand new. The cushion didn’t develop a butt-shaped indent or wear out in the middle or anything like I’ve seen happen with other chairs. I like the back support, and I like resting my feet on the footrest ring. Best of all, this chair is tall enough for Jim to use, too, so we just share this one as it’s pretty rare for both of us to want to sit at the same time.

My Boss Caressoft Drafting Stool was about $100 at Amazon.com
More Standing Desk Options
For our DIY standing desks we wanted the biggest surfaces we could get- and since we own this place, we were completely free to anchor things to the wall. But if you live in an apartment or dorm room, need to be mobile, or just aren’t sure if a standing desk is for you, here are a few alternative standing desk designs you might enjoy.
Portable Standing Laptop Desk
The Techni Mobili Cadmus Mobile Laptop Stand is the complete opposite of our gargantuan standing desks: it’s small, lightweight, portable, and, at just $42 (for cherry wood grain) and $75 (for solid black), this standing desk is crazy affordable. Well reviewed on Amazon, it’s basically a one-stop shop to a quick and easy laptop sized standing desk. I think this laptop standing desk would be awesome for a kitchen (look up recipes!) or a family room (work while the kids play!).
Techni Mobili also offers a slightly larger computer cart version with roll-out keyboard and more shelf space.

Techni Mobili Cadmus Mobile Laptop Stand in Graphite – $75 at Amazon.com
Standing Desks for Commitmentphobes
With 32″ x 22″ of surface space this standing desk add on earns its name, the Executive Stand Steady Standing Desk. There are many choices in the “standing desk attachment” category, but the Executive stands out for being huge (it’s big enough for two monitors!) and for offering adjustable height (11.25″ – 15.25″).
An additional 15.25 inches may not be enough for very tall people, so always measure your current desk before ordering. I really like this thing – if I hadn’t been so gung-ho about building my own, I’d have probably tried using The Executive with my existing desk.

The Executive Stand Steady Standing Desk has the largest dimensions of any product in its category and adjustable height.
If $200 is a bit much or if 32″ x 22″ is overkill, the Speedy Standup is a solid alternative to The Executive. It’s literally a miniature desk you plop down on top of your existing desk – done. The company makes both a “standard” size and a “tall” size, so be sure to measure your existing desk’s height to determine which one’s right for you.

Try to ignore the hilariously bad Photoshop job, the Speedy Standup has great reviews and a good price – just $60.
Splash Out on an Adjustable Standing Desk!
Electric adjustable desks typically come with a price tag somewhere between $1500 and $3000, but if you’re willing to hand-crank it you can have a all the frills of an electric adjustable desk for a fraction of the price. This adjustable standing desk by ModTable can go up to 47″, which would have just barely been tall enough for a tall guy like Jim (his desk is 46″ above the floor).

This adjustable standing desks by ModTable is a luxurious “best of both worlds” stand up desk.


