DIY Bathroom: Staining a Bathroom Vanity with Gel Stain

gel_stain_how_to_tutorial

This post is part of a multi-post series showing off the DIY renovation of our office (“guest”) bathroom.

Here’s how I updated a small, dated bathroom vanity for well under a hundred bucks. This is my very first staining project (though I’ve got plenty of experience with painting wood) so I followed the same steps demonstrated by Jessie over at Imperfectly Polished. I think it turned out pretty good.

Our Vanity “Before”

Here’s our office bathroom’s “Before”, looking pretty much like it has since we moved in 3 years ago.

Take it all in: the brass faucet has resisted all attempts to fix its leak, the sink lacquer is chipping, the light fixture is straight out of a 1970’s Hollywood dressing room, and the vinyl floor is from a 1980’s hair salon. Like most of our DIY projects here at Level Up House, this bathroom will evolve over time, starting with the very first step: staining the vanity.

stain_bathroom_vanity_before

This is not our prettiest bathroom.

Vanity Staining Supply List

Staining a bathroom vanity comes with a whole slew of stuff to buy. Here’s a list of everything I used:

  • Minwax Pre-Stain wood conditioner
  • Minwax Gel Stain in “Walnut” – 16oz can
  • Minwax Fast-Drying Polyurethane
  • Corner sander with 120 grit sanding paper
  • Painter’s tape
  • Cheesecloth (optional)
  • Old socks
  • Safety goggles & dust mask
  • Plastic gloves
  • Mineral spirits for clean up
  • A roll of paper towels
  • Shop vac + brush attachment
  • Screwdriver/drill for removing the cabinet doors and hardware

I was originally going to buy the smaller size can of stain, but went with the 16oz after realizing it was going to take several coats (and indeed, it took 5 complete coats) to get my vanity’s wood as dark as I wanted. The cheesecloth was recommended to me by the “staining professional” at my local hardware store, but I think it was kind of silly. Any old rag made of thin cloth would have worked fine and would have saved me $7.

stain_bathroom_vanity_supplies_list

My local Home Depot doesn’t carry Minwax or much variety in gel stains. I had to hit up McLendon Hardware instead, where I found Minwax and an overwhelming selection of colors to choose from.

Step 1: Take it all apart

Use the screwdriver/drill to remove doors and cabinet hardware. If you can get your faux drawers off, do that, too. (I couldn’t get mine off for the life of me.)

stain_bathroom_vanity_before_taken_apart

Countertop cleared  – bathroom is ready to begin its transformation into a work zone.

Any wood trims around the base of the vanity should come off, too. Oh, and label each one with its location.

stain_bathroom_vanity_remove_wood_trims

Labeling your trim pieces is the best thing you can do for yourself. Don’t ask me how I know this.

Step 2: Sanding the vanity

Okay, the first real step here is to put on the goggles, dust mask, and ear plugs. Sanding kicks up a ton of dust and it all goes straight into your eyeballs and lungs if you don’t properly gear up first.

dust_mask_goggles_staining_a_vanity

Lookin’ chic!

My corner sander is equipped with 100 grit sandpaper. It took about an hour to sand off the thin layer of clear shininess that currently covers the vanity.  Fortunately, the existing varnish (or whatever it was) wasn’t too thick and sanded right off. Corner sanders are great for small projects and tight corners, but if I do another wood staining project I’m going to invest in a circular sander to speed up this process.

stain_bathroom_vanity_corner_sander

Corner sander ENGAGE!


Go ’round in circles and get all that shiny layer off. Be sure to get the corners and edges, too. For that narrow area above the faux drawers I rubbed a small roll of sandpaper left/right. The doors were detached and sanded separately (I sat on the floor and sanded them in my lap).


stain_bathroom_sanding_corner_sander

Sanding my vanity’s faux drawers


When you’re done sanding vacuum the area clean with a shop vac and the brush attachment. Consider wiping everything down with a wet rag, too. Getting all the dust out of the room is just a good practice – you don’t want the debris getting mixed into your stain.

Step 3: Painter’s tape

If your vanity touches walls or floors that you care about, a few strips of painter’s tape will protect those things. Wipe off any remaining sanding dust before sticking tape to the surrounding walls, interior, and floor.

painters_tape_staining_vanity

Step 4: Prepping with Pre-Conditioner

I didn’t do a side-by-side to test if this “pre-stain wood conditioner” stuff actually makes a difference, but at $7 a can I figured I’d get it since it was recommended by the how-to guides I consulted before starting this project. Using it is straightforward: open the can, dip a paper towel in, and smear it all over the wood you’ll be staining. You’re supposed to apply stain within 2 hours of applying the pre-stain, so don’t do this step and then go to bed or something.

pre_stain_wood_conditioner

This is the only time where “pre-staining” is a good thing.

Step 5: Mixing the Gel Stain

Gel stain is disgustingly thick and gelatinous, but it has to be stirred into a smoother consistency before it can be applied. I poured half the can’s contents into another container to make it easier to stir in both containers. A good old paint stick was plenty strong for cutting and stirring this goopy stuff.

gel_stain_walnut

Gel stain is goopypoopy. Many, many comparisons to other substances were made.

Step 6: Actually Staining Things

Are we staining yet? Yes, yes we are. Dip the cheesecloth or rag into the gel stain – get a small amount, no need to go nuts here because most of it’s going to get wiped back off anyway.

gel_stain_on_cheesecloth

Oh, and wear gloves. This was taken 30 seconds before my hands became chocolate colored.

gel_stain_smeared_on

Like a big ol’ poopstain. (Seriously, if you don’t make fun of this DIY stuff you’ll never survive it.)

Go ’round and ’round in circles, then wipe in the direction of the grain.

staining a bathroom vanity stain wiping technique

Gel stain application technique: put it on heavy, smear it around around in circles and then wipe in the direction of the grain. Don’t let it pool too much in the corners and crevices.

stain_bathroom_vanity_one_coat

Before and after: bare vanity door on the left, one coat of Minwax gel stain in “Walnut” on the right. They look like chocolate squares. I wish they were chocolate squares.

I went inside and did the same to the vanity:

stain_bathroom_vanity_coat_1

Wood vanity with one coat of Minwax gel stain in “Walnut”

And that’s just the first coat. Now it needs 8 hours to dry, so I clean up for the day and take a shower. Most of the clean up is me removing gel stain from my fingers and hands, but that was easy with a little dab of mineral spirits.

mineral_spirits_gel_stain_cleanup

Mineral spirits nuke gel stain right off your flesh and doesn’t leave you dry or itching.

At this point, it’s apparent that I’m going to need several coats to reach the level of darkness I desire. It’s also apparent that my wood is resisting the stain more than my paint stick, which turned into 98% dark chocolate in just one coating. I’m no wood expert – in fact, this is the first thing I’ve ever stained, so at this point it’s good to keep realistic expectations. I’m okay with wood grain showing, with a bit of unevenness (isn’t “shabby chic” in style anyway? ugh, that phrase…).

Step 5: Stain coat #2

Second stain coat went on just like the first: rub it in, wipe it off. I have to admit to being a little frustrated at this step: the second coat doesn’t look much darker than the first.

one_coat_vs_two_coats_stain

Wtf? Each coat makes a minimal difference, at best.

Step 6: Stain coats #3-6

A lot of staining tutorials go something like, “Just two coats and you’re done, easy peasey!”

Uh, yeah, my experience was more like needing 6 coats total.

I also had to wait 24 hours between coats, or else the previous stain started smearing around and wouldn’t “stick”. This project stretched out, ultimately taking me just over two weeks to complete it. Partly to blame was my own ennui and dwindling enthusiasm for the project as each coat hardly looked different than the previous. (Each coat DID make a difference, it was just a barely perceptible difference).

I persevered and this is where it ended up after 6 coats of stain:

vanity_done_staining

It’s chocolate. Oh my god.

Step 7: Polyurethane: 3 coats

Polyurethane is just a protective clear coat that goes on over your dried stain job. I waited a full week between my last coat of stain and my first coat of polyurethane, and 24 hours between each coat of polyurethane. You can probably wait less time if you’re in a big hurry, but I wasn’t (and my Dad was in town). Compared to all those stain coats, the polyurethane step is easy.

Just blot it on, wipe it off. I used an old sock foot as my “paintbrush”, because I hate buying brand new brushes for this kind of stuff. My sock worked fine.

polyurethane_coats

Polyurethane: wipe on, wipe off

Step 8: Reattaching Hardware

Be very careful putting your hardware back on!

Your stain and polyurethane coats should be really durable, but it’s easy to scratch things when drills and metal hardware are involved.

reattach_hardware

Reattaching the cabinet hardware is easy as long as you kept track of the pieces (you put them safely in a ziplock bag, I know you did).

All Done!

Here it is: the newly stained bathroom vanity.

stained_bathroom_vanity

Staining complete!

It’s just a humble builder cabinet, so it made for a great First Stain Project Ever.

Obviously, there are still a lot of things I would like to update in this room. The sink faucet leaks, the sink is rusting, and the countertop is scruffy/stained, and a tiled ceramic floor would add a lot of appeal.

But I had to finish the vanity first to be sure it was worth putting a new countertop onto (vs. replacing the vanity as well). In the spirit of not spending a fortune on this bathroom, I think I’ll be keeping the stained vanity and finding a nice granite remnant to replace the old countertop, along with an undermount sink and new faucet.

Helpful Tips

Cheesecloth was not necessary and too messy. Everyone’s so excited about cheesecloth but I really hated working with it. It was flimsy and I was going through way too much of it. At $6 a bag, I felt pretty silly wasting perfectly clean and brand new cloth when I had a bin of torn socks upstairs. I switched to paper towels (for staining) and socks (for polyurethane and the last coat of stain) and everything went fine.

Carry everything in a box. Since my bathroom is pretty small, I basically had two workstations: the garage floor (for the vanity doors) and the bathroom itself (the rest of the vanity). Carrying all my supplies in a cardboard box made it easier to move from one workstation to another.

how_to_stain_a_vanity_supplies

Staining is messy. A box can help.

Wear a mitt. Staining is brutally messy and gets into your skin very quickly. I never liked wearing gloves on previous projects, but they were an absolute necessity for this staining project.

plastic_mitts

Cheap plastic mitts from the dollar store for the win.

Mineral spirits are essential. If you don’t know about awesome mineral spirits are, I’m here to tell you: they are awesome. Wiping my fingers and tools down with mineral spirits made cleanup extremely easy and fast. Stain does not come off with soap and water!

Okay, that’s it for this staining project! I can’t say I’m eager to rush into another one quite yet, even though there are a half dozen things in my home I’d love to freshen up or change the color of… :)

If you found this tutorial helpful, feel free to share your projects or thoughts in the comments! I always love hearing from other DIYers. :)

DIY Kitchen Backsplash (Part 5): Grouting Backsplash Tiles

DIY Tiled Kitchen Backsplash: Part 5. How to grout your DIY kitchen backsplash. It's like spreading frosting over little glass tiles!

Here are are in Part 5 of our DIY kitchen backsplash – the homestretch!  In this detailed post, I’ll show you all the steps to grouting your backsplash tiles.

Catch up on our DIY kitchen backsplash series through these links: 

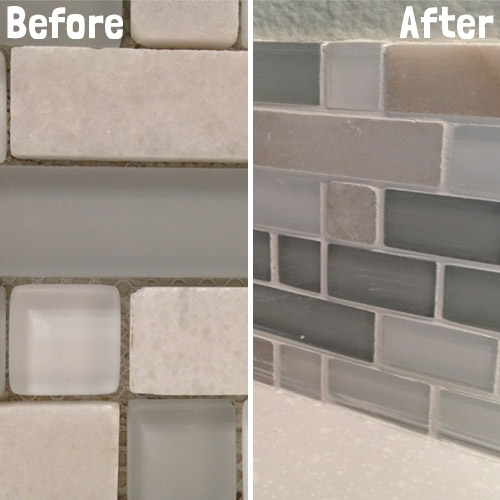
The tiles have been mortared to the wall, and after 20 hours of dry time we’re ready to fill the gaps between the tiles with a non-sanded grout.

grout_before_after

Let’s get started!

Mixing Grout

Just like making mortar, making grout involves a box of grout powder from the local hardware store, water, and a bucket.  We cut the box’s formula in half, figuring that our 8 sq feet of tile didn’t need 20 sq feet worth of grout. (We still had plenty left over.)

Tip: Don’t start this step unless you have the next 4+ hours available.

Water + non-sanded grout powder + bucket = grout. We followed the box’s instructions and mixed it up with a metal scraper. (See the Supply List for a detailed list of everything we used.)

DIY Kitchen Backsplash: Mixing grout. If you can make brownies from a mix, you can make your own grout.

A bucket ‘o grout

It’s like a thick frosting, except not delicious.

Applying Grout

Get a nice big glob of grout onto the float trowel and smear it on!  Grouting is messy, tiresome business: apply it with a firm, strong arm so it squishes into the gaps between the tiles.  Continue around the entire backsplash.  Use your fingers to get grout into corners or places the trowel won’t fit.

Our 8 square foot backsplash took the two of us well over an hour to get grout into every crack.

Tip: Remember, you’re working against time here because the grout is slowly drying and hardening as you work.  A sheet of plastic wrap over the grout bucket can help slow the drying. If you have a very large area to grout, consider working in phases or getting more helpers.

DIY kitchen backsplash: spreading wet grout over tiles.

It began with a glob of grout.

I used my fingers to stuff grout into the corner where the tiles meet..

DIY kitchen backsplash: grouting the corner where the tiles meet.

Fingers are useful for getting grout into tight areas, such as corners.

…as well as into the tight area behind the faucet:

DIY kitchen backsplash: spreading grout into tiny cracks using my own fingers.

Fingers: the other home improvement tool

Cleaning Grout off Tile Faces

When about 75% of the cracks were filled, my helper switched to using a moist sponge to wipe grout off tile faces as I continued applying grout to un-grouted areas.

Tip: Go slowly and use a moist, not a wet sponge.  Remove grout in layers.  If the grout in the cracks starts to flow out of the cracks when it gets wet, wait 10 minutes before trying this step again.

DIY kitchen backsplash: wipe grout off tile faces using a moist sponge.

Using a moist sponge to slough grout off tile faces

Once the bulk of the grout was removed from the tile faces, I switched to using moistened paper towels to remove the final thin layers of grout from the tile faces, paying extra attention to the corners. This was tedious, careful work, but it left the tiles looking crisp.

DIY kitchen backsplash: remove haze from tiles using a moist paper towel.

Using a paper towel to remove haze and excess grout from tile faces.


DIY kitchen backsplash: polish grout off the tile corners so they look nice and crisp.

Grout is drying as I polish the corners.

Polish, polish, polish – this step is super tedious but 100% worth it.  Get those corners sharp, it makes a difference!

Grout Drying

We let the grout dry for just over an hour before returning to wipe any remaining haze off the tile fronts.  The grout now has to dry for three days before applying a coat of sealer.

DIY kitchen backsplash: another home improvement project, another mess! (Good thing we have Cheez-It!)

Grouting’s done, but there’s still an hour of clean up work to do.

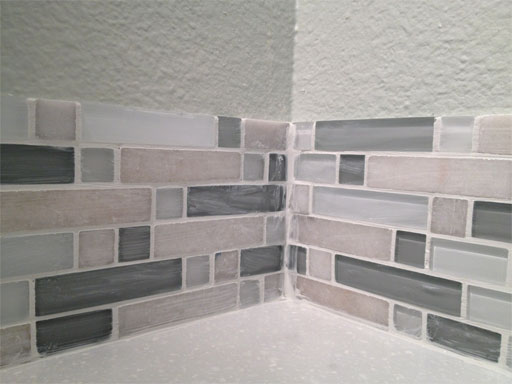
DIY kitchen backsplash: Our 6" backsplash, freshly grouted and looking sharp.

Here’s how one of the backsplash edges turned out .

DIY kitchen backsplash: complete!

Kitchen cleaned up and looking sharp as the grout dries!

Yardmageddon 2013: Part 1 – The Landscaping Death March

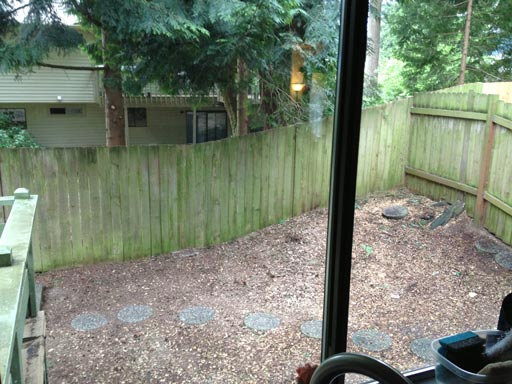
THE MISSION:  De-fugly this backyard!

YardTrim_After3

THE FUEL:  Factory Donuts!

SaturdayYard_Fuel

THE FULL DISCLOSURE:  We’ve never planted anything before.  We have no idea what we’re doing outside of a few hours of web research on this topic.

We kicked off Saturday with some early morning planning in the backyard.  Here I’ve used bricks and spigot covers to demonstrate where the arborvitaes might go.

SaturdayYard_Mockup

I later revised this down from six to three for these reasons:

1)  They were too close together (I decided putting them a full 3 feet apart was better)

2)  Planting six is gonna be hella grueling

The mockup was still a good idea though because it gave us a much better sense of where the trees will go.  It also helped me illustrate it to my husband better than pointing “over there” ever could.  With the number determined, we drove to Factory Donuts for OMG BEST DONUTS EVER and then drove to Molbak’s in Woodinville for three arborvitaes.  They keep their arborvitaes in the dirt until sold, which is different from how Home Depot packs them tight crowds of potted plants.  I don’t know much about plants, but it seems like the arborvitaes that came out of the dirt would be better than the ones sitting in pots.  I hope it’s worth the $20 or so more per plant that Molbak’s wants (Home Depot $25 each, Molbak’s $45 each) .

These trees are HEAVY!  Fortunately, Molbak’s is well staffed with tough guys ready to toss trees into hatchbacks the way I might toss a hamburger wrapper.  Obligatory Subie action shot:

SaturdayYard_Arborvitaes

And we’re done, check it out!

SaturdayYard_Mockup2

Lol, just kidding.  We Jim actually had 45 minutes of back breaking digging ahead of us him.  (Stay in school, kids, digging holes sucks ass.)  BTW, ignore the holes closer to the fence corner.  We dug there first and found too many roots, prompting us to change our placement plans.

SaturdayYard_HolesDug

We dug the holes to be about twice the volume of the arborvitae root ball and lined them with several inches of a mixture of fresh garden soil and compost.  Garden soil and compost were separate bags, and we mixed them at roughly a 2:1 ratio of garden soil:compost.  We didn’t get too pedantic about measurements –  it’s just dirt, after all.  Once lined, we dropped the trees into the holes and packed more soil and compost all around followed by a 1″ thick layer of mulch all around.

SaturdayYard_HoleDug

Repeat x3 times and you have:

SaturdayYard_TreesPlanted

High on success and packed with donuts, it was at this precise moment that I went COMPLETELY. INSANE.

I ran off to Home Depot and Molbak’s to purchase a half dozen more plants to place all around the yard, another shovel, a ton of mulch and more dirt.  Here is just some of what two motivated people can accomplish in a brutal weekend long yard work marathon.

Side of house, before:

SatYard_BeforeSide

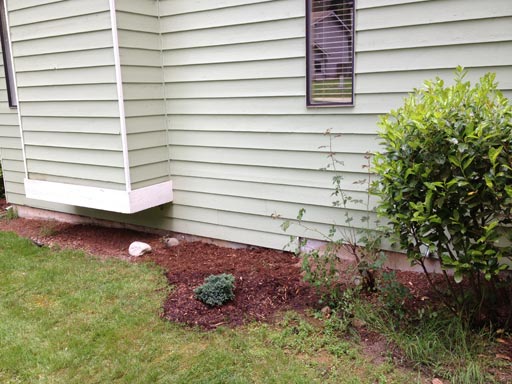
Side of house, after

  • (I forgot the name of this evergreen, I’ll put it in here when I figure it out):

SatYard_AfterSide

Front yard, before:

SatYard_FrontBefore

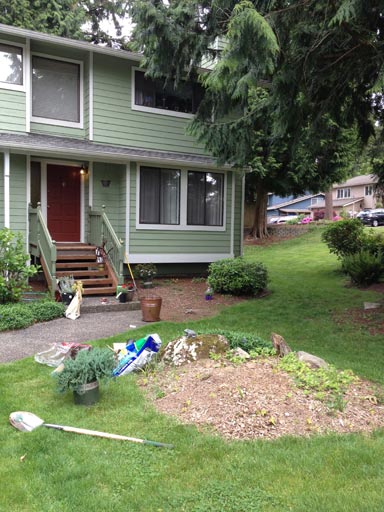
Front yard, after:

  • Blue Chip Juniper in mound
  • Yedda Hawthorne to the right of stairs
  • Hetz Midget Arborvitae x 2  in pots by stairs (not yet planted in this shot)
  • Hosta (we nicknamed it The Buddy when we planted it a few weeks ago)

SatYard_FrontAfter

Also: Sami Salmon

SamiSalmon

Garage/fence corner, after:

This area was formerly an old stump and a ton of weeds.  MOST IMPROVED AWARD!

  • Degroot Emerald Spire is the biggie plant, the rest are annual accent flowers that will probably look like crap in 3 months

FrontYard_Potted

Back deck:

Formerly empty, now home to a menagerie of potted plants and yet-to-be-potted plants.

SatYard_PottedPlants

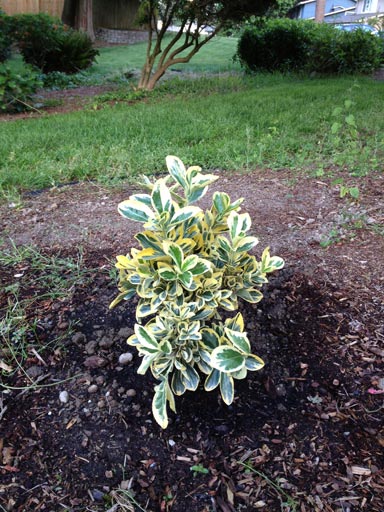
Front yard, by utility pole:

I pulled out a ton of weeds and planted this cute yellow/green shrub.

SatYard_ByCorner

Many places:

I planted several instances of this stuff from Home Depot, which is supposed to spread like creep all over the place and choke out things like grass and weeds, making a low maintenance ground-cover.  Curious to see if it actually works…

SatYard_Creep

Amazingly, this isn’t even all of it.  After posting this I realized I missed at least three more plants, and there are a few more left to plant before we can truly call this done.  From here, we water daily and hope this stuff takes root.  All in all, this wasn’t a bad first plant-something-in-the-ground experience, although it did take all weekend and we are both completely exhausted.

DIY Toilet Replacement

DIY toilet replacement  is a very simple project, and it shouldn’t intimidate anyone with a couple of wrenches and about 2 hours of time.  (Oh, and you’ll need to be strong enough to lift a toilet and carry it to where it needs to go.)

I won’t go into too much detail since the process of removing and installing a toilet is so well-documented on the web.  This video gets a link because it covers the whole process in just 3 minutes, while every other video I found wanted me to commit 9 whole minutes of my life to this crap.

Removing the Existing Toilet

Here is our old toilet, guilty of many crimes including incontinence (it leaks water at its base), and creating intolerable levels of drama when attempting to flush loads of “a respectable size”.

DIY toilet replacement

Toilet Removal Steps

Removing a toilet is easy and fun.

  1. Turn off the water supply at the wall
  2. Flush it to get rid of the water in the bowl and the tank
  3. Disconnect water supply from toilet
  4. Use a big towel to mop out any water remaining in the bowl
  5. Remove the caps at its base to expose the screws/nuts holding it to the floor
  6. Unscrew the nuts
  7. Lift toilet!  You’re free now, toilet! (We put ours on a towel in the next room)

Overreact to Wax Ring

EWWW GROSS!  (I don’t think poo actually touches the ring, but it’s fun to pretend.)

Our wax ring was basically a wax pancake.  We’re lucky our toilet leaks weren’t floods:

DIY toilet replacement

Remove Wax Ring

…with your bare hands!  Just kidding, use a tool for god’s sake.

Here I am scraping off all the old wax, which is the bestest most awesome job in the entire world:

DIY toilet replacement

Yes, I have cat pajamas, look upon me and despair.

New Wax Ring

Here’s the plump new wax ring ready to receive new potty.  Lift the potty and place it squarely on the ring.  Rock the toilet a bit and sit on it to squish it down.

DIY toilet replacement

Filling the New Toilet with Water

Connect the water supply to the toilet.  This might be a good time to switch to a braided water supply if your old one is a metal pipe.

Turn the water supply on and let the tank fill.  You can adjust the water level inside the tank by adjusting how high the float is allowed to go (your toilet may vary).

DIY toilet replacement

The Maiden Flush

Am I the only person who half-expects the toilet to explode on the first flush?  :D

All done – a new toilet, installed all by ourselves!  DIY toilet replacement is fun for the whole family.

DIY toilet replacement

Can you believe Home Depot charges $120 to replace a toilet? Wow.

Disposing of the Old Toilet

Good luck.

Our local garbage pickup here won’t take them. The annual recycling event takes them, but … we missed it by a weekend.  Your options are basically: smash it inside a garbage bag, haul it to the dump yourself, pay someone to take it.

Update: This particular toilet lived in our computer room for two months until we paid the guys who hauled out the deck debris to take the toilet, too.  They were surprisingly happy to take the toilet off our hands.