Preventing Yard Ornament Rust!

Updated 4/2014! The clear Rustoleum did nothing to slow the rust, but I found an even better technique to prevent yard ornament rust. Alas, it does involve painting the ornaments. I updated this post with all the details!

I’m not usually into yard ornaments, but I might have discovered my gateway drug when I found these big metal salmon-shaped yard ornaments at Bad Blanche in Poulsbo, WA.

yard_ornaments_rust_treatment

YARD. FISH.

The acquisition of one’s first yard ornament is probably where the path into old ladyhood begins, but I don’t care, I freaking LOVE my yard fish!

Alas, you don’t have to be a metal fish expert to know my new yard ornaments are probably going to start rusting the moment I put them into my yard.   Here’s what I did to prevent yard ornament rust and keep my yard fish looking adorable.

Supplies

Here’s what DIDN’T work…

The vast majority of Rustoleum products are actually paints.  But I didn’t want to paint my yard ornaments a different color, I just wanted to give them a coat of anti-rusting goodness.  I tried this Rustoleum “Rust Inhibitor” stuff first – I followed all the directions and gave them plenty of time to dry. I stuck ’em in my yard and within 24 hours they were rusting worse than ever before. DID NOT WORK! If anything, it made them rust faster.

preventing yard ornament rust Rustoleum rust inhibitor spray

Rustoleum Rust Inhibitor spray: all that stands between my metal fish and the water that will ruin them. How ironic.

Round 2: Preventing Yard Ornament Rust with PAINT and CAR WAX

I brought my fish indoors and let them dry. Meanwhile, I went back to the Big Orange Box and bought a can of Rusty Metal Primer Spray. Each fish (I have four now, btw – I went back to Bad Blanche  and covered each one in several coats. You know what’s ironic? Covering rust with rust-colored paint. But it looked so good, I considered stopping here.

rust_yard_ornament_paint_1

The rust primer step took several days, since I had to paint one side and let it dry before flipping the fish over to paint the back side.

I did 2 coats of rust primer on each side before switching to the Rustoleum hammered metallic paint. I had both a silver-colored paint and a black-metallic paint, and I couldn’t decide which one I liked better so I just alternated and got a nice blend. The can promises a “hammered” look but all that really means is you get little splurts of uneven paint, which worked well for fish but maybe not for things that are actually supposed to be smooth.

Here’s my fish with a couple coats of the metallic outdoor paint:

rust_yard_ornament_metallic_Hammered_paint

rust_yard_ornament_closeup

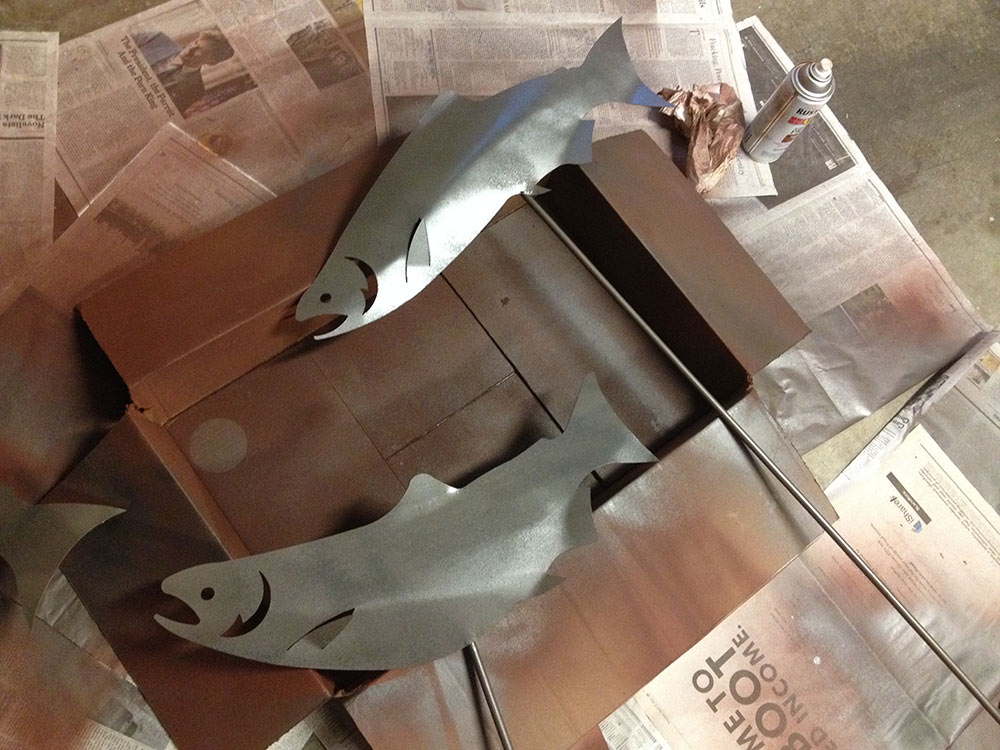
I gave the fish a good hour+ between coats and I split this project up over the course of a couple weeks (if you were in a hurry, I imagine the whole thing could be done in as little as 2 days).

Workspace Preparation

My first workspace was a neat little box that I carried outside in the grass.

preventing yard ornament rust workstation

My high-budget elevated workstation allows for moving the fish without touching them.

On round 2 of this project, I knew I’d have to do a LOT more painting so I brought the whole thing into my garage. My second workspace was a giant mess of newspaper and paint inside my garage.

fish_yard_ornaments_getting_painted

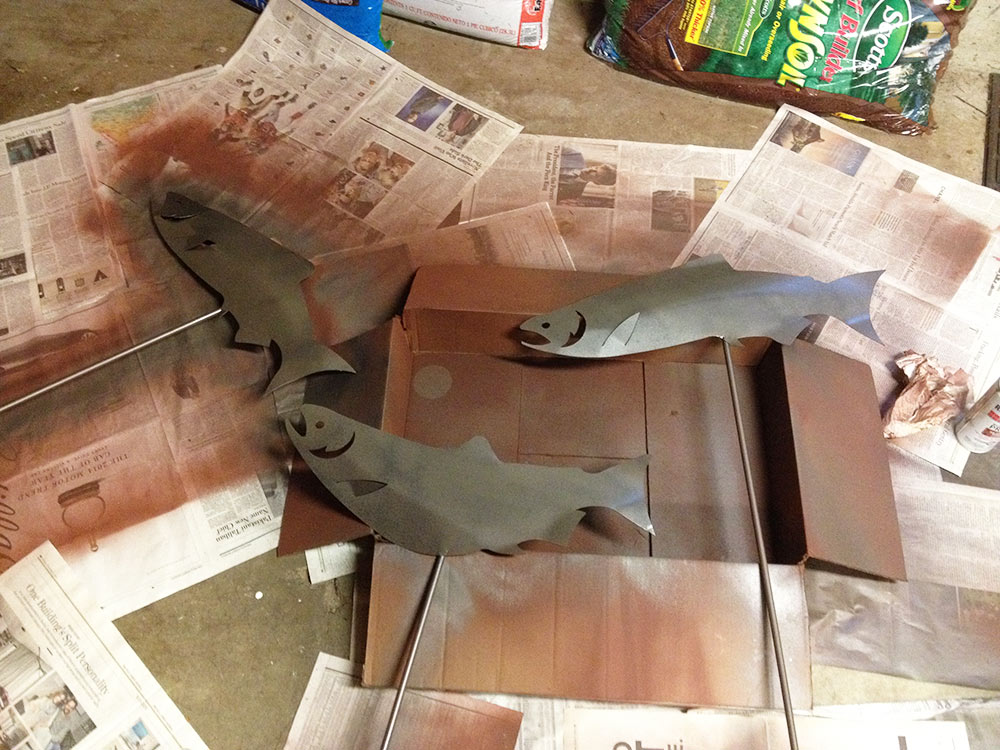
No time to explain, help me wax this fish!

Right about the time I was finishing my last coat my dad suggested I wax them like a car. Damn, that’s a good idea!

turtle_wax

Turtle Wax goes on my cars AND my fish.

Too bad we didn’t think of it before I spent hours painting the fish! I bet car wax alone would have been enough to keep these fish from rusting. I wax my cars with Turtle Wax, so I already had a pot laying around.

I applied the car wax to both sides of the fish and their posts.

car_wax_metal_fish

Finally, a chance to use my degree.

Once the wax was buffed off, it was finally the moment we’ve all been waiting for: time to put the fish in the yard! Best of all, thanks to the wax, the water just beads up and runs off ’em.

preventing yard ornament rust coated salmon

All that’s missing is MORE FISH?

Yardmageddon 2013: Watering New Arborvitaes

I couldn’t find a good guide online for watering newly planted arborvitaes, so I’m writing one!  Since the arborvitaes have survived the dry Seattle summer, I thought I’d talk about my technique for watering new arborvitaes.

New Arborvitaes?!

It’s been four months and our new arborvitaes are still alive!  Even better, they seem to be thriving.  (Last May, we planted three emerald green arborvitaes in our partially-shaded Seattle-area backyard.) They’re bright green and standing perfectly upright.  For two landscaping n00bs, the success of the arborvitaes is perhaps proof that we’re not completely incapable when it comes to landscaping.

Why watering new arborvitaes? Because all the advice I found online was different or not Seattle-specific, leaving me to guess at what was best for my arborvitaes. So here it is – this is what worked for me! I live in the hardiness zone 8a,planted the trees in May and watered regularly through September (when the natural rains finally returned).

Watering New Arborvitaes

I watered twice a week, 10-12 minutes per arborvitae. My watering schedule worked to be Saturday (anytime, usually mid-morning) and Wednesday (evening after work).

I set the hose to a steady small stream and placed the end of it at the arborvitae’s root ball.  I waited 5-6 minutes then moved the hose to the other side of the root ball.  (I sat in a lawn chair and read the Internet while I waited, it’s not a bad arrangement.)

water_arborvitae_water_pressure

watering new arborvitaes hose trickle

Each arborvitae got a good soaking, and the mulch seemed to do a good job of holding the water close to the plant’s roots.  Watering advice is all over the place on the Internet (use a hose! use a sprinkler! water daily! water weekly!), but a hose pointed right at the root ball is worked for me and required no special tools or hose attachments.

I watered the new arborvitaes deep and then let them dry out for a few days before watering again.

Full Sun for Arborvitaes?

We planted the arborvitaes in May specifically to take advantage of the uninterrupted stretch of sunshine over Seattle from June to September.  We figured we could water them ourselves and have a sort of “best of both worlds” thing going on: sky provides sun, we provide water.

arborvitae_update

They ended up needing quite a bit of water to get through the long dry spell.  After about the third month without any rain I was starting to give up hope that we’d ever see rain again.  (It has since returned, raining nearly every day of September so far this year.  Woohoo!)

The arborvitaes’ tags say they require “partial to full sun”.  Why would anyone sell a plant that requires “full sun” in the Seattle area? Surely there’s some wiggle room on the full sun requirement.

Besides, I see plenty of healthy arborvitaes around my neighborhood. The arborvitaes get about 4 hours of sunshine on a summer day, so I hope the they soaked up enough sun to carry them through the cloudy winter.

Arborvitae Growth Rate?

If the new arborvitaes have grown at all, I can’t detect it.  They’re exactly as high as the fence right now.  I suspect they don’t do much growing in the winter so it might be several years before these arborvitaes start serving their true purpose, which is blocking the view of the neighbor’s yard (and their mysterious room full of jars).

What’s Next?

I’m going to let the natural rain take over the watering business, and I’ll write an update in the spring on how the arborvitaes are growing.  Yardmageddon 2013 is drawing to a close, but I have a few more updates about our grass growing adventure and the suddenly-blooming rhodys to share in the coming days, so stay tuned! (I can’t believe growing grass counts as an adventure.)

Yardmageddon 2013: Part 3 – We Are Watching Grass Grow

It’s been 5 weeks since the start of Yardmageddon 2013.

Yardmageddon is our annual effort at DIY landscaping. We don’t know a damn thing about plants.

Yardmageddon Part 1 – Planting shrubs 

Yardmageddon Part 2 – Planting grass seeds

Our yard is pretty average

Some [retired, wealthy] people around us have made their yard their pride.  Others have so much yard it’s difficult to see the house hiding inside it.

We have the misfortune of living among the former sort, who are keen to remind us of their disdain for our landscaping.  (It’s not bad, really.  They’re just jerks.)

Doing it ourselves

But anyway, in effort to improve our resale value (and getting jerks to STFU), we’ve been working on the “beautifying” landscaping more this year. Our first year here we removed hazardous shrubs, picked up fifty pounds of dog crap from the backyard, and weeded like it was going out of style. Our second year we removed hazardous trees and weeded again.  Finally, in year 3, we are ready to beautify.

This is where well-heeled people obsessed with appearance would hire a landscaping designer and pay thousands of dollars for a yard that will cost thousands of dollars to maintain. I am neither of those things. And while I don’t know a lot about making yards pretty, I do know how to photograph pretty yards and then try to copy elements of them into my own yard. DIY landscaping at its finest, folks.

Here’s how things are growing.

Backyard shrubs:
The arborvitaes haven’t died.  Yay!  Small success there.  We’ve been watering twice a week, deeply.  Our arborvitae watering technique:

1) Point hose at base of arborvitae
2) Wait 8-10 minutes
3) Re-position hose at base of next arborvitae

4) Repeat twice a week, skip if it rains heavily.

diy landscaping: watering is so easy, even a hose can do it

These little accent shrubs I planted in the backyard are also thriving.  They are named Stonecrop Sedumn Autumn Charm.  The middle one has stayed small but its two siblings have grown larger.  Dunno why.

diy landscaping: shrubs? shrug

Side:

This dude’s doing well, too, although he hasn’t changed much in terms of size.  Since this side of the house is the sunniest, I expect him to do well over the long haul.

side_shrub

Grass:
Our grass seeds are starting to sprout and fill in, but it’s pretty slow going. We water at 8am and 8pm, about 10 minutes each session. The grass that found its way here naturally is doing super well.  I hope it spreads to the bald areas. :P

diy landscaping: grass seed starting to sprout


Close up of the grasslings:

diy landscaping: growing grass from seeds


We’re about to enter the dry season (we’re on Seattle’s eastside) in which we’ll go a good 2-3 months without rainfall.  Traditionally, this is when our yard turns yellow until the rain returns in September/October.  We’ll water through the dry period (like we did last year to establish the sod) and hope that all these plants thrive with the combination of sunlight and regular watering.


Yardmageddon 2013: Part 2 – Terraforming

Continuing in our theme of outdoor experimentation, this weekend we planted grass seed.  The area where we planted was a mix of weeds, mulch, and some small patches of grass that naturally found its way into this area.  The goal is to fill this area in with grass, which will hopefully be easier to maintain than the mulch is.

Step 1: Pull out all the weeds

Step 2: Aggressively(!) rake the mulch so it’s not just a flat surface of packed down wood chips and dirt

Step 3: Empty a few bags of lawn soil over the area, rake it into the existing mulch/dirt mixture

Step 4: Spray grass seed all over the new soil/old soil mix

Step 5: Rake again to mix the grass seed into the new soil/old soil mix

Step 6: Water for ~10 minutes! (This day, and just about every day after until well-established)

Our afternoon, in photos: 

These long strips of edging are just a massive pain in the ass.  They’re hard to mow around, easy to trip on, they look like shit when they start breaking and popping out of the ground, they’re horrible to remove, and I have no idea how we’ll dispose of them so they’re piled up in the backyard.

GrassSeed_PullUpEdge

Here’s the area we’re working in:

GrassSeed_before

The evergreen’s stump makes a nice seat for the sprinkler.

GrassSeed_before2

This bin is packed with weeds from this area:

GrassSeed_bin

These are our supplies: Scotts Turf Builder LawnSoil and Scotts Grass Seed.  We’ll know in a few weeks if this stuff actually works.

GrassSeed_Supplies