Jim’s Very Tall DIY Standing Desk

At 6’4″, my husband Jim is too tall for most commercial standing desk designs.  And at $1500+, most commercial standing desks are too expensive for our budget.

The solution was obvious: build our own extra tall DIY standing desk! We’re definitely not carpenters, but this simple DIY standing desk design should be doable by anyone with a decent plan and a saw (for home cutting – many stores that sell lumber will also cut the boards for you). My diy standing desk was easier than this one thanks to IKEA’s VIKA BYSKE legs being able to extend to just the right height for me (my desk is 42″ tall).

But Jim’s desk needed to be 46″ tall – and those 4″ were tough to figure out.  The VIKA BYSKE legs only go to 42″.  We were stuck here for several weeks as we considered various designs, but the ultimate solution was actually very cheap and simple: bed risers!  A $20 set of heavy duty bed risers from Amazon gave us the 4″ we needed.

Wondering how to determine the right height for your own standing desk?  It’s easy: stand up normally and bend your elbows at a 90 degree angle (as if you’re using an invisible keyboard right in front of you).  The distance between the floor and your elbow, minus an inch or two, is the ideal height of your standing desk.

DIY Standing Desk Parts Shopping

Here’s what we bought for this very large DIY standing desk:

tall diy standing desk parts how to build ikea parts

IKEA 

From IKEA, we got a GALANT table corner piece and two rounded ends.  The GALANT table comes in at least four colors and several configurations, so you can get whatever combo of pieces works best for your space.  We also got 4 VIKA BYSKE extension legs – these are the only legs IKEA sells that go to 42″.

We like GALANT because it’s huge and because mine’s been very durable.

Amazon.com

To get the remaining 4″ of height we needed, we bought one set of these these heavy duty $20 bed risers.  (Update: 8 months later, I’m pleased to report the bed risers have held up perfectly.  No cracks or problems!)

diy tall standing desk use bed risers to get legs tall enough

Heavy duty bed risers from Amazon.com added the height that the VIKA BYSKE legs fell a little short on

Hardware Store

We purchased 18 feet of plain, flat narrow boards 3/4” thick and 5” wide.

The boards are for building a supportive network on the underside of the desk, since we won’t be using the metal frame IKEA sells. The legs and wall brackets will attach to these boards.

Why not use the IKEA frame?  Well, we need flexibility on the leg positioning and we also need something to anchor the wall brackets to, and a metal frame would get in the way.

Assembling the Desk

The circular saw made short work of the boards (The Home Depot is able to cut for you in the store if you lack the tools or confidence with a saw).

Below: laying out the support network on the desk’s underside.

diy stand up desk support network of boards

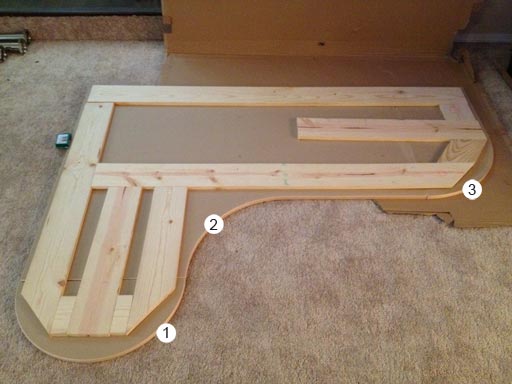
Since this desk is going to be heavy and awkward once assembled, we built it in the room we’d be using it in. 

Fastening the support boards to the desk was surprisingly straightforward:  first, drill a “pilot hole” through the board and into the desk (be sure your screw isn’t long enough to poke out the top side of the desk). The pilot hole helps prevent the screw from changing course as you’re screwing it in.  Line up a screw and screw the board to the desk surface (also using the drill – yes, you’ll swap bits a lot unless you have two drills).  We just worked our way from one end of the desk to the other.

For our desk’s thickness, we used one 30 count box of the 1 1/4” screws pictured below.

spax construction screws for stand up desk

They look like this from underneath:

assembling stand up desk

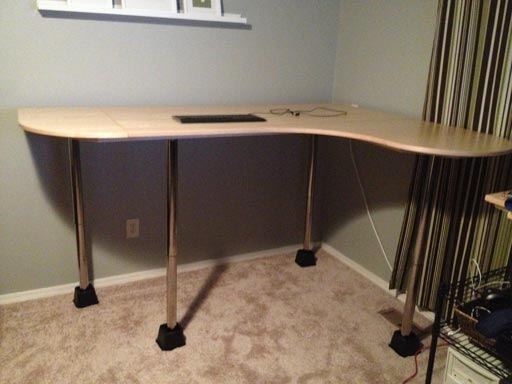
Next, we attached the four VIKA BYSKE legs to the desk and stood it up.  We’ll re-configure the legs later, once the desk is anchored to the wall.

Testing the Desk

It’s wobbly, but it’s usable. Jim’s going to try it out and we’ll probably adjust it a few times before we permanently anchor it to the walls.

testing big stand up desk

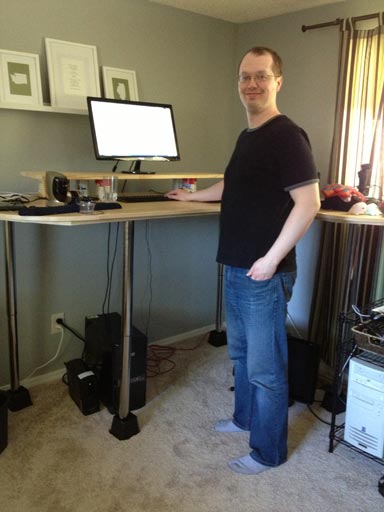
Here’s Jim at his new desk!

JimStandupDesk_4

Wait, what about a chair?

You’re right, even standing desk aficionados have to sit once in a while.  A helpful term to search for is “drafting chair” – drafting chairs tend to rise much higher than ordinary office chairs.  Before you buy a chair for your standing desk, measure as best you can where you’ll need your butt to be for your forearms to lay parallel to the desktop.

I shopped for the right chair for a long time (over a month!) before settling on the Boss Caressoft Drafting Stool B16425-BK.  This chair is great because after a year, it’s still looking brand new.  The cushion didn’t develop a butt-shaped indent or wear out in the middle or anything like I’ve seen happen with other chairs.  I like the back support, and I like resting my feet on the footrest ring. Best of all, this chair is tall enough for Jim to use, too, so we just share this one as it’s pretty rare for both of us to want to sit at the same time.

best standing desk chair

My Boss Caressoft Drafting Stool was about $100 at Amazon.com

More Standing Desk Options

For our DIY standing desks we wanted the biggest surfaces we could get-  and since we own this place, we were completely free to anchor things to the wall.  But if you live in an apartment or dorm room, need to be mobile, or just aren’t sure if a standing desk is for you, here are a few alternative standing desk designs you might enjoy.

Portable Standing Laptop Desk

The Techni Mobili Cadmus Mobile Laptop Stand is the complete opposite of our gargantuan standing desks: it’s small, lightweight, portable, and, at just $42 (for cherry wood grain) and $75 (for solid black), this standing desk is crazy affordable. Well reviewed on Amazon, it’s basically a one-stop shop to a quick and easy laptop sized standing desk.  I think this laptop standing desk would be awesome for a kitchen (look up recipes!) or a family room (work while the kids play!).

Techni Mobili also offers a slightly larger computer cart version with roll-out keyboard and more shelf space.

Standing Desks for Commitmentphobes

With 32″ x 22″  of surface space this standing desk add on earns its name, the Executive Stand Steady Standing Desk.  There are many choices in the “standing desk attachment” category, but the Executive stands out for being huge (it’s big enough for two monitors!) and for offering adjustable height (11.25″ – 15.25″).

An additional 15.25 inches may not be enough for very tall people, so always measure your current desk before ordering.  I really like this thing – if I hadn’t been so gung-ho about building my own, I’d have probably tried using The Executive with my existing desk.

DIY standing desk

The Executive Stand Steady Standing Desk has the largest dimensions of any product in its category and adjustable height.

If $200 is a bit much or if 32″ x 22″ is overkill, the Speedy Standup is a solid alternative to The Executive. It’s literally a miniature desk you plop down on top of your existing desk – done.  The company makes both a “standard” size and a “tall” size, so be sure to measure your existing desk’s height to determine which one’s right for you.

Speedy Standup desk best standing desk

Try to ignore the hilariously bad Photoshop job, the Speedy Standup has great reviews and a good price – just $60.

Splash Out on an Adjustable Standing Desk!

Electric adjustable desks typically come with a price tag somewhere between $1500 and $3000, but if you’re willing to hand-crank it you can have a all the frills of an electric adjustable desk for a fraction of the price.  This adjustable standing desk by ModTable can go up to 47″, which would have just barely been tall enough for a tall guy like Jim (his desk is 46″ above the floor).

adjustable standing desk affordable

This adjustable standing desks by ModTable is a luxurious “best of both worlds” stand up desk.

Fixing a Wobbly Standing Desk with Shelf Brackets

My standing desk was awesome but it was too wobbly – the whole desk shook like an earthquake every time I touched it or typed.  The fix was easy: I used two heavy duty shelf brackets to anchor my standing desk to the nearby wall.  The desk is rock solid now.  I can give it a good shove and it barely moves!

Here’s my easy guide to fixing a wobbly standing desk with shelf brackets.

Choosing Shelf Brackets

Shelf brackets come in surprisingly large variety of colors and sizes.  You’ll probably want at least two brackets.

Look for a shelf bracket design with:

  • 90 degree angle (some are kinda… off)
  • A good 8″+ inches on each end (mine are 12″ x 8″) but not unnecessarily large
  • Heavy duty design – go rugged, leave the “pretty” shelf brackets for lightweight shelves :)
standing_desk_heavy_duty_shelf_bracket

A prime specimen: this 12″ Knape & Vogt heavy duty bracket will lock your standup desk in place.

I used a pair of 12″ x 8″ heavy duty shelf brackets from the Big Orange Box.

fixing a wobbly standing desk with shelf brackets

My standing desk’s brackets: 12″ x 8″ of raw desk-anchoring power.

Positioning the Brackets

Your needs will vary – put your brackets wherever makes sense considering the walls around your desk and the underside of your desk.  My desk is up against a window, so I had to work around the full-length curtain.

My brackets had to be positioned:

  1. Outside of the curtain’s range of motion…
  2. …but still far enough apart to stabilize the desk and help support its weight
  3. …and not over any studs because my drill isn’t badass enough to drill into a stud

The curtain-closing requirement pretty much forced the first bracket to the center of the window, and the other one somewhere to the right of the window. That meant the left bracket would be smack dab in the center of the window, and the right bracket somewhere near the L-shaped desk’s corner.

To position the bracket, I figured out where the stud wasn’t, held the bracket in place against the wall, and marked its holes with a pencil.

fix a wobbly standing desk with shelf brackets

Ideal bracket locations: clear of the window and far enough apart underneath the desk to make having two brackets worthwhile.

Mounting the Brackets into Drywall

I used “EZ Anchors” to secure the screws, which prevents the screws from getting all wobbly in the wall.

fixing a wobbly standing desk with shelf brackets

EZ Anchor (plastic) and metal screw.

EZ Anchors are easy to use.  You can twist ’em right into location, or drill a tiny pilot hole first to make them go in even easier.

  1. Figure out where your screw will go (just hold the shelf bracket in the place where you want it to go)
  2. Mark the wall through the holes in the shelf bracket
  3. Put the shelf bracket down
  4. Screw the plastic EZ Anchor into the wall
  5. Hold the shelf bracket in place
  6. Screw the screw into the EZ Anchor

Don’t skip EZ Anchors if you aren’t screwing your brackets into studs.  Repeated nudges on the desk will eventually soften the screw’s attachment to the drywall and weaken your brackets.

fixing a wobbly standing desk with shelf brackets

EZ Anchor box looks like this.

All Done!

My wobbly standing desk is rock solid.  Check ’em out, here’s one of the brackets:

fixing a wobbly standing desk with shelf brackets

And here’s the other under the window:

fixing a wobbly standing desk with shelf brackets

And that’s it! It’s done! And it’s awesome.

Car Repair: Covering a Big Scratch

So, this is a thing that happened:

I don’t want to waste space or time ranting about the circumstances that led to this, but the end result is this: the car’s metal is exposed and needs to be covered before it explodes into a torrent of rust.

First, we visited a couple of body shops. They’d have to basically rebuild this section of the car.  The car is 11 years old and not worth this.  We also can’t afford it.

Thinking maybe we should attempt something DIY-ish, we next went to O’Reilly’s Auto Repair.  They had an overwhelming array of car body clays, potions, waxes, creams, etc, but their guys were convinced the car was going to rust no matter what we did and so missed an opportunity to sell us tons of car potions that (apparently) don’t work.

Finally, we went to the Ford dealer, where their guy told us to paint on a few coats from a little can of Ford paint (which I happen to already own) and then wax it.  SOLD!

Step 1: We scrubbed the hell out of the car. December in 40 degree weather is the best time to wash your car.  The icy water and frigid air make you work very fast.  We scrubbed until we were certain we had scrubbed off all the wax we so lovingly applied in October.

Step 2: We dried the car and pulled it into the garage. The car needs to be somewhat warm for this (the Internet seems to recommend 75 degrees, but that’s not gonna happen in December.)

Step 3:  Using a hair dryer, I warmed the area to paint.

Step 4:  I applied the first coat of touch up paint to the wound. This stuff is like thick nail polish and easy enough to apply (there’s a brush attached to the cap). No real technique here, since the angle is so awkward and the paint so goopy.  I tried my best to make the coat thin and even.

Step 5: Wait 2 hours dry time

Step 6: Apply second coat

Step 7: Wait 2 hours

Step 8: Apply third coat

Step 9: Dry for 20 hours. We were supposed to wait 24, but this would have to be close enough if we were going to wax it and still get to the grocery store before Sunday night ended.

Step 10: Wax the car (in the cold!)

Here’s our “after”:

This car doesn’t need to win any beauty pageants, but it does need to last a few more years.  Since we just applied this, I don’t know how it will work out.  It could chip off the moment the car hits 50 mph.  It could rust underneath the paint.  Rain could wash it off.

I’ll update when we know which it is!

2 Min Fix: Tighten a Toilet to the Floor!

Ah, just when I thought we were done with plumbing for the year… a wild leaky toilet appears!

While cleaning the computer room’s bathroom, I noticed a thin border of water between the toilet’s base and the floor.  My first reaction, of course, was to completely flip out and assume the worst – new toilet, new floor, new bathroom?!?!?

(Yes, the toilet seat doesn’t center on the bowl.  Yes, I would love to re-do this entire bathroom.)

BUT… the solution was simple: the toilet just needed to be tightened to the floor!  A gap nearly 1/4” in height existed between potty and floor.

Let’s get this potty on the floor.  (Let the potty hit the floor… let the potty hit the floor… )

Step 1: Pop the caps off both of the bolts that hold the potty to the floor. This deserves its own step thanks to the thick seal of crusty crap holding the caps on, which I chiseled off with a screwdriver. I knew I was in trouble the second I saw this : the nut wasn’t even on the bolt anymore, it was trapped loose inside the cap.

Step 2: Put the nut on the bolt if it isn’t already, and use a wrench (or a wrench-like tool) to turn the nut clockwise, bringing it down towards the toilet. Apply this to both sides equally – do a few turns on the left, then a few on the right, then go back to the left, etc.

Step 3: Put the caps back on. In this case, the toilet is now too low for the caps and I’ll have to come back and saw the bolts to be a little shorter, but you might be luckier than I was.  Either way, this is a minor problem compared with a water leak.

Step 4: Check for leaks 24-48 hours later I like to use some TP for this step, as it’ll absorb anything it finds.

Phew, leak fixed!

Total cost: $0.
Time spent: a couple minutes
Crises averted? YES