My Year With a Standing Desk

I’ve been using a standing desk for just over a year, and I’m thrilled to report back that I still love it.

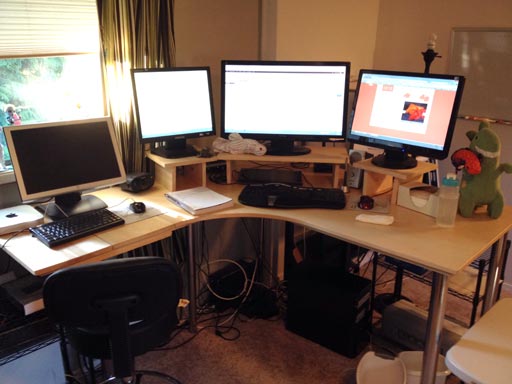
Here is the standing desk I built for use at home:

standup_desk_one_year_later

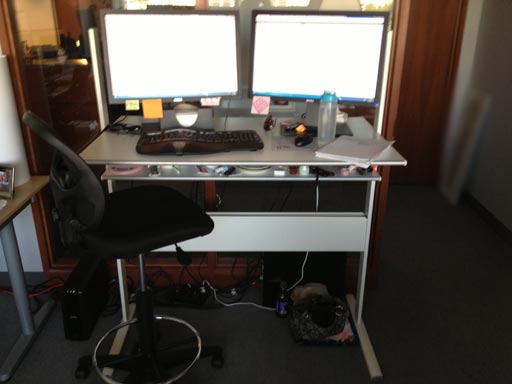
And here is the standing desk my day job graciously provides me with:

standup_desk_work

My Standing Desk Usage

6:30am – wake up and start standing as I spend the first two hours doing some combination of exercising and working at my computer
8:15am – showering (standing)
8:30am – work prep, cooking breakfast
9:10am – switch to sitting for a 10 minute breakfast
9:20am-9:45 – drive to work
9:45am-9:55 – walk to office from parking
9:55am-12:00pm – I usually stand for the first hour of the day, both in morning meetings and at my desk.   By noon, I’ve usually been standing for about 4 hours.
12:00pm-3:00pm – I take my first extended “sit break” of the day.  I eat lunch sitting and I just give my feet a rest.  My workstation is not comfortable for sitting for long periods so I usually do a mix of standing and sitting for the afternoon. My office serves dinner so I sit to eat dinner and continue working until 7:00.
7:00pm – I go home, sitting all the way in my car, but once I’m home I’m standing again.
7:30pm – 10:00 – I usually like to spend the evening at my computer and going for a ~30 minute walk once the sun sets.
10:15pm – I go to bed, after a day that included about 7-8 hours of standing.

Energy Level

I find I have plenty of strength for morning workouts and evening walks, but I have shortened both my morning workouts and my evening walks because I am just slightly more tired in general.  In my workouts, I go for intensity instead of duration.  A good dead-lifting day will wipe me out for a couple days, and I often spend the day after a leg day sitting most of the day.

In general,  I sleep soundly and wake up rested.

One unexpected side effect is I seem to have lost my ability to sit comfortably for long periods of time.  Multi-hour meetings, plane rides, movie theaters all make my legs, back, and butt ache from sitting.  I find I fidget more when forced to sit.

Aches and Pains

My heels don’t enjoy standing as much as the rest of me does, but in general my feet and legs feel fine.  My legs love standing all day and never seem to get tired.  My lower back is pain free (but it always has been).  My upper back pain only becomes a problem when I sit and type for long stretches of time (1 hour+).  Standing relieves most discomforts, but it comes at the cost of tiring me out.

Focus Levels

I’ve always been a very focused person, but standing puts it on steroids.  Standing gives working this sort of “it’s go time!” feeling that’s hard to quantify.  I definitely feel more alert and ready for action when standing.

I especially love playing action games while standing.  I get super pumped up and excited.  XCOM: Enemy Unknown felt extra intense and I felt like I was actually in the field with my dudes while I played standing up.  Torchlight II was a blast paired with some awesome loud music and my standing desk.  You know how rockstars on stage slam their keyboards and headbang along with the music?  That’s me at my standing desk when I play games.

Social Perceptions

I hate being seated when someone is standing over me talking to me.  It puts me in a position of feeling “under” whoever is speaking to me.  In a sitting desk, this happened all the time.  Standing, I feel more confident and just plain better being eye-level with visiting co-workers.

Also, since people can’t pull up a chair and get comfortable at my workstation, I think standing helps keep coworker conversations shorter and more productive.

Weight Loss

It’s not a miracle weight loss solution, but my standing desk did help reverse a six-year trend of slowly gaining weight each passing year.  The first six years of my career (as a professional sitter), I gained enough weight to go from 155 lbs to 185 lbs despite being a regular exerciser and a conscientious eater.  I couldn’t out-exercise or out-diet the effect of sitting all day.  That 30 lb gain happened at a rate of about 5 lbs a year, which was slow enough that I didn’t really notice.  I wasn’t obsessive about my weight during these years (I just kind of ignored it, as a software developer I have the luxury of not having to be very image-conscious). I just bought whatever fit, but once the only clothes that fit were coming from the plus size section I freaked out a little.

Switching to a standing desk is the only major change that’s happened to my exercise or diet routine in the past year, so I have to give the standing desk some credit for the 10 lbs I’ve dropped since making the change.  Standing all day isn’t a miracle cure, but it was just one more way to add extra activity to my day and that seems to have made a difference.

$100 Home Office Makeover: Budget Breakdown (Day 4)

This is the final post in a series about revamping the largest room in my house to serve as a home office.  

The work is done and the room has been put back in order!  Just in time for the weekend, too.

Budget breakdown:

For $100, I gave this room a whole new look and layout.  My workspace feels refreshing and different – the perfect way to start a new adventure.  My desk space doubled thanks to a fabulous free desktop found on a neighbor’s curb, but the room is still able to serve as a part-time guest room.  I even built my own photography corner by painting the walls of one corner white.


Glitter Text Generator


$100 Home Office Makeover: Painting the Baseboard Trim (Day 3)

This is the third post in a series about improving my computer room to serve as a full-time office.

It’s Friday, or DAY 3! Time is running out to get this room into shape by Saturday. Here’s what’s left to do:

  • One more big wall of grey paint
  • Paint the baseboard trim
  • Put all the furniture into their new positions

Today’s post is mostly about my trim painting technique. If you’re like me, you 1) like the look of white trim but also 2) balk at the expense of hiring a professional to replace all your trim, especially if it’s functional otherwise.

I’ve talked about my trim painting technique before, but this walk through is much more detailed.

Quick Reality Check:

  • My wood baseboard trim is unpainted and unstained, so it’s ready to receive paint without any sanding or stripping. If your trim is already painted or has a glossy varnish, you may need to first strip and sand your trim, which probably cannot be done over your carpet.  Or just paint over it and see how it holds up.
  • This project takes about a full day for typical size bedroom.
  • Be careful! You’ll need to keep track of what sides of your shields have wet paint on them.

Supply List:

  • Plastic paint shields – these are cheap and readily available at hardware stores and paint aisles in department stores
  • Paint for your trim – You’ll need at least a half gallon. For my house I use Behr in Popped Corn in eggshell finish. Semi-gloss and satin finishes also looks nice on trim
  • Paint for your walls
  • Small paint brush – this flexible Wooster brush is my absolute favorite
  • Painting tape: Optional. Since I paint the walls after I paint the trim, I don’t need to tape the walls to protect them. If you are only doing trim, you may wish to tape along the bottom of the walls where they meet the wood trim.
  • Plastic sheets to protect carpet and other stuff that might otherwise become inadvertently exposed to paint

Step 1: Paint the top 3/4ths of your trim.

If your trim’s like mine, it’s going to need a few coats. I like to do this first coat quickly so it can dry as I do other things. I do this I do it before I finish painting the walls so I don’t have to worry about not getting paint on the walls, since painting the walls will cover up any sloppiness here.

I like to do this first coat without bothering with the shields, since setting them up takes time and gets them covered in paint.

Just grab your brush and go quickly over all the trim in your room like so:

Step 2: Put Shields in Place

Once that first coat is drying on the trim, it’s time to bust out the plastic shields. Stuff your shields between the carpet and the trim, like so:


Step 3: Paint the trim again, including the bottom 1/4th this time

Once the shields are in place, you’ll paint the trim again, this time going all the way to the bottom (as far down as the shield allows). Your top 3/4ths get a second coat and the part covered by carpet gets a first coat, which in most cases is sufficient. If you need to do a second coat just leave the shield in place and come back in 10-15 minutes to paint a second coat before removing the shield.

Don’t let paint pool on the shield, and don’t let paint form a bridge between the shield and the trim. If this happens, you may find it difficult to remove the shield. I like to remove the shield before the trim paint is fully dried.

Step 4: Paint the walls while you wait for the trim to dry

Much has already been written about painting walls, but while waiting on the trim to dry is a good time to get it done.

Step 5: Carefully paint the edge where wall meets trim


That’s it! I’m sure there are other ways to get this done, so experiment if you think there’s a faster and better way!

$100 Home Office Makeover: Painting (Day 1)

This is the first post in a series about improving my computer room to serve as a full-time office.

Big news! I was laid off yesterday. It was not a surprise at all, no hard feelings, the company I used to work for was bought by a company a year ago that has struggled to turn a profit on their purchase. A ton of talented, hard-working people were let go. My former employer’s loss is every competitor’s gain!

To celebrate and welcome this change, I am going to give the computer room a major update.

The computer room was hastily painted and set up during our late 2010 move. Not much thought was given to how to best utilize the space and we used the same workstation equipment we used in our apartment (and before that, our Illinois house). Two years later, though, we have a better idea of how we use the room.

Things I want to improve:

  • Jim and I would both like larger work spaces / desks (so we can stop augmenting them with TV trays and bar tables)
  • I would like to not face the window that features blinding sunshine every afternoon
  • Fresh wall color: I think the entrance hall grey would both brighten up and class up the room
  • I would like a permanent location for photographing plush for Etsy / DeviantArt

But here are the catches:

  • Jim and I must be able to see each others’ monitors. No getting up and walking around
  • I do not want to sit with my back to a doorway (perhaps I am a long lost member of House Atreides? Honestly, it just freaks me out.)
  • The bed and its nightstand must stay in this room for now (the walk in junk closet small bedroom simply isn’t ready to become a guest bedroom)
  • Budget: < $100

Before shots, including our normal amount of mess:

 Day 1 Progress:  Three walls painted grey and white.  The white corner will be useful for taking photos of things for my websites.


Check out Day 2, where I plan the new furniture arrangement and continue painting walls.