DIY Toilet Replacement

DIY toilet replacement  is a very simple project, and it shouldn’t intimidate anyone with a couple of wrenches and about 2 hours of time.  (Oh, and you’ll need to be strong enough to lift a toilet and carry it to where it needs to go.)

I won’t go into too much detail since the process of removing and installing a toilet is so well-documented on the web.  This video gets a link because it covers the whole process in just 3 minutes, while every other video I found wanted me to commit 9 whole minutes of my life to this crap.

Removing the Existing Toilet

Here is our old toilet, guilty of many crimes including incontinence (it leaks water at its base), and creating intolerable levels of drama when attempting to flush loads of “a respectable size”.

DIY toilet replacement

Toilet Removal Steps

Removing a toilet is easy and fun.

  1. Turn off the water supply at the wall
  2. Flush it to get rid of the water in the bowl and the tank
  3. Disconnect water supply from toilet
  4. Use a big towel to mop out any water remaining in the bowl
  5. Remove the caps at its base to expose the screws/nuts holding it to the floor
  6. Unscrew the nuts
  7. Lift toilet!  You’re free now, toilet! (We put ours on a towel in the next room)

Overreact to Wax Ring

EWWW GROSS!  (I don’t think poo actually touches the ring, but it’s fun to pretend.)

Our wax ring was basically a wax pancake.  We’re lucky our toilet leaks weren’t floods:

DIY toilet replacement

Remove Wax Ring

…with your bare hands!  Just kidding, use a tool for god’s sake.

Here I am scraping off all the old wax, which is the bestest most awesome job in the entire world:

DIY toilet replacement

Yes, I have cat pajamas, look upon me and despair.

New Wax Ring

Here’s the plump new wax ring ready to receive new potty.  Lift the potty and place it squarely on the ring.  Rock the toilet a bit and sit on it to squish it down.

DIY toilet replacement

Filling the New Toilet with Water

Connect the water supply to the toilet.  This might be a good time to switch to a braided water supply if your old one is a metal pipe.

Turn the water supply on and let the tank fill.  You can adjust the water level inside the tank by adjusting how high the float is allowed to go (your toilet may vary).

DIY toilet replacement

The Maiden Flush

Am I the only person who half-expects the toilet to explode on the first flush?  :D

All done – a new toilet, installed all by ourselves!  DIY toilet replacement is fun for the whole family.

DIY toilet replacement

Can you believe Home Depot charges $120 to replace a toilet? Wow.

Disposing of the Old Toilet

Good luck.

Our local garbage pickup here won’t take them. The annual recycling event takes them, but … we missed it by a weekend.  Your options are basically: smash it inside a garbage bag, haul it to the dump yourself, pay someone to take it.

Update: This particular toilet lived in our computer room for two months until we paid the guys who hauled out the deck debris to take the toilet, too.  They were surprisingly happy to take the toilet off our hands.

Jim’s Very Tall DIY Standing Desk

At 6’4″, my husband Jim is too tall for most commercial standing desk designs.  And at $1500+, most commercial standing desks are too expensive for our budget.

The solution was obvious: build our own extra tall DIY standing desk! We’re definitely not carpenters, but this simple DIY standing desk design should be doable by anyone with a decent plan and a saw (for home cutting – many stores that sell lumber will also cut the boards for you). My diy standing desk was easier than this one thanks to IKEA’s VIKA BYSKE legs being able to extend to just the right height for me (my desk is 42″ tall).

But Jim’s desk needed to be 46″ tall – and those 4″ were tough to figure out.  The VIKA BYSKE legs only go to 42″.  We were stuck here for several weeks as we considered various designs, but the ultimate solution was actually very cheap and simple: bed risers!  A $20 set of heavy duty bed risers from Amazon gave us the 4″ we needed.

Wondering how to determine the right height for your own standing desk?  It’s easy: stand up normally and bend your elbows at a 90 degree angle (as if you’re using an invisible keyboard right in front of you).  The distance between the floor and your elbow, minus an inch or two, is the ideal height of your standing desk.

DIY Standing Desk Parts Shopping

Here’s what we bought for this very large DIY standing desk:

tall diy standing desk parts how to build ikea parts

IKEA 

From IKEA, we got a GALANT table corner piece and two rounded ends.  The GALANT table comes in at least four colors and several configurations, so you can get whatever combo of pieces works best for your space.  We also got 4 VIKA BYSKE extension legs – these are the only legs IKEA sells that go to 42″.

We like GALANT because it’s huge and because mine’s been very durable.

Amazon.com

To get the remaining 4″ of height we needed, we bought one set of these these heavy duty $20 bed risers.  (Update: 8 months later, I’m pleased to report the bed risers have held up perfectly.  No cracks or problems!)

diy tall standing desk use bed risers to get legs tall enough

Heavy duty bed risers from Amazon.com added the height that the VIKA BYSKE legs fell a little short on

Hardware Store

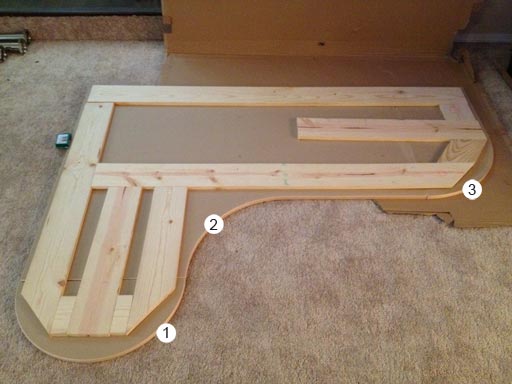
We purchased 18 feet of plain, flat narrow boards 3/4” thick and 5” wide.

The boards are for building a supportive network on the underside of the desk, since we won’t be using the metal frame IKEA sells. The legs and wall brackets will attach to these boards.

Why not use the IKEA frame?  Well, we need flexibility on the leg positioning and we also need something to anchor the wall brackets to, and a metal frame would get in the way.

Assembling the Desk

The circular saw made short work of the boards (The Home Depot is able to cut for you in the store if you lack the tools or confidence with a saw).

Below: laying out the support network on the desk’s underside.

diy stand up desk support network of boards

Since this desk is going to be heavy and awkward once assembled, we built it in the room we’d be using it in. 

Fastening the support boards to the desk was surprisingly straightforward:  first, drill a “pilot hole” through the board and into the desk (be sure your screw isn’t long enough to poke out the top side of the desk). The pilot hole helps prevent the screw from changing course as you’re screwing it in.  Line up a screw and screw the board to the desk surface (also using the drill – yes, you’ll swap bits a lot unless you have two drills).  We just worked our way from one end of the desk to the other.

For our desk’s thickness, we used one 30 count box of the 1 1/4” screws pictured below.

spax construction screws for stand up desk

They look like this from underneath:

assembling stand up desk

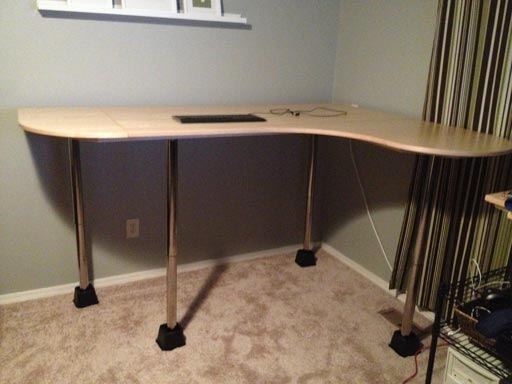
Next, we attached the four VIKA BYSKE legs to the desk and stood it up.  We’ll re-configure the legs later, once the desk is anchored to the wall.

Testing the Desk

It’s wobbly, but it’s usable. Jim’s going to try it out and we’ll probably adjust it a few times before we permanently anchor it to the walls.

testing big stand up desk

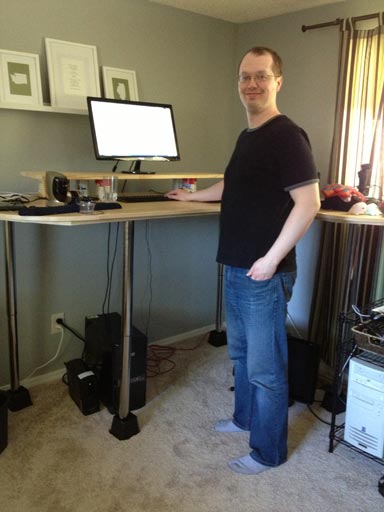
Here’s Jim at his new desk!

JimStandupDesk_4

Wait, what about a chair?

You’re right, even standing desk aficionados have to sit once in a while.  A helpful term to search for is “drafting chair” – drafting chairs tend to rise much higher than ordinary office chairs.  Before you buy a chair for your standing desk, measure as best you can where you’ll need your butt to be for your forearms to lay parallel to the desktop.

I shopped for the right chair for a long time (over a month!) before settling on the Boss Caressoft Drafting Stool B16425-BK.  This chair is great because after a year, it’s still looking brand new.  The cushion didn’t develop a butt-shaped indent or wear out in the middle or anything like I’ve seen happen with other chairs.  I like the back support, and I like resting my feet on the footrest ring. Best of all, this chair is tall enough for Jim to use, too, so we just share this one as it’s pretty rare for both of us to want to sit at the same time.

best standing desk chair

My Boss Caressoft Drafting Stool was about $100 at Amazon.com

More Standing Desk Options

For our DIY standing desks we wanted the biggest surfaces we could get-  and since we own this place, we were completely free to anchor things to the wall.  But if you live in an apartment or dorm room, need to be mobile, or just aren’t sure if a standing desk is for you, here are a few alternative standing desk designs you might enjoy.

Portable Standing Laptop Desk

The Techni Mobili Cadmus Mobile Laptop Stand is the complete opposite of our gargantuan standing desks: it’s small, lightweight, portable, and, at just $42 (for cherry wood grain) and $75 (for solid black), this standing desk is crazy affordable. Well reviewed on Amazon, it’s basically a one-stop shop to a quick and easy laptop sized standing desk.  I think this laptop standing desk would be awesome for a kitchen (look up recipes!) or a family room (work while the kids play!).

Techni Mobili also offers a slightly larger computer cart version with roll-out keyboard and more shelf space.

Standing Desks for Commitmentphobes

With 32″ x 22″  of surface space this standing desk add on earns its name, the Executive Stand Steady Standing Desk.  There are many choices in the “standing desk attachment” category, but the Executive stands out for being huge (it’s big enough for two monitors!) and for offering adjustable height (11.25″ – 15.25″).

An additional 15.25 inches may not be enough for very tall people, so always measure your current desk before ordering.  I really like this thing – if I hadn’t been so gung-ho about building my own, I’d have probably tried using The Executive with my existing desk.

DIY standing desk

The Executive Stand Steady Standing Desk has the largest dimensions of any product in its category and adjustable height.

If $200 is a bit much or if 32″ x 22″ is overkill, the Speedy Standup is a solid alternative to The Executive. It’s literally a miniature desk you plop down on top of your existing desk – done.  The company makes both a “standard” size and a “tall” size, so be sure to measure your existing desk’s height to determine which one’s right for you.

Speedy Standup desk best standing desk

Try to ignore the hilariously bad Photoshop job, the Speedy Standup has great reviews and a good price – just $60.

Splash Out on an Adjustable Standing Desk!

Electric adjustable desks typically come with a price tag somewhere between $1500 and $3000, but if you’re willing to hand-crank it you can have a all the frills of an electric adjustable desk for a fraction of the price.  This adjustable standing desk by ModTable can go up to 47″, which would have just barely been tall enough for a tall guy like Jim (his desk is 46″ above the floor).

adjustable standing desk affordable

This adjustable standing desks by ModTable is a luxurious “best of both worlds” stand up desk.

New Garage Lights

I don’t know why we put this off for so long.  The two fluorescent lighting fixtures that came with our house’s garage are crap.   One of them is just completely dead, and as if to add insult to injury it randomly pooped out its bulbs onto our car parked underneath it a few months ago (which was super fun to clean up).

It was Dad who got the inspiration to replace these lights on his most recent visit.  He just climbed up the ladder, disconnected the broken one, and proposed a trip to Home Depot for replacement fixtures.

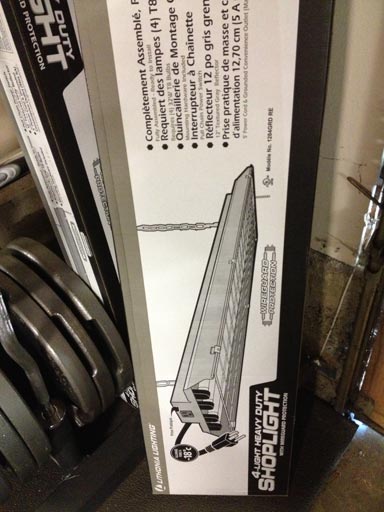
In a matter of about an hour, we went from two of these heavy, broken light fixtures:

GarageLights_3

To two of these awesome ones (with cages, so no more lightbulb pooping).  In case you haven’t guessed, “Heavy Duty” is our favorite phrase.

GarageLights_2

Here’s Dad after hanging one of the fixtures.

GarageLights_1

Here’s our glorious after: a well-lit garage, lightweight lamps, bulbs safely behind cages.

GarageLights_4

This project is a classic example of us letting a simple project intimidate us into not doing it.  We thought working overhead on lighting fixtures would be difficult, if not outright impossible.  We had no idea how easy this could be!

Home Inventory: Why You Need One, How to Make One

This week I completed a very tedious important project: making a home inventory document and video set.

I’ve been working on this bit by bit over the last two months. It’s a lot to do, but breaking it up into smaller tasks makes it much less overwhelming.

Why Make an Inventory?

Bad things happen – earthquakes, fires, hurricanes, floods, tornadoes. Chances are, you live near at least one nightmare-fuel hazard or another.

How much stuff do you have? Of what quality? In what quantity?

Knowing the answers to these questions will help you determine how much insurance to buy and help prove to your insurance company what you had. Some additional reasons:

1. Something’s better than nothing – it doesn’t matter if your house is messy or undecorated. Messy proof > no proof.

2. You have more stuff than you realize. Silverware, clothing, underwear, off-season clothing, tools, cleaning supplies – I’d wager that in most homes, it’s not the big ticket items like the TV or the computers that represents most of the expenditures. It’s the day to day stuff.

3. The condition of your stuff is worth documenting. If your car is 10 years old but rust-free without a dent on it, wouldn’t you want your insurance company to know that?

4. A major appliance inventory is just plain useful, for warranties and especially when you go to sell

5. Disaster can strike ANY TIME! Luck favors the prepared.

Making a Major Appliance Spreadsheet

This step is easy but time consuming. The idea here is to document every major appliance in your house in a spreadsheet (or on paper if you’re oldschool like that).

Your document should include:

  • purchase/install date
  • purchase price
  • serial number
  • model name/number
  • installer

I also included carpeting, flooring, blow-in insulation, and other similarly major work done on the house.

This sheet may seem like tedious work now, but it’ll be a huge help when it’s time to sell (your realtor will want to know how old things are) and it will help prove the quality and age of the stuff in your home to your insurance company should anything happen to your home.

This is how I structured my spreadsheet. I’ve flagged data I don’t know in red as a reminder to go get that information next time I work on the spreadsheet.

home_appliance_inventory

Making Inventory Videos

This video part was simple, especially once I got started. I don’t know why I dreaded this task so much. I set my camera to video recording mode and repeated these steps for each room:

1. Standing in the door, I started the video and panned from left to right to get the full room recorded.

2. I verbally stated the date and the room I was standing in.

3. Keeping the video recording, I walked around the perimeter of the room (counterclockwise if you’re above the equator, clockwise if you’re below it of course)

4. I opened drawers, cabinets, closets, etc, and used my free hand to point out objects and talk about their value and when I acquired them.

I did this room by room so that as rooms change and get new stuff, I can remake the video for just that room rather than redo the entire house. For best visual results, I did this during the daytime with lights turned on.

Organizing the Videos

I brought all the videos onto my local hard drive and named them by room. All in all, the files total about 18GB (!).

home_insurance_videos


Storing (Backing Up) the Videos

I took two approaches to backing up the videos:

Backup 1: Physical Media in a Fire Resistant Safe

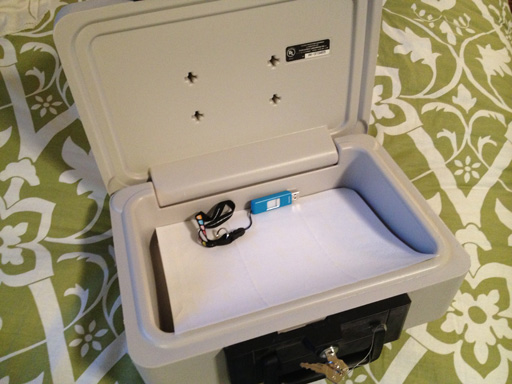
I copied the videos to a flash drive (or multiples, depending on video size and drive size) and put the drive inside a small fire resistant safe like this one.

home_inventory_backup

We already use this box to hold things like birth and marriage certificates. In event of fire, the box’s thick plastic should basically melt and form a seal protecting the contents inside.

Please note that this is not a foolproof plan – digital media and other contents of the safe aren’t guaranteed to survive if the box is heated to extremes (over 135 or so). I wouldn’t go tossing this box into a fire just to see what happens. However, fire is not the only hazard we’re up against here: if the house were significantly damaged, the box could be exposed to smoke, rain, snow, or even just heavy impact. Tossing the videos onto a drive and putting it inside this safe is better than doing absolutely nothing, but as with all data backup, the best plan is redundancy.

Backup 2: Online cloud backup

I am already a subscriber to Mozy backup. It’s worth every penny, but they also have a free plan for up to 2 GB. If your videos are not as extensive as mine, 2GB might be plenty. (Of course, there may be better services available. Search Google for free online backup and see what you find.) Heck, you could put them on YouTube as private videos, or hand them out to friends/family.

No matter what online backup service provider you use, the end goal is the same: get your videos copied to a server somewhere outside your home.

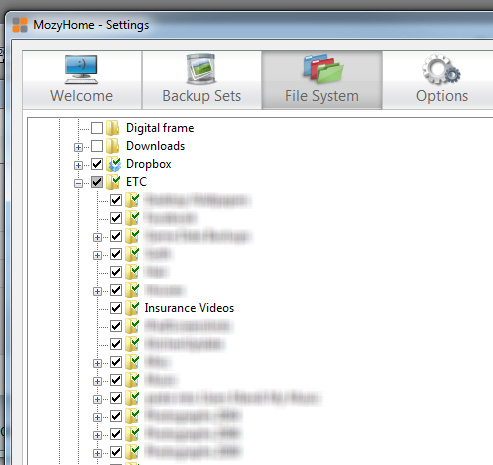
This is Mozy’s interface for choosing which folders get backed up to their server:

home_inventory_backup_choose_folder

This is what Mozy backup looks like when it’s busy backing up your stuff:

home_inventory_online_backup

Cheap but Effective Alternative: Photos

Making videos can be pretty overwhelming, especially in terms of data storage. For years, I documented my belongings by photographing them instead. Put the photos online in some way or another, or if you’re truly oldschool you can have them developed and store them somewhere other than your home.

The Moral of the Story?

It doesn’t matter how you document your stuff, it matters that you do document it. Get started today – once you get the process going, you’ve already done the hardest step!