Merry Day Off Work!

I’m quite pleased that we’ll be spending the holiday in airports/wrapping gifts/posting boring photos of trees and food to Facebook OD-ing on Skyrim (me) and Dishonored (Jim)!

WOOO, I love our non-traditional Christmases.  Happy Christmas, everyone!

Happy 2 Year House-iversary!

We’ve now lived in this house for 2 years!  And I still can’t remember that the downstairs bathroom’s light switch is on the left when you’re entering the room.

2012’s handmade Christmas ornament is …a plush stealth bomber!

stealthBomberOrnament

Minty Fresh Family Room, Part 1

Do you have a big project in mind that will take a ton of time but all you can give it is an hour or so a day?  That’s our situation – we are two full time workers with a needy house.  This post details how just 90 minutes a day made a huge difference in one week!

House projects were on hiatus for a bit while I traveled to see family in Illinois and shipped my latest project at work.  We’re back in our routine now, and with a few weeks to go ’til Jim and I travel again it seemed like a great opportunity to knock off a project at home: painting the family room!  The walls are dirty, scuffed, and just in need of a big freshen-up.

Normally we’d grind this sort of thing out over a weekend, but this time we tried something different: do a bit each night, and maybe it’ll be done by weekend instead of just getting started on a Saturday morning.  We’ll have to wash our brushes and clean up every night, but the tradeoff may be worth it.  With just an hour and a half or so of time to dedicate to this project each evening, we didn’t have a minute to waste!

Sunday: A quick trip to Home Depot netted us a sample of the pale minty color I chose for the walls.  Afterwards, we moved everything portable out of the family room.  This includes books, wall art, mantel decorations, draperies, and laundry.  We threw old blankets/sheets over what remained (and when we ran out of drop clothes, we RISKED IT ALL FOR FAME AND GLORY were just extra careful). Here, the contents of our family room take refuge in our living room:

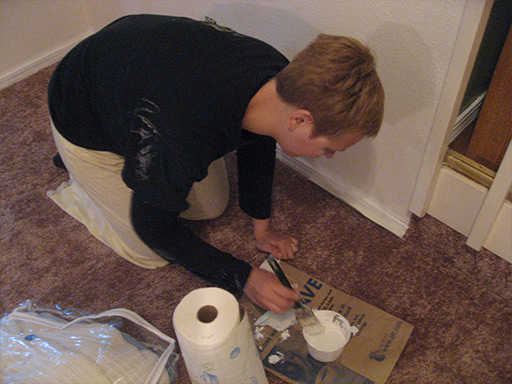
Monday: Trim time!  I painted the border around the carpet, Jim handled the trim around the slider.  1 hour and 30 mins later, most of our trim had its first coat.

My trim-next-to-carpet technique: paint the top 80% or so of the trim with a thick coat of white paint (my particular color is known as “Popped Corn” – YUM!), being careful not to paint the carpet.  Once the first coat dries, return with a painting shield to jam between the carpet and the trim and do a second coat.  Repeat in 12” segments around the room, moving the shield as you go. The first coat goes on fast, the finishing coat goes on slow, but it’s much faster than using the shield for both coats and no one notices the slightly thinner coat on the part of the trim that gets covered by carpet.

Tuesday: Trim finishin’ time.  I busted out the paint shield, stuffed it between trim and carpet, and worked my way around the entire room in 1-foot segments.  It’s tedious, but when you paint after carpeting you take what you can get!  The end result is crisp white woodwork against carpet.  Jim painted the fence separating the family room from the kitchen. We only had about an hour this evening, bringing total time to 2:30.

Wednesday: Time for the teal paint!  Now it’s starting to look like something!   Jim spackled, loosened the drapery hardware, removed electrical outlet covers, and other go-fer tasks while I painted this corner:

…and this wall:

Total time: 4:00.

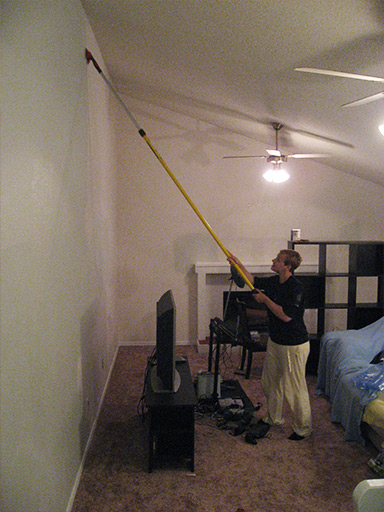
Thursday: Jim’s project requires a 1 hr+ phone call from him one night a week, and this week it fell on Thursday.  While he did his call, I took our new extension pole for a whirl and painted the tallest wall of the family room using a roller and a flat pad for the corner where ceiling meets wall:

Jim’s call is done! DINNER BREAK:

A pan fried stir fry of steamed broccoli, bell peppers, zucchini, onions, and Trader Joe’s high protein tofu.  (I freakin’ love tofu… and everything else made of meat or a meat-like substance.)  After dinner, we painted the rest of the tall wall. Total time: about 6:00 now, although for one of those hours we were at half staff as I painted during Jim’s call.

Friday: We painted the wall around the mantel.  This went so freakishly fast I neglected to take any photos of it in progress.  We started putting tools, sheets, etc away.  Total time: about 7:00.

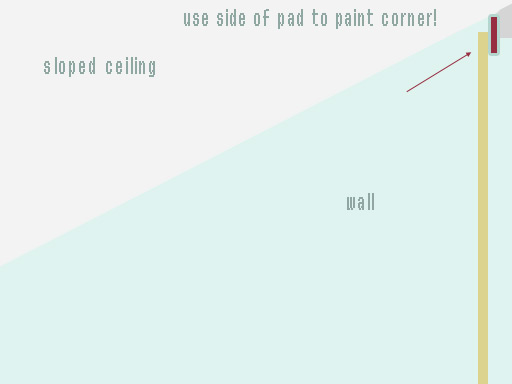
Saturday: All that was left by Saturday were the corners where the vaulted ceiling meets the walls.  We couldn’t figure out how to get the rectangular painting pad into the angled corner.   Here was our dilemma:

We were stumped on this for a full day, and we even stopped at McLendon’s during our Saturday bike ride to see if they had a special angled pad for this kind of situation.
Then I had a lightbulb moment – ah hah – the pad can be used sideways!  Putting the paint on its edge and dragging it along like a thin brush worked like a charm and finished off our corners.

VICTORY LAP! I painted the mantel using the same white I used on the trim.  Just a thin coat to cover some of the wear and dirt, since it’s already white.

Total time: 8:00

Sunday: At last, we can use our family room again!  Best of all, we didn’t spend a WHOLE DAY painting this room/getting exhausted/wishing we were having fun on our weekend instead.  Having to wash the paint rollers and brushes every night wasn’t the time sink we thought it would be, either – and we have enough rollers and brushes to replace anything that was still damp the next day.

A better “after” will be posted once the room is fully back together!  We’ve still got to replace some electrical outlets, cover the furnace intake, and haul a bunch of stuff back into the room.


Garage & Yard Upgrades

Some garages get to relax and be messy, but not this garage!!   I made the garage the first thing on my to-do list this morning, starting with sorting the pile of stuff stacked along the pictured wall.  Most of it was Goodwill donations that haven’t been donated yet (into the car they went!) and Christmas stuff (onto the shelves it went!), and tools. So many tools.  Our garage runneth over with tools.

20 minutes later the wall was unblocked and looking like this:

And that’s when the madness hit.  INSPIRATION!

Out of nowhere, a tub of Spackle and a painting roller appeared in my hands and before you could say “what a filthy wall!”, it was GONE – coated in Oat Cakey goodness (still got 2 gallons!).

Next, I hauled the black wire shelves that have been blocking the kitchen slider into the garage (I think we’re fully weaned off them… we’d better be fully weaned off them!) and presto, our dumpy wall suddenly became AWESOME:

The Ryobies finally have a place to call their own, too.  They’d been slumming it on the carpet patch.  The hooks that were uselessly high on the pegboard were moved down low so the weed whacker and blower hang like neon bats.  The saw and hedge trimmer snuggle together on the middle shelf.   The dishpan that we use as a “sort me later” tool bin sits atop the shelf for easy access.

While waiting on drying times, I put the blower and shop vac to good use on the garage floor, in the ongoing effort against the invading pine needle army, tidied the pantry shelves, and organized more shelving spaces.    On a side note, there’s a weird cut in the wall behind the thin wood door that covers the under-the-stairs storage:

I love a mystery, so I pulled off the drywall cover and behold…nothing but a crappy old glass bottle!

Seriously bummed – I was hoping to find someone’s secret stash of something embarrassing.  I guess I can pretend the bottle contains someone’s soul, or something…  I poked the camera into the hole and took a photo to see what’s further in.  Oooh, scandalous: a cigarette and three marbles.

I’ll seal up the hole once I find my wall repair supplies.  It might be fun to stick a small “time capsule” or letter to future owners in here!

The “Free Corner” also saw some action today.  The corner of our property is fairly well-traveled, and everything I’ve put out here (from old lawn mowers to a giant storage container intended for a vehicle’s luggage rack) has disappeared within a day or so.  Today I’ll try my luck with this stuff:

The wood cart was gone by the time I turned around.  Must have been worth something, lol.  (Update:  someone with big projects in mind, or maybe just some serious hording tenancies, took the rest by the next day! WOOT!)

My last project of the afternoon was to dig out some dirt around the gate to the backyard so the gate can swing free.  It used to open only about two feet wide before it got stopped by dirt, which was annoying anytime we had to walk through it (sideways, generally).  Digging out a track for it turned into trying my hand at amateur brick laying, and 3 hours later, I had this:

We have these white bricks in abundance because the shed was sitting on a foundation made of ’em.  The broken ones were handy for getting the ends of the path decently flush and for working around the cement blob around the fence post base.  I used a shovel to dig down deep enough to fit the bricks under the gate, and made a smooth foundation for them to sit on with the gravel the shed was sitting on.  Sure, it’s a cob job, but it is SO much nicer to use this gate now!!

Here it is with the gate open:

I have a ton of bricks left over, too, so I’m thinking of “paving” the side yard in a similar manner if this platform holds up well.  If it melts away in the first rain we get, oh well – at least it was one helluva workout!