Living With Less: 500 sq. feet and just the essentials

My husband and I just returned from a wonderful 3 day vacation in Friday Harbor, a touristy town of about 2,000 on San Juan Island, Washington.

friday_harbor_dock

This was our first trip with Gadget and an unusual trip for us in that we spent almost half of every day inside our 500 sq ft hotel room!

Since our trip fell squarely into what is considered the “off season” on the island, most attractions were either running on winter hours or closed altogether. So while we may wake up at 6 and be ready to venture into the world by 7, there wasn’t much to do before 10am or after 5pm.  (Not a complaint, we love the quirks of off-season travel.)

When we travel we usually try to maximize the time we spend at whatever the nearby point of interest is. Disney parks have us up by 7 and in line for whichever park opens earliest by 8 or 9. Ditto and likewise for road trips and skiing vacations. On those kinds of trips, we return to the room and collapse into bed somewhere around 9 or 10. There’s never much time to enjoy the room, nor is there any point – the rooms we rent tend to be little more than a bed in a box.

But this room was different!

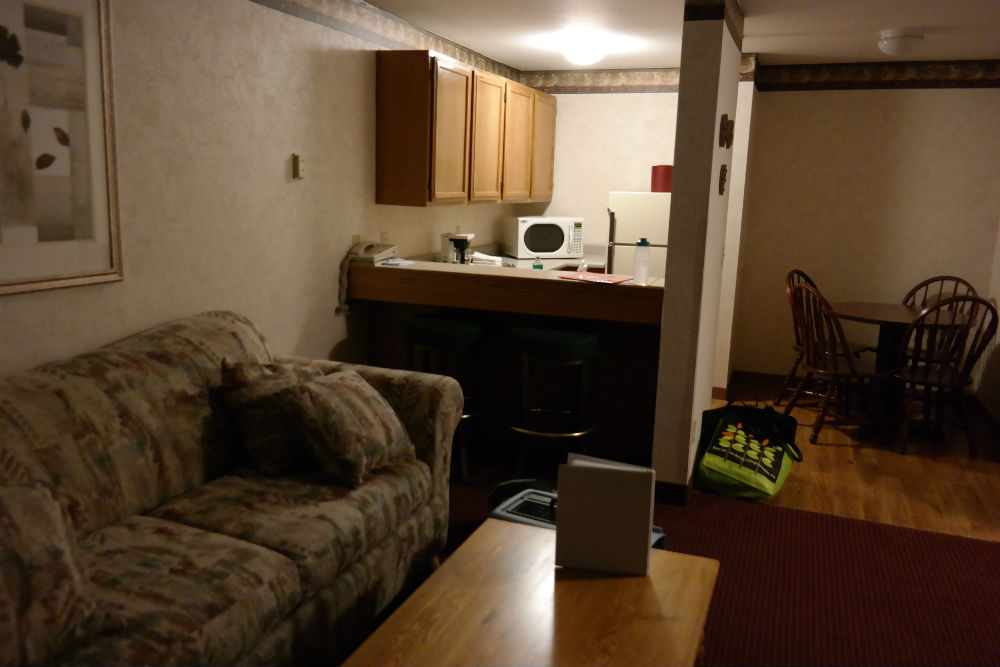
This room (at the Friday Harbor Suites) had an almost-kitchen including flatware, bowls and plates, a sink with Palmolive and a new sponge, microwave, medium sized fridge. It also had a dining table, a separate bedroom, a bathroom larger than any I have in my single family home, a living room complete with sofa and oversized coffee table, and a little sliding door that opened to a ground-level deck. If the room just had a range to cook on, I think I could have moved in.

Everything had a purpose, and almost nothing duplicated the purpose of anything else (well, except for the two flat screen televisions and the bar chairs at the kitchen ledge).

friday_harbor_suites_room_1

friday_harbor_suites_room_2

Living in this tiny space was refreshing! As a recovering stuff addict, I love an opportunity to see just how much stuff I don’t actually need.

Three days in the “mini house” also made it obvious how much of my home is just duplication.

Whereas this hotel room had just one table to eat at, my home has at least five places where we occasionally dine:

  • dining room table (where most of our meals are eaten)
  • TV trays in front of the blue sofa
  • computer desks upstairs (I eat here sometimes)
  • folding card table in living room
  • standing up in the kitchen (guilty…)

I can also sew at two different machines, shower in two different showers, sit on four different toilets, wash my hands in any of 5 different sinks, and lounge on two different sofas. If I wanted to sit somewhere, I count at least 11 different places I could have a nice sit. I have two televisions (and three laptops, plus an iPad) for watching things on, and I even have two separate beds I could sleep in.

That’s a lot of duplication.

If I removed all the duplication from my home (three of the four bathrooms, all but one of the bedrooms, one of the living rooms, etc), I’d probably have a 700 sq ft home instead of a 2200 sq ft home!

A lot of it happened accidentally – upgrading to a new version of something and retaining the old one is the most common cause of duplication. But it’s a lot of upkeep and management, time I’d rather spend making art or writing or walking outdoors with my family.

In a way, my home encouraged it. When there’s room for stuff, it’s easy to keep it around!

When we replaced our 7 year old sofa with one large enough to hold us both, the old sofa just moved to another room (at the cost of $125 for movers, since we couldn’t move it ourselves). The room that received it was otherwise empty – because for whatever reason, my 1977 single family home has both a family room and a living room to fill up. Sure, we’d left that living room empty for a good three years, but the looks we got from visitors made it clear that the social expectation was that living rooms should have at least a little furniture in them.

But what’s the point? I didn’t miss the excess while on my vacation, and I didn’t mind having “only” one place to sit or sleep. Why do I need two sofas if one will do? Why was my house (and so many like it) built on the assumption that someone would want so many duplicates of things? (It even has two fireplaces!)

The three days I spent in this little room were inspiring. I took three car-loads of unused stuff to the local charity dropoff the day after we got back. Feels good, man.

Thing I Like: D-Link Wi-Fi Cloud Camera Review – Spy on your Home!

Palm-sized and lightweight, D-Link Cloud cameras let you spy on your home – even in the dark.

For a long time, I dismissed home security products as evidence of suburban paranoia run amok.

Who wants to dig through archive footage to figure out which neighbor’s dog pooped in your yard? Eh.. not me.

But then my dad went down the home surveillance rabbit hole and got me hooked, too. I now have three D-Link Wi-Fi cameras and I think they’re super awesome. I spy on the dog, check that I put the dinner away, and confirm that I closed the garage door. Mundane stuff, sure, but having “eyes” everywhere is awesome.

Read on to learn more about these great little cameras and find out which one is best for you.

PS: I wasn’t paid or perked to write this review, and I do actually own and use these cameras! The camera shots you’ll see in this review are mine. I’m just a tech enthusiast searching for the best gizmos and gadgets for her home, so if you see an error let me know.

The links in this article are Amazon Affiliate links. Purchases made through these links help support this site at no additional cost to you. Read my affiliate disclosure here

 Please enjoy and share this review. :)

DLink_Camera_Review

D-Link Wi-Fi Cloud Camera Review

Home surveillance via little Wi-Fi cameras isn’t so much about trying to catch a crook, it’s about keeping an eye on things.

  • Did you leave the garage door open?
  • Who is ringing the doorbell?
  • What are the kids doing in the yard?
  • Is the dog on the couch or chewing up the rug?
  • Did you leave the medicine out?
  • Is the kitchen on fire?
  • Is the basement flooding?

At just $45-$100 a pop, it’s easy to get hooked. My Wi-Fi cameras have been in action for 2 months now, and I LOVE checking my “spy network” when I’m away.

D-Link Wi-Fi Cloud Camera watching out a window

I spy with my little camera… a yard.

Why D-Link? D-Link vs. Dropcam

Dropcam_Wifi_Camera

Dropcam is a feature-packed alternative to the D-Link cameras, but be careful not to buy more features than you need.

Rapid adoption of broadband and smartphones opened the home monitoring floodgates! There are a ton of brands to choose from, but the major players in the “inexpensive home surveillance” category right now are D-Link, Dropcam, Samsung, and Linksys. Which one you choose basically comes down to your budget and your desired features.

Dropcam, for instance, is another popular home surveillance camera manufacturer, but Dropcams is aimed at a rather sophisticated and upscale ($$$) market.  Dropcams are cool, don’t get me wrong – they offer a plethora of great features: remote zoom, tilt, two-way talk, high def video, additional motion-detection sensors, easy wall mounting, and off-site recording as an option. If you don’t need those features, though, there’s no point in paying for them – and you can get 3 or 5 of the most basic D-Link cameras for the cost of one Dropcam(!).

I didn’t need Dropcam’s bells and whistles, and I’d rather have 3 good enough cameras instead of one overkill camera, so I went with D-Link.

D-Link Camera Features & Advantages

  • Inexpensive: Seriously, the cheapest one is around $35. Dropcams start around $125. (Prices fluctuate, check Amazon for the current price.)
  • Well reviewed: The D-Link DCS-930L is Amazon’s #1 best seller in the Home Security Systems category
  • Mix and match options to suit your needs: Day or Day/Night, Wi-Fi repeater, recording to on-camera memory, two-way speakers, remote viewing angle adjustment
  • Adjustable camera head: It stays put, too.
  • Extend Wi-Fi network range: Boost your router’s Wi-Fi signal to the furthest corners of your house
  • iOS / Android app: It’s free and it works great.
  • Easy setup: Installation details further down

PS: If you’re just getting started with home monitoring, you’ll want to buy all your cameras in the same “family” so you can use 1 app to check them all. Try to choose a brand family that will meet your needs for years to come.

How does it work?

Once your camera is set up, it streams live video that you can access via the web portal (http://mydlink.com) and/or via the free iOS/Android app. The video stream looks good and updates every second or so.

This 6 minute video by Lon Seidman takes you on a tour of the camera’s features. Most of these features are shared by all D-Link Wi-Fi cameras. (Caution: bad music!)

Mix and Match Features

D-Link makes a big variety of cameras, giving you the flexibility to buy only the features you want.

For example, if you just want to check on your dog while you’re out during the day the inexpensive DCS-930L is all you need. If you want to set up a full-fledged home surveillance network, you can buy several remotely controllable cameras and use the built-in D-Link software to watch their feeds simultaneously.

** denotes the models I personally use.

ModelNight VisionWi-Fi RepeaterRemote Pan/TiltDescriptionApprox. Price
DCS-930L **NoNoNoInexpensive home monitoring$

DCS-931L **
NoYesNoDay cam with Wi-Fi range extender$
DCS-932L **Yes - 15 feetNoNoDay/night without Wi-Fi range extension$$
DCS-933LYes - 15 feetYesNoDay/night with Wi-Fi range extension$$

DCS-942L
Yes - 15 feetNoNoDay/night with on-camera microSD video recording
DCS-5010LYes - 26 feetNoYesDay/night with app-controlled pan/tilt$$$
DCS-5010LYes - 26 feetYesYesDay/night with app-controlled pan/tilt and Wi-Fi range extension$$$
DCS-2332LYes - 15 feetNoNoDay/night with rugged casing for outdoor use$$$

Search Amazon for the model(s) you’re interested in to see current prices and stock.

Wireless & Wi-Fi Range Extension

All the D-Link cloud camera models are designed to work with your existing Wi-Fi network. You can use a wired Ethernet connection if you prefer, although the provided cable is very short.

Some of D-Link’s cameras offer Wi-Fi range extension. This extends the reach of your home’s existing Wi-Fi network and works for all devices (not just more cameras). I love this feature, since my home is rather wide and my Wi-Fi router is in the far end of it.

Alas, this also means that if your Internet connection or power goes down, so do your cameras.

Great Image Quality

The DLink Cloud Camera image quality is high enough for my uses. Here’s a few sample shots taken at 640 x 480 (click to see full size):

DLink Wifi Camera review

Me in my yard, as seen by a D-Link camera I placed in a second story window.

DLink_Camera_Watching_Dog

Watching the dog from across the living room with a daylight-only D-Link camera.  (Gadget is good at avoiding the protective blankets, it seems.)

dlink_camera_front_yard

Watching the driveway and front steps with a D-Link camera placed in the front window.

Spy into Darkness

D-Link cloud cameras can see in total darkness up to 15 feet or 26 feet, depending on the model. Cameras that support night vision automatically flip their lens and LEDs as the room’s brightness levels change. The lens changeover is audible, so be careful placing day/night cams into rooms where the clicking sound would annoy you.

Here’s how night vision looks in a very dark room:

D-Link Wi-Fi Cloud Camera Review Night Vision Test

My dog walks past the family room camera in near-darkness.

The only light is coming from the camera’s LEDs and the dim lamp at the far end of the room. The camera makes the room look MUCH brighter than it was in real life.

Recording Capabilities

sandisk_micro_32GB_card

Some DLink cameras support recording to a removable SD card.

I haven’t really felt the need to record what my cameras see for later review (I just watch in realtime), but all the DLink Wi-Fi cameras can be configured via DLink’s software to save footage to a hard drive.

Or! You can a model that supports on-camera recording, like the DCS-942L model. You can stick a 32GB MicroSD card into this bad boy and record an entire weekend worth of (low frame rate) footage.

101 Uses for Wi-Fi Cameras

At first I was like… “What am I going to do with a camera? I don’t want to sit and watch my yard all day.”

Then I realized the power of pointing the camera into the house.

  • Inside garage: Check if you left the garage door open! We do this a lot…
  • Kitchen: Confirm that food and medicine got put away, even if you’re out of the house. Or watch the oven timer. Or see if that pot’s boiling yet. (I also found out my dog likes to inspect the garbage can when I’m not around.)
  • Living room: Keep an eye on your dog/kids/spouse.
  • Basement: Is that storm sending water into the basement? Or did you just leave the lights on?
  • Nursery: Watch baby sleep (I don’t have a baby, but if I did I’d would totally use one to watch said baby.)
  • General peace of mind. Confirm that the house did not, in fact, burn down while you are away on vacation. Yay!

I found a few outdoor uses, too. (By “outdoor” I mean “the camera is inside and pointed out a window”. Note that night vision does not work when pointed through a window.)

  • Neighborhood spy cam: What was that noise? If you’re at your computer, keep a browser tab open to show the live feed. (Spoiler: noise was probably another FedEx truck going by.)
  • Pool: Keep an eye on your backyard pool
  • Yard surveillance: Did you leave the gate open? What are the kids doing out there? A camera pointed into the yard makes it easy to check.
  • Pointed out window towards front door: If your house’s layout allows for it, you can use your cam to see who’s at the door.

I can only imagine how much less crap my sister and I would have gotten away with as kids if my mom had access to a network of these little spy cameras. D-Link cloud cameras would also be great for checking on elderly parents, pets, children, contractors, and babysitters.

myDlink App

The companion viewing app is called “myDlink Lite” (here’s a link to the iOS version of the app). The app is great. It’s simply laid out, the layout is easy to navigate, and I’ve been impressed by its ability to stream (very choppy) video over even the crappiest 1-bar 3G.

  • Works in horizontal or vertical format
  • Manually switch into “night vision” mode
  • Save a snapshot (to your phone) of what you’re currently seeing
  • Access all of your home’s cameras
  • Listen to audio feed (or mute it)
DLink_Camera_App

Access any of your cameras remotely via D-Link’s free smartphone app.

What’s in the box?

In the box: D-Link camera, power adapter with a nice long cord, a short white Ethernet cable, and instruction/advertisement booklets.

DLink_Cloud_Camera_Box_Contents

DLink Cloud Camera 1100 (DCS-932L) box contents.

DLink Wifi Camera

D-Link camera with power cord and included Ethernet cable.

Installation

Trouble with installation is the cause of many (if not most) of the camera’s negative Amazon reviews. My tips for a smooth camera installation:

1. Triple check your Wi-Fi password. The installation fails silently if the password is entered wrong. Pretty dumb that it can’t say “hey bonehead, your password is wrong!”, so watch out for that.

2. Access the camera directly via its IP address. Even if you’re having trouble with the installation itself, you might be able to access the camera directly. Go to your router’s control panel (usually accessed via 192.168.0.1) to see a list of connected devices, or start guessing IPs and you might be able to access the camera’s own control panel. My cameras, for example, ended up being something like 192.168.0.7 and 192.168.0.12.

3. Call D-Link’s support line. They’re actually well-trained and English-speaking. They helped my not-so-technical dad through the installation of his cameras.

The only complaint I have about the camera installation process is the requirement to upgrade firmware right away. This only seems to affect some cameras – one of mine needed a firmware upgrade as soon as I got it all set up in the right location. Why couldn’t the firmware update have been part of the installation wizard? Updating the firmware requires bringing the camera back to the router and plugging it in directly, so hang onto that Ethernet cable.

Other than that, the installation wasn’t a problem and once it’s done it’s good forever (or until there’s a firmware update, which so far has just been once in two months).

Wi-Fi Camera Limitations

These cameras are awesome, especially for the price, but there are a few things you just can’t do or don’t work as well as you might hope:

Night vision works great… unless you’re aiming through a window. The night vision LEDs (the red lights on the front of the camera) create blown-out white spots on the window glass when it’s dark outside. If you don’t need to see through the window at night, just get a daytime camera and point it out the window.

If you want night vision through a window, these cameras can’t do it. You’ll need an outdoor camera like the DLink Wireless Day/Night Outdoor (DCS-2332L) which comes in a weatherproof casing .

Motion detection is spammy and doesn’t work well. I fiddled with motion detection regions and sensitivities for a month before I finally just gave up and disabled motion detection. The idea is nice: get emailed a picture whenever there’s significant motion. In reality, I was getting spammed tons of photos every time a branch or the sunlight moved. The tech just isn’t there.

Cameras can (on occasion) take a long time to reconnect to D-Link’s servers. I don’t know what caused it, but one time I moved my cameras and it took them 30 minutes to become available via the app again.

Not battery powered. Your spy network goes down when the power’s out, though I imagine you could hook the camera up to a UPC (and your router, too) for usage during a power outage.

Conclusion

I love these little cameras. The added peace of mind has been completely worth it, and I’ve been expanding my spy network over the past few months to watch more corners of my home. If you have kids or pets, or just worry about your home, you might really love having an extra set of “eyes” watching over your home

Welcome Home, Gadget

My husband, Jim, and I have felt the absence of a dog in our lives for years. Part of the reason we got a house in the first place was so that we could have a dog. But there was always something holding us back: the 9 hour workday, the usual uncertainties and worries (what if the dog is difficult to train, or what if the dog spoils our nice home?), and the general logistics (what happens when we travel?).

Since I’m currently unemployed and studying for bootcamp – and after that, who knows? – now seemed like as good a time as any to make good on our promise to someday get a dog. I’d be home to train her and get her situated, and we can ease back into that whole workday routine thing. We’ll figure the rest out as it comes.

In late May we went to a local rescue group’s adoption event (People United for Pets – check ’em out if you’re in the Puget Sound area) intending to just have a look, not really committed to any particular breed/mix. But the moment we saw her, we knew she belonged with us. We applied and four days later, she was ours!

Welcome home, Gadget. We waited a long time for you!

14128650038_fa451062cd_k

14128698600_ddc46a45ef_o

14335503883_fdcc5e38e9_b

14469026629_6c9aabeb01_k

14469195547_2071f697e8_k

She might be a Chi, but she hasn’t lived up to the negative breed stereotypes. Easy to train, rarely provoked to bark, and incredibly playful. She also loves to hump elbows, especially if you play some metal. She’s rad like that.

DIY Bathroom: Staining a Bathroom Vanity with Gel Stain

gel_stain_how_to_tutorial

This post is part of a multi-post series showing off the DIY renovation of our office (“guest”) bathroom.

Here’s how I updated a small, dated bathroom vanity for well under a hundred bucks. This is my very first staining project (though I’ve got plenty of experience with painting wood) so I followed the same steps demonstrated by Jessie over at Imperfectly Polished. I think it turned out pretty good.

Our Vanity “Before”

Here’s our office bathroom’s “Before”, looking pretty much like it has since we moved in 3 years ago.

Take it all in: the brass faucet has resisted all attempts to fix its leak, the sink lacquer is chipping, the light fixture is straight out of a 1970’s Hollywood dressing room, and the vinyl floor is from a 1980’s hair salon. Like most of our DIY projects here at Level Up House, this bathroom will evolve over time, starting with the very first step: staining the vanity.

stain_bathroom_vanity_before

This is not our prettiest bathroom.

Vanity Staining Supply List

Staining a bathroom vanity comes with a whole slew of stuff to buy. Here’s a list of everything I used:

  • Minwax Pre-Stain wood conditioner
  • Minwax Gel Stain in “Walnut” – 16oz can
  • Minwax Fast-Drying Polyurethane
  • Corner sander with 120 grit sanding paper
  • Painter’s tape
  • Cheesecloth (optional)
  • Old socks
  • Safety goggles & dust mask
  • Plastic gloves
  • Mineral spirits for clean up
  • A roll of paper towels
  • Shop vac + brush attachment
  • Screwdriver/drill for removing the cabinet doors and hardware

I was originally going to buy the smaller size can of stain, but went with the 16oz after realizing it was going to take several coats (and indeed, it took 5 complete coats) to get my vanity’s wood as dark as I wanted. The cheesecloth was recommended to me by the “staining professional” at my local hardware store, but I think it was kind of silly. Any old rag made of thin cloth would have worked fine and would have saved me $7.

stain_bathroom_vanity_supplies_list

My local Home Depot doesn’t carry Minwax or much variety in gel stains. I had to hit up McLendon Hardware instead, where I found Minwax and an overwhelming selection of colors to choose from.

Step 1: Take it all apart

Use the screwdriver/drill to remove doors and cabinet hardware. If you can get your faux drawers off, do that, too. (I couldn’t get mine off for the life of me.)

stain_bathroom_vanity_before_taken_apart

Countertop cleared  – bathroom is ready to begin its transformation into a work zone.

Any wood trims around the base of the vanity should come off, too. Oh, and label each one with its location.

stain_bathroom_vanity_remove_wood_trims

Labeling your trim pieces is the best thing you can do for yourself. Don’t ask me how I know this.

Step 2: Sanding the vanity

Okay, the first real step here is to put on the goggles, dust mask, and ear plugs. Sanding kicks up a ton of dust and it all goes straight into your eyeballs and lungs if you don’t properly gear up first.

dust_mask_goggles_staining_a_vanity

Lookin’ chic!

My corner sander is equipped with 100 grit sandpaper. It took about an hour to sand off the thin layer of clear shininess that currently covers the vanity.  Fortunately, the existing varnish (or whatever it was) wasn’t too thick and sanded right off. Corner sanders are great for small projects and tight corners, but if I do another wood staining project I’m going to invest in a circular sander to speed up this process.

stain_bathroom_vanity_corner_sander

Corner sander ENGAGE!


Go ’round in circles and get all that shiny layer off. Be sure to get the corners and edges, too. For that narrow area above the faux drawers I rubbed a small roll of sandpaper left/right. The doors were detached and sanded separately (I sat on the floor and sanded them in my lap).


stain_bathroom_sanding_corner_sander

Sanding my vanity’s faux drawers


When you’re done sanding vacuum the area clean with a shop vac and the brush attachment. Consider wiping everything down with a wet rag, too. Getting all the dust out of the room is just a good practice – you don’t want the debris getting mixed into your stain.

Step 3: Painter’s tape

If your vanity touches walls or floors that you care about, a few strips of painter’s tape will protect those things. Wipe off any remaining sanding dust before sticking tape to the surrounding walls, interior, and floor.

painters_tape_staining_vanity

Step 4: Prepping with Pre-Conditioner

I didn’t do a side-by-side to test if this “pre-stain wood conditioner” stuff actually makes a difference, but at $7 a can I figured I’d get it since it was recommended by the how-to guides I consulted before starting this project. Using it is straightforward: open the can, dip a paper towel in, and smear it all over the wood you’ll be staining. You’re supposed to apply stain within 2 hours of applying the pre-stain, so don’t do this step and then go to bed or something.

pre_stain_wood_conditioner

This is the only time where “pre-staining” is a good thing.

Step 5: Mixing the Gel Stain

Gel stain is disgustingly thick and gelatinous, but it has to be stirred into a smoother consistency before it can be applied. I poured half the can’s contents into another container to make it easier to stir in both containers. A good old paint stick was plenty strong for cutting and stirring this goopy stuff.

gel_stain_walnut

Gel stain is goopypoopy. Many, many comparisons to other substances were made.

Step 6: Actually Staining Things

Are we staining yet? Yes, yes we are. Dip the cheesecloth or rag into the gel stain – get a small amount, no need to go nuts here because most of it’s going to get wiped back off anyway.

gel_stain_on_cheesecloth

Oh, and wear gloves. This was taken 30 seconds before my hands became chocolate colored.

gel_stain_smeared_on

Like a big ol’ poopstain. (Seriously, if you don’t make fun of this DIY stuff you’ll never survive it.)

Go ’round and ’round in circles, then wipe in the direction of the grain.

staining a bathroom vanity stain wiping technique

Gel stain application technique: put it on heavy, smear it around around in circles and then wipe in the direction of the grain. Don’t let it pool too much in the corners and crevices.

stain_bathroom_vanity_one_coat

Before and after: bare vanity door on the left, one coat of Minwax gel stain in “Walnut” on the right. They look like chocolate squares. I wish they were chocolate squares.

I went inside and did the same to the vanity:

stain_bathroom_vanity_coat_1

Wood vanity with one coat of Minwax gel stain in “Walnut”

And that’s just the first coat. Now it needs 8 hours to dry, so I clean up for the day and take a shower. Most of the clean up is me removing gel stain from my fingers and hands, but that was easy with a little dab of mineral spirits.

mineral_spirits_gel_stain_cleanup

Mineral spirits nuke gel stain right off your flesh and doesn’t leave you dry or itching.

At this point, it’s apparent that I’m going to need several coats to reach the level of darkness I desire. It’s also apparent that my wood is resisting the stain more than my paint stick, which turned into 98% dark chocolate in just one coating. I’m no wood expert – in fact, this is the first thing I’ve ever stained, so at this point it’s good to keep realistic expectations. I’m okay with wood grain showing, with a bit of unevenness (isn’t “shabby chic” in style anyway? ugh, that phrase…).

Step 5: Stain coat #2

Second stain coat went on just like the first: rub it in, wipe it off. I have to admit to being a little frustrated at this step: the second coat doesn’t look much darker than the first.

one_coat_vs_two_coats_stain

Wtf? Each coat makes a minimal difference, at best.

Step 6: Stain coats #3-6

A lot of staining tutorials go something like, “Just two coats and you’re done, easy peasey!”

Uh, yeah, my experience was more like needing 6 coats total.

I also had to wait 24 hours between coats, or else the previous stain started smearing around and wouldn’t “stick”. This project stretched out, ultimately taking me just over two weeks to complete it. Partly to blame was my own ennui and dwindling enthusiasm for the project as each coat hardly looked different than the previous. (Each coat DID make a difference, it was just a barely perceptible difference).

I persevered and this is where it ended up after 6 coats of stain:

vanity_done_staining

It’s chocolate. Oh my god.

Step 7: Polyurethane: 3 coats

Polyurethane is just a protective clear coat that goes on over your dried stain job. I waited a full week between my last coat of stain and my first coat of polyurethane, and 24 hours between each coat of polyurethane. You can probably wait less time if you’re in a big hurry, but I wasn’t (and my Dad was in town). Compared to all those stain coats, the polyurethane step is easy.

Just blot it on, wipe it off. I used an old sock foot as my “paintbrush”, because I hate buying brand new brushes for this kind of stuff. My sock worked fine.

polyurethane_coats

Polyurethane: wipe on, wipe off

Step 8: Reattaching Hardware

Be very careful putting your hardware back on!

Your stain and polyurethane coats should be really durable, but it’s easy to scratch things when drills and metal hardware are involved.

reattach_hardware

Reattaching the cabinet hardware is easy as long as you kept track of the pieces (you put them safely in a ziplock bag, I know you did).

All Done!

Here it is: the newly stained bathroom vanity.

stained_bathroom_vanity

Staining complete!

It’s just a humble builder cabinet, so it made for a great First Stain Project Ever.

Obviously, there are still a lot of things I would like to update in this room. The sink faucet leaks, the sink is rusting, and the countertop is scruffy/stained, and a tiled ceramic floor would add a lot of appeal.

But I had to finish the vanity first to be sure it was worth putting a new countertop onto (vs. replacing the vanity as well). In the spirit of not spending a fortune on this bathroom, I think I’ll be keeping the stained vanity and finding a nice granite remnant to replace the old countertop, along with an undermount sink and new faucet.

Helpful Tips

Cheesecloth was not necessary and too messy. Everyone’s so excited about cheesecloth but I really hated working with it. It was flimsy and I was going through way too much of it. At $6 a bag, I felt pretty silly wasting perfectly clean and brand new cloth when I had a bin of torn socks upstairs. I switched to paper towels (for staining) and socks (for polyurethane and the last coat of stain) and everything went fine.

Carry everything in a box. Since my bathroom is pretty small, I basically had two workstations: the garage floor (for the vanity doors) and the bathroom itself (the rest of the vanity). Carrying all my supplies in a cardboard box made it easier to move from one workstation to another.

how_to_stain_a_vanity_supplies

Staining is messy. A box can help.

Wear a mitt. Staining is brutally messy and gets into your skin very quickly. I never liked wearing gloves on previous projects, but they were an absolute necessity for this staining project.

plastic_mitts

Cheap plastic mitts from the dollar store for the win.

Mineral spirits are essential. If you don’t know about awesome mineral spirits are, I’m here to tell you: they are awesome. Wiping my fingers and tools down with mineral spirits made cleanup extremely easy and fast. Stain does not come off with soap and water!

Okay, that’s it for this staining project! I can’t say I’m eager to rush into another one quite yet, even though there are a half dozen things in my home I’d love to freshen up or change the color of… :)

If you found this tutorial helpful, feel free to share your projects or thoughts in the comments! I always love hearing from other DIYers. :)