Meet Subie! How We Chose the Subaru Forester as our Next Car

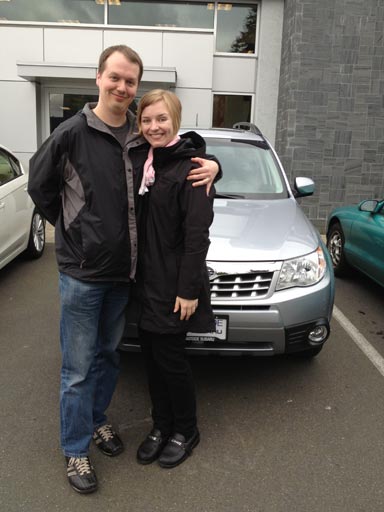
We finally did it: we added a second car to our family! Welcome, Subie! It’s a 2013 Subaru Forester and we SUPER LOOOOOOVE IT!!!

NewCar_0

Ever since Jim’s ’99 Ford Escort croaked mid-WA-move, we’ve been sharing my 2002 Ford Taurus.

We did this for four and a half years and it went pretty well, but that was because we worked at the same office and that office was just four miles from home. After buying the house and after Jim accepted a job 10 miles from home in a different direction than the office where I still worked, we started to feel the need for a second car. (Also: Bah at America’s stubborn reliance on personal vehicles!)

Our Next Car Needs

If we were going to add a car to our fleet, we wanted all of the following:

  • All wheel drive for our neighborhood’s hilly terrain in the winter. Getting trapped on our hill in winter snowstorms sucks… and I don’t even want to think about what being trapped at the bottom might be like.
  • Hatchback for upgraded hauling capacity. The bigger the better.
  • A second car for times when we need to be in two places at once
  • A newer car, quite simply, because our beloved Taurus is now 11 years/85k miles old

We were pretty sure we wanted a Subaru, after a decade+ of admiring other Subies on the roads. We also needed a car that Jim (6’3”) and I (5’8”) both fit comfortably into, and a good number of hatchbacks failed at meeting that basic requirement. We liked Subaru for its AWD, general driving experience of their vehicles, brand reputation, vehicle comfort, and dealership’s presence in our neighborhood. We also figured that since every other car here in the PNW is a Subaru, it’d be hard to go wrong.

Test Driving & Lot Shopping

Over the course of six months (seriously, we are that slow!) we visited the dealership five times to test drive and browse inventory. We’re definitely reluctant spenders, so purchasing a new vehicle, even one we felt the need for, was something we wanted to consider over a long period of time. (We also both went into this expecting to buy a pre-owned vehicle, but used Subarus seem to go for as much as new ones.)

I have to give a shoutout to the guys at Eastside Subaru here in Kirkland, WA.  Not only did they put up with us dropping by the lot many (many) times to sit in cars, look at cars, and test drive cars, they did it with grace and friendliness.  No hard sells.  No nagging.  No asshole jokes like “when are you guys going to quit teasing us and buy a car already?!”.

This is why we kept coming back and this is why we bought Forester car here.  (And this is why we never went back to the Honda dealer.)

Test Driving the Forester

In January, a friend offered to take us along with her on a Saturday ski outing. We rode in her 2012 Forester and absolutely loved it. She probably thought we were nuts gushing about her car for an hour.

Then, a few weeks later, Subaru announced a 0% financing event. We took this as a sign and headed on over to the dealership to test drive a Forester.  We loved the Forester.

It met all our criteria, and the lot had two cars with all our desired features: back up camera, cloth interior in the dark color, tinted back windows, all weather package, silver exterior.

Outback vs. Forester

We’ve loved the Outback for years. I was certain that we’d bring home an Outback when the day came. We even referred to it, long before we even got serious about a second car. “When we get an Outback…”

We ruled out the Impreza as being too small for us, but we were wrong to overlook the Forester.

  • We had perceived the Forester to be larger than the Outback (it’s not, it’s actually narrower and shorter).
  • We has also read that the ride isn’t as nice as the Outback’s (we can’t tell the difference).

Debating whether to get an Outback or a Forester was a main topic of discussion for a long time.  The two cars are pretty interchangeable, but this is what made is choose a Forester:

  • The Forester is narrower and shorter, which made it fit better in our garage 
  • The Forester is a couple thousand dollars less
  • The Forester feels perkier, more “upright”, and a bit more nimble (to us – your mileage may vary)
  • I was going to be craving major Bloomin’ Onions if we had an Outback in the garage (as it happens, the Forester’s first trip ever was that night to Outback Steakhouse)

Purchasing

The 0% financing sealed the deal.  We went into car buying with no intention of leasing (we intended to buy it outright), but at 0% you’d be crazy to spend all $30k right now instead of slowly, over time, letting your money earn interest in an investment.

We did, however, use a chunk of the money we’d been saving for years towards a new car as a down payment to lower the monthly payment.  I hate monthly payments, even when they’re good deals like this one.  We drove our new Subaru off the lot an hour later.

The car has been nothing short of fantastic, unlocking all sorts of new capabilities like hauling large purchases and letting us drive places we couldn’t before. I feel good about it not just because we like the car so much, but because we researched it exhaustively and saved for years in preparation for it.

So, in short, yay!

Dear Toro, You and Your Lawn Mowers Suck

Dear Toro,

I wasn’t going to think twice about you.  I was going to simply never buy a Toro lawn mower again and forget about this whole episode.

But then you asked me directly for my opinion via your Toro email survey.  You even said “We’d Love to Hear What You Think!” .

Awesome, I’d love to tell you!

ToroReviewRequest

You see, I also care about product.  I’m obsessed with user experience – that’s why I work as an interaction designer.  I love getting real user feedback on my software.

So, I thought you’d like some honest and accurate feedback on your product.  I filled out your survey and patted myself on the back for doing my good deed.

Then you (Toro) responded:

ToroReviewRejected

My review absolutely followed your guidelines!

No obscenities were used, no contact info, no advertising, but oh, what’s this?  I can’t be critical of the Toro product I bought?

Well, darn.

toro lawn mower review guidelines toro sucks

Toro doesn’t want to hear negative feedback about their lawn mowers.  Clearly, Toro does not care about product feedback and does not want potential customers to know about flaws in their lawn mower products.  But that’s okay, I can post my review here, where it is the single largest driver of traffic to this blog.

My Toro Personal Pace Electric Start 20334 is a lemon.

20334 electric start toro lawnmowers suck lemon

My Toro lawnmower, model 20344 with Personal Pace and Electric Start, purchased April 2010 from Home Depot in Bothell WA, has had a very short and disabled life.

At the time of its last use, it was 18 months old.  My lawn is modestly sized and quick to mow.  It has mowed my lawn less than 20 times.

In those 18 months:

Toro issued a recall on the Personal Pace system

– My Toro’s Personal Pace system broke, making the mower difficult to push

– Toro doesn’t do house calls, so I had to disassemble this and stuff it into my sedan to get it to a repair shop.   The cause was determined to be a problem with Personal Pace… but not a problem relating to the recall.  AHAHA that’s how they getcha, we paid full price for that repair. $80 and 5 weeks later, we had our mower back.  Hooray?

– Electric start just stopped working.  The only way to start this mower now is to yank the cord repeatedly, which I can do… but that’s like asking: if you can push your car, why drive it?  Why pay more for a feature that doesn’t work?

Am I alone in thinking this mower is junk?

No.

Amazon reviewers have rated it 2 stars out of 5.

This blogger has had as much trouble with their Toro mower as I have with mine, if not more.

Plenty of bad reviews over on Home Depot, too.

So why did I get suckered into owning this mower?

I didn’t, my Dad did.  He bought it for me as a gift, without researching it, out of trust in Home Depot and the Toro brand.

:(

Home Inventory: Why You Need One, How to Make One

This week I completed a very tedious important project: making a home inventory document and video set.

I’ve been working on this bit by bit over the last two months. It’s a lot to do, but breaking it up into smaller tasks makes it much less overwhelming.

Why Make an Inventory?

Bad things happen – earthquakes, fires, hurricanes, floods, tornadoes. Chances are, you live near at least one nightmare-fuel hazard or another.

How much stuff do you have? Of what quality? In what quantity?

Knowing the answers to these questions will help you determine how much insurance to buy and help prove to your insurance company what you had. Some additional reasons:

1. Something’s better than nothing – it doesn’t matter if your house is messy or undecorated. Messy proof > no proof.

2. You have more stuff than you realize. Silverware, clothing, underwear, off-season clothing, tools, cleaning supplies – I’d wager that in most homes, it’s not the big ticket items like the TV or the computers that represents most of the expenditures. It’s the day to day stuff.

3. The condition of your stuff is worth documenting. If your car is 10 years old but rust-free without a dent on it, wouldn’t you want your insurance company to know that?

4. A major appliance inventory is just plain useful, for warranties and especially when you go to sell

5. Disaster can strike ANY TIME! Luck favors the prepared.

Making a Major Appliance Spreadsheet

This step is easy but time consuming. The idea here is to document every major appliance in your house in a spreadsheet (or on paper if you’re oldschool like that).

Your document should include:

  • purchase/install date
  • purchase price
  • serial number
  • model name/number
  • installer

I also included carpeting, flooring, blow-in insulation, and other similarly major work done on the house.

This sheet may seem like tedious work now, but it’ll be a huge help when it’s time to sell (your realtor will want to know how old things are) and it will help prove the quality and age of the stuff in your home to your insurance company should anything happen to your home.

This is how I structured my spreadsheet. I’ve flagged data I don’t know in red as a reminder to go get that information next time I work on the spreadsheet.

home_appliance_inventory

Making Inventory Videos

This video part was simple, especially once I got started. I don’t know why I dreaded this task so much. I set my camera to video recording mode and repeated these steps for each room:

1. Standing in the door, I started the video and panned from left to right to get the full room recorded.

2. I verbally stated the date and the room I was standing in.

3. Keeping the video recording, I walked around the perimeter of the room (counterclockwise if you’re above the equator, clockwise if you’re below it of course)

4. I opened drawers, cabinets, closets, etc, and used my free hand to point out objects and talk about their value and when I acquired them.

I did this room by room so that as rooms change and get new stuff, I can remake the video for just that room rather than redo the entire house. For best visual results, I did this during the daytime with lights turned on.

Organizing the Videos

I brought all the videos onto my local hard drive and named them by room. All in all, the files total about 18GB (!).

home_insurance_videos


Storing (Backing Up) the Videos

I took two approaches to backing up the videos:

Backup 1: Physical Media in a Fire Resistant Safe

I copied the videos to a flash drive (or multiples, depending on video size and drive size) and put the drive inside a small fire resistant safe like this one.

home_inventory_backup

We already use this box to hold things like birth and marriage certificates. In event of fire, the box’s thick plastic should basically melt and form a seal protecting the contents inside.

Please note that this is not a foolproof plan – digital media and other contents of the safe aren’t guaranteed to survive if the box is heated to extremes (over 135 or so). I wouldn’t go tossing this box into a fire just to see what happens. However, fire is not the only hazard we’re up against here: if the house were significantly damaged, the box could be exposed to smoke, rain, snow, or even just heavy impact. Tossing the videos onto a drive and putting it inside this safe is better than doing absolutely nothing, but as with all data backup, the best plan is redundancy.

Backup 2: Online cloud backup

I am already a subscriber to Mozy backup. It’s worth every penny, but they also have a free plan for up to 2 GB. If your videos are not as extensive as mine, 2GB might be plenty. (Of course, there may be better services available. Search Google for free online backup and see what you find.) Heck, you could put them on YouTube as private videos, or hand them out to friends/family.

No matter what online backup service provider you use, the end goal is the same: get your videos copied to a server somewhere outside your home.

This is Mozy’s interface for choosing which folders get backed up to their server:

home_inventory_backup_choose_folder

This is what Mozy backup looks like when it’s busy backing up your stuff:

home_inventory_online_backup

Cheap but Effective Alternative: Photos

Making videos can be pretty overwhelming, especially in terms of data storage. For years, I documented my belongings by photographing them instead. Put the photos online in some way or another, or if you’re truly oldschool you can have them developed and store them somewhere other than your home.

The Moral of the Story?

It doesn’t matter how you document your stuff, it matters that you do document it. Get started today – once you get the process going, you’ve already done the hardest step!


Fixing a Wobbly Standing Desk with Shelf Brackets

My standing desk was awesome but it was too wobbly – the whole desk shook like an earthquake every time I touched it or typed.  The fix was easy: I used two heavy duty shelf brackets to anchor my standing desk to the nearby wall.  The desk is rock solid now.  I can give it a good shove and it barely moves!

Here’s my easy guide to fixing a wobbly standing desk with shelf brackets.

Choosing Shelf Brackets

Shelf brackets come in surprisingly large variety of colors and sizes.  You’ll probably want at least two brackets.

Look for a shelf bracket design with:

  • 90 degree angle (some are kinda… off)
  • A good 8″+ inches on each end (mine are 12″ x 8″) but not unnecessarily large
  • Heavy duty design – go rugged, leave the “pretty” shelf brackets for lightweight shelves :)
standing_desk_heavy_duty_shelf_bracket

A prime specimen: this 12″ Knape & Vogt heavy duty bracket will lock your standup desk in place.

I used a pair of 12″ x 8″ heavy duty shelf brackets from the Big Orange Box.

fixing a wobbly standing desk with shelf brackets

My standing desk’s brackets: 12″ x 8″ of raw desk-anchoring power.

Positioning the Brackets

Your needs will vary – put your brackets wherever makes sense considering the walls around your desk and the underside of your desk.  My desk is up against a window, so I had to work around the full-length curtain.

My brackets had to be positioned:

  1. Outside of the curtain’s range of motion…
  2. …but still far enough apart to stabilize the desk and help support its weight
  3. …and not over any studs because my drill isn’t badass enough to drill into a stud

The curtain-closing requirement pretty much forced the first bracket to the center of the window, and the other one somewhere to the right of the window. That meant the left bracket would be smack dab in the center of the window, and the right bracket somewhere near the L-shaped desk’s corner.

To position the bracket, I figured out where the stud wasn’t, held the bracket in place against the wall, and marked its holes with a pencil.

fix a wobbly standing desk with shelf brackets

Ideal bracket locations: clear of the window and far enough apart underneath the desk to make having two brackets worthwhile.

Mounting the Brackets into Drywall

I used “EZ Anchors” to secure the screws, which prevents the screws from getting all wobbly in the wall.

fixing a wobbly standing desk with shelf brackets

EZ Anchor (plastic) and metal screw.

EZ Anchors are easy to use.  You can twist ’em right into location, or drill a tiny pilot hole first to make them go in even easier.

  1. Figure out where your screw will go (just hold the shelf bracket in the place where you want it to go)
  2. Mark the wall through the holes in the shelf bracket
  3. Put the shelf bracket down
  4. Screw the plastic EZ Anchor into the wall
  5. Hold the shelf bracket in place
  6. Screw the screw into the EZ Anchor

Don’t skip EZ Anchors if you aren’t screwing your brackets into studs.  Repeated nudges on the desk will eventually soften the screw’s attachment to the drywall and weaken your brackets.

fixing a wobbly standing desk with shelf brackets

EZ Anchor box looks like this.

All Done!

My wobbly standing desk is rock solid.  Check ’em out, here’s one of the brackets:

fixing a wobbly standing desk with shelf brackets

And here’s the other under the window:

fixing a wobbly standing desk with shelf brackets

And that’s it! It’s done! And it’s awesome.