DIY Bathroom: Staining a Bathroom Vanity with Gel Stain

gel_stain_how_to_tutorial

This post is part of a multi-post series showing off the DIY renovation of our office (“guest”) bathroom.

Here’s how I updated a small, dated bathroom vanity for well under a hundred bucks. This is my very first staining project (though I’ve got plenty of experience with painting wood) so I followed the same steps demonstrated by Jessie over at Imperfectly Polished. I think it turned out pretty good.

Our Vanity “Before”

Here’s our office bathroom’s “Before”, looking pretty much like it has since we moved in 3 years ago.

Take it all in: the brass faucet has resisted all attempts to fix its leak, the sink lacquer is chipping, the light fixture is straight out of a 1970’s Hollywood dressing room, and the vinyl floor is from a 1980’s hair salon. Like most of our DIY projects here at Level Up House, this bathroom will evolve over time, starting with the very first step: staining the vanity.

stain_bathroom_vanity_before

This is not our prettiest bathroom.

Vanity Staining Supply List

Staining a bathroom vanity comes with a whole slew of stuff to buy. Here’s a list of everything I used:

  • Minwax Pre-Stain wood conditioner
  • Minwax Gel Stain in “Walnut” – 16oz can
  • Minwax Fast-Drying Polyurethane
  • Corner sander with 120 grit sanding paper
  • Painter’s tape
  • Cheesecloth (optional)
  • Old socks
  • Safety goggles & dust mask
  • Plastic gloves
  • Mineral spirits for clean up
  • A roll of paper towels
  • Shop vac + brush attachment
  • Screwdriver/drill for removing the cabinet doors and hardware

I was originally going to buy the smaller size can of stain, but went with the 16oz after realizing it was going to take several coats (and indeed, it took 5 complete coats) to get my vanity’s wood as dark as I wanted. The cheesecloth was recommended to me by the “staining professional” at my local hardware store, but I think it was kind of silly. Any old rag made of thin cloth would have worked fine and would have saved me $7.

stain_bathroom_vanity_supplies_list

My local Home Depot doesn’t carry Minwax or much variety in gel stains. I had to hit up McLendon Hardware instead, where I found Minwax and an overwhelming selection of colors to choose from.

Step 1: Take it all apart

Use the screwdriver/drill to remove doors and cabinet hardware. If you can get your faux drawers off, do that, too. (I couldn’t get mine off for the life of me.)

stain_bathroom_vanity_before_taken_apart

Countertop cleared  – bathroom is ready to begin its transformation into a work zone.

Any wood trims around the base of the vanity should come off, too. Oh, and label each one with its location.

stain_bathroom_vanity_remove_wood_trims

Labeling your trim pieces is the best thing you can do for yourself. Don’t ask me how I know this.

Step 2: Sanding the vanity

Okay, the first real step here is to put on the goggles, dust mask, and ear plugs. Sanding kicks up a ton of dust and it all goes straight into your eyeballs and lungs if you don’t properly gear up first.

dust_mask_goggles_staining_a_vanity

Lookin’ chic!

My corner sander is equipped with 100 grit sandpaper. It took about an hour to sand off the thin layer of clear shininess that currently covers the vanity.  Fortunately, the existing varnish (or whatever it was) wasn’t too thick and sanded right off. Corner sanders are great for small projects and tight corners, but if I do another wood staining project I’m going to invest in a circular sander to speed up this process.

stain_bathroom_vanity_corner_sander

Corner sander ENGAGE!


Go ’round in circles and get all that shiny layer off. Be sure to get the corners and edges, too. For that narrow area above the faux drawers I rubbed a small roll of sandpaper left/right. The doors were detached and sanded separately (I sat on the floor and sanded them in my lap).


stain_bathroom_sanding_corner_sander

Sanding my vanity’s faux drawers


When you’re done sanding vacuum the area clean with a shop vac and the brush attachment. Consider wiping everything down with a wet rag, too. Getting all the dust out of the room is just a good practice – you don’t want the debris getting mixed into your stain.

Step 3: Painter’s tape

If your vanity touches walls or floors that you care about, a few strips of painter’s tape will protect those things. Wipe off any remaining sanding dust before sticking tape to the surrounding walls, interior, and floor.

painters_tape_staining_vanity

Step 4: Prepping with Pre-Conditioner

I didn’t do a side-by-side to test if this “pre-stain wood conditioner” stuff actually makes a difference, but at $7 a can I figured I’d get it since it was recommended by the how-to guides I consulted before starting this project. Using it is straightforward: open the can, dip a paper towel in, and smear it all over the wood you’ll be staining. You’re supposed to apply stain within 2 hours of applying the pre-stain, so don’t do this step and then go to bed or something.

pre_stain_wood_conditioner

This is the only time where “pre-staining” is a good thing.

Step 5: Mixing the Gel Stain

Gel stain is disgustingly thick and gelatinous, but it has to be stirred into a smoother consistency before it can be applied. I poured half the can’s contents into another container to make it easier to stir in both containers. A good old paint stick was plenty strong for cutting and stirring this goopy stuff.

gel_stain_walnut

Gel stain is goopypoopy. Many, many comparisons to other substances were made.

Step 6: Actually Staining Things

Are we staining yet? Yes, yes we are. Dip the cheesecloth or rag into the gel stain – get a small amount, no need to go nuts here because most of it’s going to get wiped back off anyway.

gel_stain_on_cheesecloth

Oh, and wear gloves. This was taken 30 seconds before my hands became chocolate colored.

gel_stain_smeared_on

Like a big ol’ poopstain. (Seriously, if you don’t make fun of this DIY stuff you’ll never survive it.)

Go ’round and ’round in circles, then wipe in the direction of the grain.

staining a bathroom vanity stain wiping technique

Gel stain application technique: put it on heavy, smear it around around in circles and then wipe in the direction of the grain. Don’t let it pool too much in the corners and crevices.

stain_bathroom_vanity_one_coat

Before and after: bare vanity door on the left, one coat of Minwax gel stain in “Walnut” on the right. They look like chocolate squares. I wish they were chocolate squares.

I went inside and did the same to the vanity:

stain_bathroom_vanity_coat_1

Wood vanity with one coat of Minwax gel stain in “Walnut”

And that’s just the first coat. Now it needs 8 hours to dry, so I clean up for the day and take a shower. Most of the clean up is me removing gel stain from my fingers and hands, but that was easy with a little dab of mineral spirits.

mineral_spirits_gel_stain_cleanup

Mineral spirits nuke gel stain right off your flesh and doesn’t leave you dry or itching.

At this point, it’s apparent that I’m going to need several coats to reach the level of darkness I desire. It’s also apparent that my wood is resisting the stain more than my paint stick, which turned into 98% dark chocolate in just one coating. I’m no wood expert – in fact, this is the first thing I’ve ever stained, so at this point it’s good to keep realistic expectations. I’m okay with wood grain showing, with a bit of unevenness (isn’t “shabby chic” in style anyway? ugh, that phrase…).

Step 5: Stain coat #2

Second stain coat went on just like the first: rub it in, wipe it off. I have to admit to being a little frustrated at this step: the second coat doesn’t look much darker than the first.

one_coat_vs_two_coats_stain

Wtf? Each coat makes a minimal difference, at best.

Step 6: Stain coats #3-6

A lot of staining tutorials go something like, “Just two coats and you’re done, easy peasey!”

Uh, yeah, my experience was more like needing 6 coats total.

I also had to wait 24 hours between coats, or else the previous stain started smearing around and wouldn’t “stick”. This project stretched out, ultimately taking me just over two weeks to complete it. Partly to blame was my own ennui and dwindling enthusiasm for the project as each coat hardly looked different than the previous. (Each coat DID make a difference, it was just a barely perceptible difference).

I persevered and this is where it ended up after 6 coats of stain:

vanity_done_staining

It’s chocolate. Oh my god.

Step 7: Polyurethane: 3 coats

Polyurethane is just a protective clear coat that goes on over your dried stain job. I waited a full week between my last coat of stain and my first coat of polyurethane, and 24 hours between each coat of polyurethane. You can probably wait less time if you’re in a big hurry, but I wasn’t (and my Dad was in town). Compared to all those stain coats, the polyurethane step is easy.

Just blot it on, wipe it off. I used an old sock foot as my “paintbrush”, because I hate buying brand new brushes for this kind of stuff. My sock worked fine.

polyurethane_coats

Polyurethane: wipe on, wipe off

Step 8: Reattaching Hardware

Be very careful putting your hardware back on!

Your stain and polyurethane coats should be really durable, but it’s easy to scratch things when drills and metal hardware are involved.

reattach_hardware

Reattaching the cabinet hardware is easy as long as you kept track of the pieces (you put them safely in a ziplock bag, I know you did).

All Done!

Here it is: the newly stained bathroom vanity.

stained_bathroom_vanity

Staining complete!

It’s just a humble builder cabinet, so it made for a great First Stain Project Ever.

Obviously, there are still a lot of things I would like to update in this room. The sink faucet leaks, the sink is rusting, and the countertop is scruffy/stained, and a tiled ceramic floor would add a lot of appeal.

But I had to finish the vanity first to be sure it was worth putting a new countertop onto (vs. replacing the vanity as well). In the spirit of not spending a fortune on this bathroom, I think I’ll be keeping the stained vanity and finding a nice granite remnant to replace the old countertop, along with an undermount sink and new faucet.

Helpful Tips

Cheesecloth was not necessary and too messy. Everyone’s so excited about cheesecloth but I really hated working with it. It was flimsy and I was going through way too much of it. At $6 a bag, I felt pretty silly wasting perfectly clean and brand new cloth when I had a bin of torn socks upstairs. I switched to paper towels (for staining) and socks (for polyurethane and the last coat of stain) and everything went fine.

Carry everything in a box. Since my bathroom is pretty small, I basically had two workstations: the garage floor (for the vanity doors) and the bathroom itself (the rest of the vanity). Carrying all my supplies in a cardboard box made it easier to move from one workstation to another.

how_to_stain_a_vanity_supplies

Staining is messy. A box can help.

Wear a mitt. Staining is brutally messy and gets into your skin very quickly. I never liked wearing gloves on previous projects, but they were an absolute necessity for this staining project.

plastic_mitts

Cheap plastic mitts from the dollar store for the win.

Mineral spirits are essential. If you don’t know about awesome mineral spirits are, I’m here to tell you: they are awesome. Wiping my fingers and tools down with mineral spirits made cleanup extremely easy and fast. Stain does not come off with soap and water!

Okay, that’s it for this staining project! I can’t say I’m eager to rush into another one quite yet, even though there are a half dozen things in my home I’d love to freshen up or change the color of… :)

If you found this tutorial helpful, feel free to share your projects or thoughts in the comments! I always love hearing from other DIYers. :)

Get Fit at Home with a DIY Garage Gym

As we start a new year and everyone resolves to get fit, gyms are on everyone’s mind these days. If you’ve got a bit of space in your garage, here’s what you could do with it!

Setting up a home gym in the garage weight lifting cardio

Home is where the gym is!

Lifting is one of our favorite hobbies (both of us!), and we’ve always wanted to set up our own little home gym. Home gyms don’t have to be expensive or huge – ours cost less than $2500 for everything in it, thanks to buying our major equipment on Craigslist. (If $2500 sounds crazy, the home gym we priced out at Precor’s store was well over $6000.)

In this lengthy post, I’ll show you everything that’s in our gym, why it’s awesome, and where we got it.  If you’re interested in setting up a home gym in the garage, read on!

Setting up a Home Gym

We like to lift. Everything else is fluff! Obviously, the thing we both wanted for the home gym was a squat rack, a bench, a 45 lb Olympic bar, and a collection of plate weights to go with it.  Throw in a set of adjustable dumbells and you’ve got all your major lifts covered!

Lifting Equipment

Power Rack + Olympic Bar + Weights

setting up a home gym in the garage lifting rack

I don’t think the dude comes with it, which is too bad, because a built-in spotter would be sweet.

Power racks are awesome: this simple cage positions the bar so you can do squats and bench presses.  You can also do deadlifts, pull ups, and dips – heck, you can even stand in the rack doing curls. (Don’t do curls in the rack at a commercial gym. :P)

This PowerLine Power Rack isn’t the exact same rack I have, but it’s got the same features that make mine awesome:

  • pull up bar
  • adjustable safety bars
  • separate set of hooks for squat mode
  • plus, it’s well-reviewed on Amazon!

The only thing I’d miss are the numbered stickers, but you could easily add your own with some tape.  (My power rack is a discontinued Tuff Stuff brand power rack.)

Find your 45-lb Olympic bar and weight plates at any local used sporting goods store.  These equipment pieces are durable and easy to find secondhand for big savings.

Power Rack Workouts

A power rack is extremely versatile, and a safe way to set yourself up for the three biggie lifts: squatbench pressdeadlift(Links go to YouTube videos showing proper form). A rack is also good for pull ups, barbell lunges, and tricep dips.

Bowflex SelectTech Adjustable Dumbells

setting up a home gym in the garage bowflex adjustable dumbells

My Bowflex SelectTech Adjustable Dumbells are absolute treasures. Quickly switch between different weights, from 7.5 up to 52.5 lbs.

Adjustable dumbells rule because they take up so little space.  It’s like collapsing that long row of dumbells at the gym into just one set.  Bonus: the only sweat on them is yours.

I have a set of Bowflex SelectTech adjustable dumbells and they’re worth every penny.  They feel great in my hands, change easily, and haven’t broken after several years of near-daily use. (The pictured dumbells are a slightly newer version of the set I use.)

  • Go from 7.5 lbs to 52.5 with the turn of a dial.
  • They take up almost no space
  • Rugged as hell (though I don’t make a point of dropping them)
  • Flat “bottom” edge so they don’t roll away on you
  • Safe to hold over your head – the plates won’t fly or fall off the dumbell

Dumbell Workouts

There’s literally no shortage to the variety of workouts you can do with dumbells:

  • dumbell bench presses
  • bicep curls
  • flyes
  • upright rows
  • tricep kickbacks
  • lunges
  • one-armed rows

… the list goes on and on, it’s ridiculous.  Check out www.dumbbell-exercises.com for like, a billion dumbell exercise ideas, complete with cute animations.

One last note: Don’t buy those “hand in a box” dumbells, they’re too restrictive on your range of motion and the variety of exercises you can do. You want dumbell-shaped dumbells.

Body Vision Power Tower

body_vision_power_tower

Body Vision Power Tower: get a hardcore core workout!

At first glance a power tower it looks sort of like a seatless chair, but the power tower is a versatile and efficient piece of equipment for your home gym.  Back at the commercial gyms, I’d see ripped guys doing dips and chin-ups on these things with weights hanging from their waist – you never outgrow a power tower. It doesn’t have any moving parts – that’s because you’re the weight.

Do push-ups, pull-ups, knee-raises, and dips to give your upper body and “core” muscles a pretty brutal workout. When I first got the my Body Vision Power Tower, I could barely hang from it for more than a few seconds – now I use it for pull-ups and dips.

  • chin-ups and pull-ups with multiple hand positions for arm strengthening workouts
  • leg and knee raises for leg and core workouts
  • dip station for tricep dips, working your triceps and chest muscles
  • foot grips / push up bars near the bottom for pushups (not that you can’t just do these on the floor…)
  • just plain hangin’ around because even that’s pretty tough after a while!

This power tower is height adjustable on assembly – it’s not adjustable once it’s put together.  At 5’8″ and 170 lbs I fit on it great, but my 6’4″ husband at 210 lbs finds it a bit rocky.

PS: I can’t believe I got to write “power tower” in complete seriousness!

Home Gym Cardio Equipment

Precor EFX 5.23 Elliptical

Precor is basically the king of elliptical machines, owning most of the patents and the best commercial models.  Precor is by far my favorite brand: I’ve tried other brands in gyms and on showroom floors, and they’re just not as good.   They wobble, or feel weird, or are missing great features like adjustable incline. My Precor 5.23 is a commercial model with static “arms”.

Here’s an official photo of it:

precor_home_gym_elliptical

My Precor elliptical has seen hundreds of hours of use, and it’s still going strong. Sturdy and rugged, I love this thing.

And here’s mine in the garage, looking quite a bit more cluttered (but you get the idea!).  I set it up to face a multi-tiered shelf, which used to hold a TV (until the TV mysteriously stopped working).  Also on the shelf are my speakers, weight lifting gloves, and some household storage.

My_precor_home_gym_elliptical

It’s not as cluttered as it looks, I swear. :)

If you’re shopping for an elliptical, plan to spend a good deal of time figuring out your preferences.

These are my preferences:

  • Adjustable incline – Good way to get some variety into your workout
  • Adjustable resistance – Don’t even consider an elliptical without the ability to crank up the resistance
  • Sturdy design – When testing, get on an elliptical and go full speed – half the models I tested wobble in a good HIIT workout, but my Precor is solid
  • No swinging arms – I’ve been smacked by swinging arms enough, and they become especially dangerous on high speed “runs”.  I often carry weights when using the elliptical, anyway.
  • Water bottle / iPod shelf – Essential for a $1500+ piece of equipment, I think
  • Magazine shelf – for leisurely workouts :)

Home Gym Accessories

Cyber Acoustics Subwoofer Satellite System

This Cyber Acoustics speaker system is the same one I bought for my garage gym 2 years ago.  It’s been a #1 best seller on Amazon forever, and for good reason: the base is thumping, the volume goes louder than most noise ordinances allow for, and it sounds fantastic.  The deluxe speaker system hooked up to my computer cost 5x more than this system, but I’ll let you in on a little secret – this one’s better!!

My favorite features:

  • AWESOME BASE – my #1 requirement in a sound system. I hate flat sound!
  • Volume adjuster “pod” is on a long wire, making it accessible unlike, say, a knob on an out-of-the-way speaker
  • Base can be adjusted separate from volume
  • Works with iPod/iPhone/smartphone – plug one end of an aux-in cable into your device’s headphone port and the other end into the control pod’s “AUX IN” port
cyber_acoustics_subwoofer_satellite_system_best_home_gym_speakers

Badass sound and all the best features.

Resistance Bands

I collected a number of resistance bands over the years, but if I was starting from scratch I’d get this set of resistance bands by Black Mountain Products.

This set is awesome because multiple bands can be combined with one handle.  If you’ve ever tried to use multiple handles at once, you know how frustrating (and silly) it can get trying to wrangle ’em into alignment.  If you’re new to working out with bands, you’re in for a treat – bands are great at working smaller groups of muscles that get overlooked in larger lifts, travel easily, and can be used while idly doing something else (I often use mine while watching TV or going for a “float” on the elliptical).

  • Multiple resistance levels
  • Combine bands with one handle
  • Convenient storage / travel bag
  • Ankle strap for leg workouts
BMP_resistance_bands

Black Mountain Products makes an awesome set of resistance bands – use ’em alone or combine them for a tougher workout.

Bowflex Adjustable Bench

This adjustable Bowflex bench is the exact same one I have in my home gym.  I think it’s awesome – if you’re considering a bench, invest in an adjustable bench and open up a huge variety of free weight workouts.  Combine with a set of adjustable dumbells and there isn’t much you can’t do with just these two pieces of equipment.

  • Four positions – straight upright, leaned back, flat, and decline
  • Sturdy with a rugged vinyl cover – if you’ve read this far, you know how obsessed I am with durability!
  • Leg pad attachment – holds your legs in place, essential for some lifts
bowflex_adjustable_bench

Adjustable benches are worth it for the variety of inclines.

Mirrors

I got mine free – I found ’em in a neighbor’s remodel garbage heap. Try yard sales or back-to-school season sales for cheap mirrors.

Cork Bulletin Board

I mounted this simple cork board near our home gym to hang lifting logs and write down rack settings, and a weight cheat sheet.

Advantages of a Home Gym

There are sooo many advantages to having a home gym.  Here’s just a few:

  • Always open – I used to get mad when I couldn’t work out on a holiday!
  • Private – I can make all the silly lifting faces I like, no one’s watching.
  • Shower and dress at home – Showing at the gym sucked, especially for Jim because the showers were open. EW.
  • Eat breakfast at home – I used to have to eat breakfast at the office because it wasn’t economical to drive back home before work.
  • No waiting for equipment – That guy curling in the squat rack is not my problem anymore! :D
  • Use it for as little or as much time as you like –  Sometimes I go down for just 10 minutes – not worth driving to the gym for, but easy to do at home.
  • Post logs and records on the wall – A cheap cork board mounted on the wall near our rack gave me a place to record workouts

Disadvantages of a Home Gym

Nope, none.

Naw, just kidding – the biggest disadvantages of a home gym are the cost to set it up and the space it requires.  At $2200, we were essentially buying a 3-and-a-half-year gym membership upfront.  I do not recommend building a dedicated home gym unless you are already an avid gym-goer.  We were somewhere in our fifth year of near-daily gym use when we put our home gym together.

Some other (minor) disadvantages:

  • Negotiating gym time – There’s only one of each thing and two of us, so Jim and I coordinate who is using what and when
  • Less space in the garage – Many people here in the Pacific Northwest use their garages the way people in the Midwest use their basements – packed to the brim with stuff!
  • Garage can be kinda cold – but that’s just motivation to lift harder!

But I’m on a Budget! (Or In a Tiny Space)

I feel for you – I used to work out in my little apartment with equipment that could be tucked away when not in use.   Here’s what I used – for less than $300 you can put together a respectable home gym with the following equipment:

The best part?  All this stuff is super durable – you’ll use it for years, even if you put together a larger home gym later on.  I think small equipment like the above is a great way to get started with home gymming – start small, and work your way up to a larger gym.  If you don’t already like to exercise, jumping right into the deep end of a $3000+ home gym might not change that. I’ve seen much nicer home gyms than ours going unused, and I’ve seen crazy buff people whose only equipment is the sidewalk and a few dumbells.

Where’d you learn all this?

Bodybuilding.com’s forums are my absolute favorite resource for nutrition, lifting techniques, equipment recommendations, and motivation.  I’ve been a regular reader for six years and I highly recommend this community.

50 Ways to Feel Warmer in Your Freezing Cold House (Without Cranking up the Heat)

Winter's here, but it doesn't have to feel that way. Make your FREEZING COLD house way more enjoyable with these heat-saving bill-slashing tips.

I love winter, but everyone around me thinks I’m nuts. Do I know the divine secret to keeping warm all winter? Maybe!

The over-arching theme to all of these tips is to focus your efforts on keeping heat in your house and warming yourself, not your entire house.

Here are 50 ways to feel warmer in your freezing cold house – without spending a fortune. (In fact, most of these tips should save you money in the long haul.)

LET’S GET WARM!!! 

20 Free Fixes

Free ways to be warmer?! Sign me up! Even better, some of these tips can save you more than new windows or appliance upgrades ever will!

1. Lower the thermostat

Sure, every “how to save on heating” list starts with this one, but what does it mean? It means if you normally keep your heat at 72 F, drop it to 66 instead. You’ll survive. Heated air is expensive and it likes to escape, so the best thing you can do is to not produce it in the first place.

The rest of the tips on this page will help you live with the lower temp.

2. Bundle your butt up

Double up on socks, get some nice thick slippers, wear a hoodie over a short-sleeve shirt over a long-sleeve shirt. Shirts within shirts, folks, that’s the secret! You get a choice: be bulky or have a bulky heating bill. The first time I got slapped with a $400 bill for the luxury of wearing a T-shirt in January was the last time that happened.

Level Up House: 50 ways to keep warm in your freezing cold house! Tip #2: BUNDLE UP!

Photo credit: Mark Turnauckas

3. Close your chimney flue

Is it closed all the way? Our flue is stupid and likes to open itself on its own. Leaving a window or a chimney flue open is like opening your wallet and letting dollar bills flutter out.

4. Lock your windows

Locking windows makes the seal a bit tighter. Oh, and duh – don’t leave windows open.  If you do open a window to get some fresh air, shut the door to the rest of the house.

5. Keep outside doors tightly shut

Even if you’re stepping outside for just a few minutes, pull that door all the way closed.

6. Minimize use of your kitchen and bathroom fans.

Kitchen and bathroom fans pull lovely heated air out of your home and into the outdoors. (Wallet, fluttering bills…)

7. Wrap yourself in a blanket.

Be a human burrito. It’s winter, no one will judge.  If they do, give them a good kick.  Kicking warms you up!

human_burrito

You should see her sexy heating bill!

8. Rob a bank

Or just pretend you’re going to rob a bank by pulling up the hood on a hoodie. It’ll trap heat and keep you warmer. Bank robbers might suck at being kind to society, but they do save a bit of cash on not having to keep the house so warm.

9. Drop and give me 20! 

Pushups or jumping jacks will warm you right up – and help negate the effects of tip #14.

10. Move furniture away from vents

If you’ve got any furniture over or near your heat source, it’s probably soaking up that heat instead of letting it float around the room. Try re-arranging your furniture, if feasible, to work better with the heating vents.

11. Open drapes during the day, close ’em at night

If your summers are hot, you’re probably in the habit of covering your windows to try to keep the rooms a bit cooler.  The same principle works in reverse for heating a room: open your drapes and blinds during the day to let heat in, then close ’em up at sunset to keep that heat in.

12. Block door drafts

My first apartment’s doors were the first in the hallway to the outside, so anytime someone came in from outside I’d get a whoosh of icy air under my own door. I wised up and stuck a rolled-up towel at the base of each door.  Instant improvement!  

If you’re crafty, Not Martha shows readers how to make a pretty DIY door draft stopper. And if you’re not crafty, there’s always something like this As-Seen-On-TV Draft Guard.

doordraftstopper_350

DIY draft stopper by Not Martha

13. Take a walk outside

Counter-intuitive, maybe, but a brisk walk in the freezing weather outside warms me up and gives me a new appreciation for the inside temperature.

14. Eat (or drink) something warm

Warm food makes cold temps more tolerable. Food in general kicks up your metabolism, too, so dig in.  That’s what I tell myself as I polish off the last of the Christmas cookies.

warm_up_with_cookies

Photo credit: joyofkosher.com

15. Close the door to unused rooms

If you rarely go into a room, close the door and don’t heat it.  Cold air from the unused room won’t mix with the heated spaces.  Keeping 1500 sq feet warm instead of 1800 sq feet will save you quite a bit of cash.

16. Raise your door thresholds

If you see daylight under your front door, you’re losing expensive heated air through that crack! That metal bar you step over when you go through the door can usually be made taller to close the gap.  Turn the screws counterclockwise until the daylight is mostly gone.  Don’t make the door harder to open and close, just shrink the gap a bit.

17. Plug gaps around electrical boxes

Remove the cover plate from an electrical outlet – is there a large gap between the drywall and the electrical box?  Most hardware stores sell little sheets of insulation shaped like the outlet cover itself to stick in here. (PS: Don’t pump caulk or foam into the electrical box, that’s bad advice that sometimes shows up in lists like this).

18. Typing gloves!

Don’t heat your whole house just so your tiny fingers can feel warm. DIY typing gloves:  cut the fingertips off a pair of cheap garden gloves, and you can still use your keyboard, tablet, and phone while your hands stay roasty toasty. Or, get a nice pair of handmade typing gloves like these from ElenaLittleCreations on Etsy.

50 Ways to Feel Warmer in Your Freezing Cold House: #18 - wear typing gloves!

Typing gloves by ElenaLittleCreations

19. Roast a chicken

Fire up your oven and bake something huge – your whole house will smell great and feel warm and toasty!

kellers_roast_chicken

Roasted chicken credit: Elsie Bauer SimplyRecipes

20. Snuggle up close to someone

The world needs more snuggling.

20 Cheap Upgrades

Easy upgrades that cost less as little as a few dollars and no more than $250.

21. Get a space heater

Drop the thermostat, corral everyone into one room, and fire up a space heater for $BIG SAVINGS$.  It’s way cheaper to heat just one room via a space heater than it is to heat the whole house.

My family used this space heater trick when I was growing up and I use it in my own place now, and it’s seriously the best. It’s below freezing outside as I write this, but I am toasty warm in my heated computer-room cocoon thanks to the space heater pointed at me.

Don’t have a space heater? Browse Amazon’s full selection of space heaters to find the right one for you.

lasko_space_heater

Here’s a nice portable space heater by Lasko. It doesn’t take a huge space heater to make a room cozy.

22. Install a smart thermostat

No, not a programmable thermostat, unless you promise to program it and use it as intended (most people don’t). Read more about the programmable thermostat energy savings myth here and here.

Keeping the house the same temperature 24/7 is expensive and wasteful, but many people do it.  If you have a programmable thermostat, setting it up to lower the temperature during the work day and during the night could save you hundreds of dollars over the heating season.

make your home warmer in the winter with a learning thermostat

It’s crazy popular for a reason – the Nest thermostat finds the most efficient heating routine for your home with almost no effort on your part.

23. Change your furnace filter

A dirty filter makes the furnace work harder, which increases the cost to run the thing and wears it out faster.  This YouTube video shows how simple it is to change a furnace filter.  Measure your existing filter before shopping, since they come in lots of sizes.  Change the filter every 6-8 weeks, or whenever it looks really dirty, for the duration of the heating season.

Shop for furnace filters of every size at Home Depot.

furnace_filters

The humble furnace filter can save you $$$.

24. Upgrade your insulation

You know that fluffy pink stuff that itches like hell if you touch it?  Stapling it into your garage, attic, and crawlspace or basement is messy and unpleasant but should save you some cash.  Even better, a lot of people have a few rolls of it left over from their own insulation, so ask around – I insulated the walls around my first garage door with some leftover insulation from my parents.

25. Wrap your hot water tank

If your hot water tank is in an unheated part of your home, such as your garage, a water heater insulation blanket might pay for itself very quickly.   Many people also report their water is hotter and arrives faster, so there’s that, too.

26. Replace weather stripping

Weather seals compress and wear out over time, making it easier for expensive heated air to escape. ThisOldHouse offers a simple guide for replacing your weather seals.

27. Caulk windows and doors

Depending on your window and door style, a thin bead of caulk applied to cracks between the trim and wall might save you some cash.

28. Locate and fix air leaks

Warm air escaping through tiny cracks and crevices wastes money.  Energy.gov offers a guide on detecting air leaks.  Keep in mind, though, that you do need some airflow.  Blocking everything will cause a moisture build-up, so plug the big ones and then move on.

29. Tape duct cracks

Follow the heating ducts from your furnace: are there any cracks or sags?  You may need to seal (or fully replace) your duct work.

30. Give your chimney a pillow

Your chimney(s) are pointed in heat’s favorite direction: up!  Plug that thing with an inflatable draftstopping pillow.  It’s basically a glorified pool toy for your chimney, and it’s much cheaper than retrofits or new fireplace doors. Sizes vary, so measure before you buy. (PS: Always remove your pillow before lighting any fires.)

Chimney_Pillow_Draftstopper

Plug your chimney with a chimney pillow and keep heat inside where it belongs!

31. Get a heated toilet seat

One of the worst things about lowering your home’s ambient temperature is having to sit on a cold toilet seat.  A heated toilet seat changes everything. I got a UltraTouch Heated Toilet Seat several years ago and it is amazingOne sit and you’re spoiled for life. 

32. Apply window film

Heat lost through windows accounts for 10-25% of your heating bill.  Covering your windows with clear plastic film (find kits at your local hardware store) can reduce this loss. If you want a really cheap window fix, try this bubble wrap window insulation technique.

33. Get a furnace tune-up

For about $80-$100 a technician inspects your furnace to ensure it is performing at its peak.  Doing the maintenance is also a great way to avoid being the proud owner of a dead furnace on Christmas Day, scrambling for your city’s only available repairman.

34. Clean and repair your roof

Moss, leaves, and pine needles retain moisture, so get those things off your roof. Also, repair any existing damage while you’re up there. Replacing damaged shingles and repairing flashing around vent stacks and chimneys will both help your roof last longer and make it a bit more energy efficient.

35. Insulate hot water pipes

Pipes that are warm to the touch should be wrapped to help keep that heat where it belongs (inside the pipe).  Pre-slit pipe foam is available at most hardware stores.  Just cut to size and fasten it in place with duct tape. The catch? Your pipes are probably in your crawlspace or otherwise awkward to access.

Level Up House: Wrap your hot water pipes with foam insulation to keep heat where it belongs.

I wrapped my own crawlspace pipes – took a few hours and several yards of foam insulation. Totally worth it – our crawlspace is exposed to the ambient temperature, and no busted pipes yet.

36. Insulate the attic “access door”

Even if you pumped your attic full of blow-in cellulose, if the access door itself doesn’t lay flat or lacks insulation it’s just another way for hot air to escape.

37. Hang thick curtains

Room darkening thermal curtains are a real thing and they are awesome. Open ’em wide during the day, then close ’em up at night.  The heavier the curtain, the more it will do to retain heat.

38. …or hang thermal liners

I use a Eclipse Thermal Liners on the back of my bedroom curtains year-round.  It makes them heavier, but the liners are very effective at keeping winter heat in and summer heat out.

eclipse_thermal_liner

My Eclipse-brand thermal liner hangs on the backside of my bedroom curtains, which keeps the room dark in the summer and a bit warmer in the winter.

39. Roll out some rugs

Floors can account for up to 10% of your heat loss if they’re not properly insulated.  Mitigate heat loss with rugs (or blankets).

40. Hug a heating pad.

A 50-watt heating pad can make winter so much more tolerable for the always-cold among us.  This Sunbeam Heating Pad is a family favorite.

10 Long-Term Investments

Here’s the big upgrades: for just a few hundred or thousand dollars, you can help your freezing house be a bit warmer for the rest of all time. Unfortunately, most of these things take a long time to break even on.  Still, buying these things make sense if you’re staying a while, or the one you have is already a complete piece of junk, and will help you sell in a buyer’s market.

41. Live in a small home

The practicality of this tip varies by region. Ironically, in my area smaller (1200-1600 sq ft) homes cost just as much, if not more, than larger (1800-2400 sq ft) homes. I think other people are onto this secret. But if you’re choosing between a small home and a larger one, consider the cost to heat the additional space.

42. Replace your furnace

Depending on what you’re replacing, a new model might be way more efficient and could pay for itself in a few years.

43. Install a heat pump

A heat pump isn’t something you just walk into Home Depot and buy – it’s more like a new furnace.

If you live in a climate with mild winters, you’ve probably heard of heat pumps, which move heat rather than generate it. They’re popular here in the Pacific Northwest, and can serve as air conditioning in the summer, but it will will take several years to recover the installation cost.

Read more about heat pumps at Heatpump-Reviews.com.

44. Insulate your attic

Here’s an easy way to tell if your attic insulation isn’t cutting it: icicles are hanging from the edges of your roof.  Ice dams and icicles mean there’s heat escaping from your house through your attic – it goes through the roof, melts the snow, and that snow becomes icicles on your gutters.

We insulated our attic with blown-in insulation (it’s a fluffy cellulose material sprayed onto the “floor” of the attic). Our upstairs used to be “the cold floor” of the house: after the blow-in insulation, it’s now the warmest. 

45. Increase your home’s thermal mass

Heavy materials retain heat better. Mr. Money Mustache wrote a comprehensive guide on the concept of a home’s “thermal mass” – things to keep in mind when choosing materials for your renovations.

46. Replace your windows

New windows are expensive and messy, but depending on how ancient your windows are you may wait as little as two years for a return on your investment.  But most homeowners will wait a lot longer for a return on their window investment (like, a decade). Figure out what windows you have, and compare them to what you’d replace them with, before jumping into a new windows project.

(PS: Windows aren’t just about heat retention. This guide by Andersen Windows points out some of the other advantages of replacing your windows.)

47. Replace your front door

Is your front door super crappy? It might be beyond simple caulking and weatherstripping – replacing the whole door can also improve your resale value (assuming you pick a nice door that suits the house’s design, but you knew that).

48. Insulate your crawl space

Are your floors cold in the winter?  The crawlspace under your first floor might be poorly insulated. Explore EnergyStar’s guide on checking your insulation levels for region-specific information.  (In the meantime, house slippers help a lot.)

49. Get a tank-less hot water heater

Provides hot water on-demand, and the lack of a tank means hot water isn’t sitting around 22 hours of the day doing nothing.  I don’t have a tank-less, but some of my friends do and they love it.

50. Move!

When all else fails, relocate to a warmer climate! I happen to enjoy the cold weather, and I feel bad for people who complain from October to March about the winter season.  Las Vegas and Texas are affordable and booming – check ’em out!

Note to readers: Some of the links in this article are affiliate links. They are provided to help you find the recommended product quickly.  If you shop through an affiliate link, a tiny % of your purchase (if you make one) helps support this site with a tiny kickback at no cost to you.  As always, I encourage you to shop around and price compare to be sure you get the best deal!

DIY Kitchen Backsplash (Part 5): Grouting Backsplash Tiles

DIY Tiled Kitchen Backsplash: Part 5. How to grout your DIY kitchen backsplash. It's like spreading frosting over little glass tiles!

Here are are in Part 5 of our DIY kitchen backsplash – the homestretch!  In this detailed post, I’ll show you all the steps to grouting your backsplash tiles.

Catch up on our DIY kitchen backsplash series through these links: 

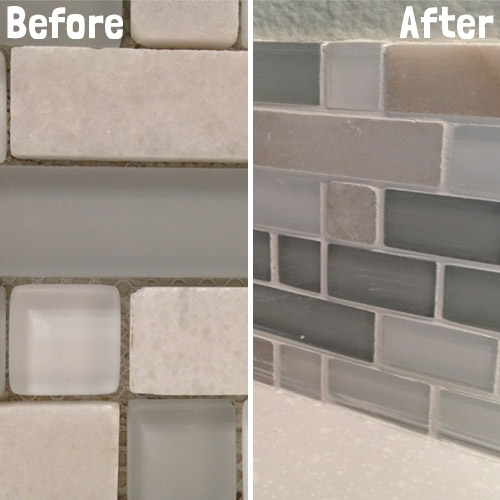
The tiles have been mortared to the wall, and after 20 hours of dry time we’re ready to fill the gaps between the tiles with a non-sanded grout.

grout_before_after

Let’s get started!

Mixing Grout

Just like making mortar, making grout involves a box of grout powder from the local hardware store, water, and a bucket.  We cut the box’s formula in half, figuring that our 8 sq feet of tile didn’t need 20 sq feet worth of grout. (We still had plenty left over.)

Tip: Don’t start this step unless you have the next 4+ hours available.

Water + non-sanded grout powder + bucket = grout. We followed the box’s instructions and mixed it up with a metal scraper. (See the Supply List for a detailed list of everything we used.)

DIY Kitchen Backsplash: Mixing grout. If you can make brownies from a mix, you can make your own grout.

A bucket ‘o grout

It’s like a thick frosting, except not delicious.

Applying Grout

Get a nice big glob of grout onto the float trowel and smear it on!  Grouting is messy, tiresome business: apply it with a firm, strong arm so it squishes into the gaps between the tiles.  Continue around the entire backsplash.  Use your fingers to get grout into corners or places the trowel won’t fit.

Our 8 square foot backsplash took the two of us well over an hour to get grout into every crack.

Tip: Remember, you’re working against time here because the grout is slowly drying and hardening as you work.  A sheet of plastic wrap over the grout bucket can help slow the drying. If you have a very large area to grout, consider working in phases or getting more helpers.

DIY kitchen backsplash: spreading wet grout over tiles.

It began with a glob of grout.

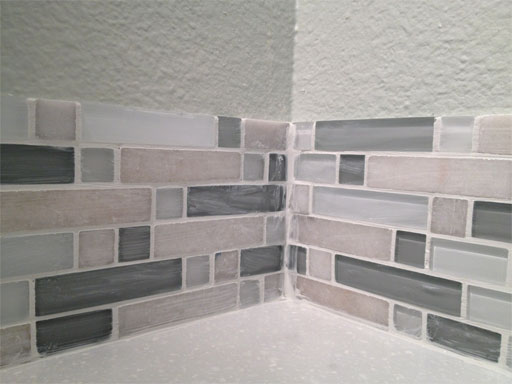
I used my fingers to stuff grout into the corner where the tiles meet..

DIY kitchen backsplash: grouting the corner where the tiles meet.

Fingers are useful for getting grout into tight areas, such as corners.

…as well as into the tight area behind the faucet:

DIY kitchen backsplash: spreading grout into tiny cracks using my own fingers.

Fingers: the other home improvement tool

Cleaning Grout off Tile Faces

When about 75% of the cracks were filled, my helper switched to using a moist sponge to wipe grout off tile faces as I continued applying grout to un-grouted areas.

Tip: Go slowly and use a moist, not a wet sponge.  Remove grout in layers.  If the grout in the cracks starts to flow out of the cracks when it gets wet, wait 10 minutes before trying this step again.

DIY kitchen backsplash: wipe grout off tile faces using a moist sponge.

Using a moist sponge to slough grout off tile faces

Once the bulk of the grout was removed from the tile faces, I switched to using moistened paper towels to remove the final thin layers of grout from the tile faces, paying extra attention to the corners. This was tedious, careful work, but it left the tiles looking crisp.

DIY kitchen backsplash: remove haze from tiles using a moist paper towel.

Using a paper towel to remove haze and excess grout from tile faces.


DIY kitchen backsplash: polish grout off the tile corners so they look nice and crisp.

Grout is drying as I polish the corners.

Polish, polish, polish – this step is super tedious but 100% worth it.  Get those corners sharp, it makes a difference!

Grout Drying

We let the grout dry for just over an hour before returning to wipe any remaining haze off the tile fronts.  The grout now has to dry for three days before applying a coat of sealer.

DIY kitchen backsplash: another home improvement project, another mess! (Good thing we have Cheez-It!)

Grouting’s done, but there’s still an hour of clean up work to do.

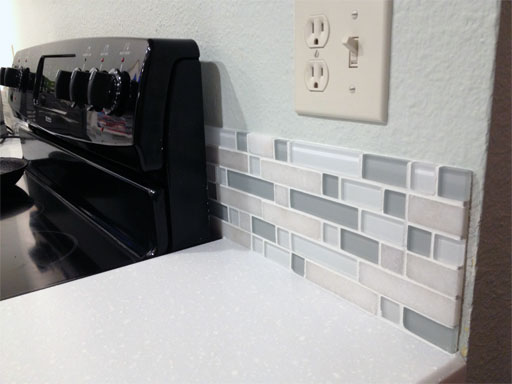
DIY kitchen backsplash: Our 6" backsplash, freshly grouted and looking sharp.

Here’s how one of the backsplash edges turned out .

DIY kitchen backsplash: complete!

Kitchen cleaned up and looking sharp as the grout dries!