Budget DIY Kitchen Remodel: Choosing a Kitchen Sink

With the countertop chosen and a measure scheduled with our installers (The Home Depot), the next order of business in our DIY kitchen remodel was to choose a sink and have it available for the measuring appointment.  Somewhat surprisingly, none of the sinks at the d’Pot really fit our requirements:

  • single bowl
  • huge size
  • under-mount
  • stainless steel

TO THE INTERNET!

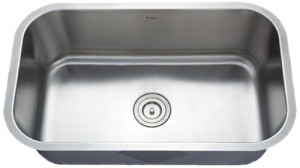
On Amazon we found this beauty: a Kraus brand single bowl stainless steel under-mount sink.  70+ reviews and 5 stars?  Yeah, I’m there.

The Kraus sink checks all our boxes (including price – at $300, it left budget for a classier faucet) and it’ll arrive with plenty of time to spare before the measure in two weeks.

choosing a kitchen sink kraus stainless steel


We also checked Home Depot’s website, which boasts of its 4000+ sink inventory, but none of those 4000 sinks met our needs, either.  I don’t know how that’s possible.

Some of the things we grappled with while choosing a kitchen sink:

Single Bowl vs. Double Bowl

This was an easy decision: I want a huge sink.

Like, the biggest sink that will fit in this kitchen, because I am done fighting with runt sinks designed for washing nothing larger than a drinking cup!

I have always been unhappy with double bowl setups in previous homes, and I can’t think of a single positive thing to say about them. I don’t do a lot of dishes by hand, but when I do it’s because I’m washing a couple one-off items like cookie sheets… and I don’t want soapy cookie sheets hanging halfway out the sink, dripping water and soap everywhere.

I really didn’t know what I’d do with a narrow bowl or a corner bowl or any of the other oddities I saw on display in the sink aisle.

Sink Size

I got the biggest sink that would fit, and it was completely worth it.  Go big, there’s no disadvantage to a large sink.  Just make sure of two things:

  • You’ve left enough space for a faucet
  • The bottom of your new sink won’t be lower than the drain pipe underneath your current sink

Under-Mount

Under-mount has changed my life. An under-mount sink eliminates any “bump” between countertop and sink, so wiping crumbs off the countertop and into the sink is effortless.  Just wipe and in they go.  Future buyers will love you for your under-mount sink choice.

Also: no caulk rim around the sink edge to get dirty (or moldy).

Stainless Steel

Stainless just looks and functions better.  I’ve lived with two beige colored sinks that must’ve been painted or coated with something to give them that look, and they both looked nasty all the time no matter how much I scrubbed.

Budget DIY Kitchen Remodel: Removing Flooring

I’ve threatened it for over a year now, and that time is finally here!  The final reckoning for our house’s mosaic of downstairs flooring!

We’ve already carpeted everywhere we intend to carpet, but the “hard” floors have remained untouched until now.  We’ll be replacing old hardwoods in the entry and the bathroom, and cheap Allure/vinyl in the kitchen, and ancient carpet in the dining room.  Restoring the hard woods was an option, but I would rather have one seamless floor downstairs instead of a bunch of mismatched flooring. The transition pieces are awkward to step over.  I don’t know why the previous owner stopped the hardwoods where they did, because the steams are awkward and ugly.  So alas, the hardwoods are out.  Perhaps they can be removed without damaging them, and donated to a good cause?

This weekend was the first major step towards completing our flooring.  The more we remove ourselves, the more we save, so out came the crowbars!

Over the last few days we:

  • pulled up all of the Allure flooring in the kitchen and hall (it is now a giant scrap pile in the garage)
  • removed all carpeting and padding from the dining room
  • removed most of the woodwork trim from the kitchen, dining room, and hallway
  • tried (and mostly failed) to remove the hardwood flooring from the bathroom
  • removed all the brassy joiners that acted as seams for our patchwork flooring
  • ordered our Corian countertop for our kitchen
  • scheduled a measure with Haight Flooring for tomorrow

We are pooped!  But things are moving again, and that’s awesome!!  Here are some photos of our work:

Allure flooring gone!  Fortunately, it was only glued to itself, not the vinyl underneath.


This vinyl has seen MUCH better days. I have no idea what f’d this floor up so bad.  This damage is actually torn into the vinyl, and no, it wasn’t just pulled up by the Allure.  Whatever happened, it must have been pretty awesome to watch.

In the bathroom we removed the wood trim (revealing more of my favorite wallpaper ever) and pulled out a few of the hardwood planks to reveal what has got to be the final word on hideous vinyl.  And not just one layer, but TWO!  TWO ugly vinyls right on top of each other!!  It’s like an ugly vinyl sandwich.  The wood boards are nailed in, which makes pulling them out pretty difficult.  They break up when removed, which is a bummer.  We didn’t get too far.  We may have our new flooring installers take this one out.  It’s pretty beastly.

Pulling up the metal threshold transition between our garage stairs and our hallway revealed another ugly vinyl sandwich with a different ugly pattern.  I can’t imagine the eyesore that this house apparently was at some point in its 34 year life.

And finally, a large sample of our laminate flooring!  Shaw brand “Brazillian Vue” isn’t quite as red as it looks in this photo, and should be stunning next to white trim and our pale green and beige walls.  I like that it’s made in the US, too.

With this in place our former patchwork of 4 different floors will be transformed into one smooth and silky chocolately brown laminate covering.  Hooray!

Click here for more of our adventures in DIY flooring removal.

Budget DIY Kitchen Remodel: Professional Range Hood Installation

Welcome to our Budget DIY Kitchen Remodel project. Links to each step of the project can be found on our Budget DIY Kitchen Remodel home page.

Hello, it’s the crazy couple again, still knee-deep in our kitchen renovation!

It’s March, and we’ve since removed the last of the cabinets from this wall. The giant gaping hole in the wall above the range has been patched, and I primed the whole wall just to give it some extra oomph. This is the wall “before” the range hood went in. We let a pro handle this one.

Before:

After: 

Ta-da! I always dreamed of an awesome range hood, and this Zephyr-brand range hood is pretty deluxe. We bought it from Bothell Home Appliance (in Bothell, WA) and the two dudes they sent had it installed in about an hour – if you live in the Puget Sound area, say wut up to them for me, they’re my favorite place for appliances.

But what’s with that cord? Hooking up the electrical to anything other than an outlet is outside the scope of their services, so alas, we have a long dangling cord for now.  Also, the ventilation  duct remains exposed because the stainless steel covered provided by the manufacturer is about a foot or so too tall for the space.  I get why they provided a super long cover, but I hope they offer some sort of cutting service because this is incomplete until we figure out a solution.

In the meantime, though, the appliance itself works GREAT!  Super quiet and super effective ventilation for our twice-daily cooking. Hooray!!

Any guesses as to what we will work on in March? If you guessed “the backbreaking labor of tearing up our own floors”, you’re correct!

Patching a Large Drywall Hole

We ordered our range hood Monday! It’ll arrive this coming Thursday, so I gotta get to work on this wall situation!

First up: wall repair and priming. I primed the wall (and the ceiling) first, and then got to work on patching the big hole over the range. The old wall mounted microwave had burninated some holes in the wall (at least, that’s what I imagine happened):

And because killing a fly with a grenade is the only way I do things, I cut around all the damage to make a big empty box and reveal two studs onto which I would later mount a new chunk of drywall.


This was easy to repair – all I had to do was cut a rectangle of new dry wall to match the size of the hole and nail it to the studs. Screws didn’t work (pardon the large hole above the nail, lol). I then applied some crazy wall repair mesh tape to cover where the edges meet, and then slathered on a load of spackle.


Walls and ceiling freshly primed, rectangular hole repaired and drying!

(No, the kitchen was not magically this clean when I finished. This is after about an hour of cleaning up the mess that painting and drywall repair made. :P)

And in other news, we’ve evacuated the dining room furniture into the living room, which is surprisingly cozy!

This was done in preparation for removing the old carpet from the dining room platform. Everything we do or remove before our contractor starts work on our kitchen sometime in April saves us $$, so we do as much as we can ourselves! Besides, demolition is fun! :)