Budget DIY Kitchen Remodel: Tearing Out Cabinets

Today started early with the first coat of enamel on the cabinet fronts and the second inside on the cabinet framework. Here’s Jim carefully painting inside:

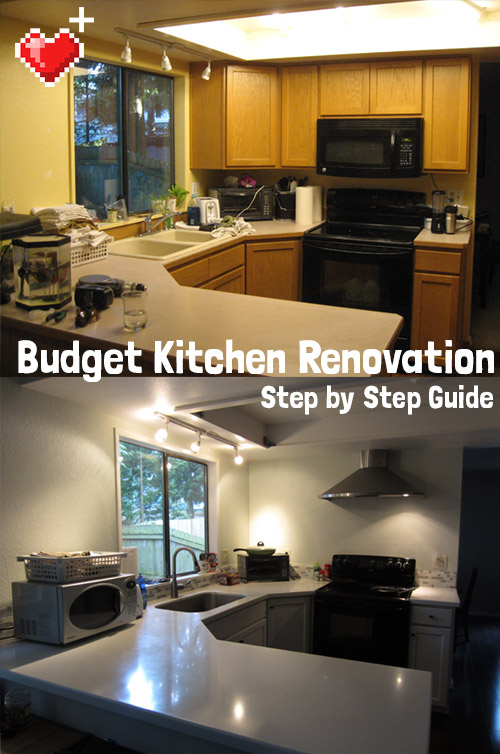
You’ve already seen a few posts about carefully painting cabinets though, so let’s get to some destruction!! You might recall that our oven-wall used to look like this.

We found this arrangement… lacking.

  • We weren’t utilizing the cabinets well because they are too small and awkward for keeping much in
  • The cabinets block the view at least half of the countertop and the range’s cook top.
  • The over-the-range-microwave has been an aggravation since the day we moved in. It’s just a beast of a microwave, dimming the lights every time it starts up and unable to co-exist with a running toaster oven (blown circuit every time we forget!). We’re not big microwave users, and it always seemed rather ridiculous to be putting a tiny bowl of veggies into something sized for a turkey.
  • Neither of us likes the idea of standing at the stove, cooking, with our head just inches from the microwave when it is on
  • The microwave ventilation was AWFUL! Our downstairs suffers low visibility from steam and smoke pretty much every time we cook (twice a day!). We need a range hood that can keep up with two cooks!
  • It’s just kinda… cramped. Like these cabinets are all up in my business every time I stand near the range or the sink. Like they don’t respect personal space.


There was only one thing to do.

Unscrewing these last two cabinets from the wall was as simple as using the drill to remove 4 long screws. But they remained just as firmly attached to the wall as ever (and to each other).

Mandi: I think these might be glued, look – they aren’t even wiggling when I pull on them.

Jim: Let me try *RIPS CABINETS OFF WALL*

Mandi and Jim: AHHHH OH MY GOD AHHHHHH I GOT IT KEEP HOLDING OKAY PUT IT DOWN AHHHH IT’S HEAVY

Anyway, we did safely lower the cabinet mass onto the countertop, and then we hauled it into the living room, which has become our project graveyard. Ahhhhhh, the kitchen breathes! It’s open! The room feels like it doubled in size. (Okay, maybe not double, but at least 25%. Maybe even 30%.)

Next up: removing the wood backsplash from around the edge of the countertop. Using a screwdriver, hammer, and a weak spot in the trim’s adhesion to the wall, I was able to start the prying-off process like so:

Once the gap was large enough for the crowbar, I used the crowbar to separate the backsplash from the wall.

I thought this method was pretty radical until accidentally punched a wide hole in the drywall with the crowbar, and until the longest portion of the backsplash split horizontally. Oops.

Still, considering the length of the backsplash on the sink wall, this seems like a minor setback. The majority of it came right off after some prying.

YAY!

One more thing before we break for lunch and our regularly scheduled weekend chores: cutting out the damaged drywall from behind where the microwave used to be. I’ve seen Dad do this like, once, so that means I’m qualified, right?

I used the level to draw a rectangle around the damaged area and I overshot the studs to give the new drywall patch something to screw into. This was actually a pretty straightforward task, and I was careful not to ram any wires or the back side of our dining room wall. I am going to leave the hole unpatched until I am certain the contractor installing our range hood doesn’t need access to any of the wires inside here.

And here’s where we are now:

Do you like our mess? Admit it, you’re impressed.

Budget DIY Kitchen Remodel: Pantry Makeover (Part 1)

Our kitchen includes a narrow pantry.  Judging by the craftsmanship, it was probably some previous owner’s project.  All they did was nail some thin strips of wood to the walls and set shelves on top.  Not bad.  I would’ve done it differently, but I don’t have bandwidth to change it up significantly.  So I’m going to just give it a makeover, rather than complete cosmetic surgery.

Here’s a “before”:

First thing I did was pull all our food out and put it in the living room.  Jim worked inside, deglossing the pantry interior and shelves while I got to work on sanding the pantry door.

Next up: priming the door, the shelves, and the interior of the pantry.  All told, it only took about an hour and a half or so to accomplish all that and get back to the “waiting” step as it all dries!  Best of all, these were the last primer-related steps.  On to enamel!


Sanding Kitchen Cabinet Doors Before Priming

Welcome to our Budget DIY Kitchen Remodel project. Links to each step of the project can be found on our Budget DIY Kitchen Remodel home page.

With the stripping done, the next step is to sand the cabinet doors. Sanding kitchen cabinet doors is easy, even if you’ve never done it before (I hadn’t!):

  1. Sand with a coarse grit to remove varnish
  2. Wipe clean
  3. Sand with a fine grit to smooth everything out
  4. Wipe super clean

Sanding part 1: Coarse Grit (60)

A powered sander (I use a corner sander) is absolutely essential if you’re going to be refinishing your own cabinets. Do not attempt this using sandpaper alone – you’ll go crazy, and you probably won’t get as smooth a finish. My sanders are a Black and Decker and a Ryobi, and both are excellent.

If you’re in the market for a corner sander, this Genesis corner sander is Amazon’s best rated and it’s cheaper than what I paid for either of mine.

corner_sander

The Genesis corner sander even comes with sandpaper pads!

I first used 60 grit sandpaper to remove any remaining varnish from each cabinet door face.

sanding cabinet faces with coarse grit

BRBRBRBRBRBRRBRBRBRBRBRBR!

Sanding part 2: Fine Grit (200)

I did a second sanding pass with a finer grit sand paper (grit 200) to make the faces smoother.

sanding cabinet faces in preparation for painting

brbrbrbrbrbrbrbrbr!

I don’t have a scientific method for knowing when to switch grits or knowing when I’m done.  Basically, when the wood looked shine-free (no varnish) and had a smooth texture, I was done.  I did both sides and all the edges of the cabinets before handing them off to Jim for final wiping and drying.

I wiped each cabinet down with a wet towel to remove any lingering dust or sanding debris before moving onto the next step: primer!

Budget Kitchen Renovation: Watch Us Wreck Our Kitchen and Put it Back Together

Level Up House's budget kitchen renovation. We repainted our cabinets, replaced our floors, installed a range hood, replaced the dated fluorescents with can lights, and tiled our own backsplash. And we did it for $6000 - WAY less than any contractor would've done it for!

Welcome to our largest project to date: a budget-friendly, semi-DIY kitchen renovation.

Why “semi-DIY”? Well, we won’t make or install the countertop ourselves, and we’re going to let the pros install the floor, but we’ll handle the demolition, cabinet refinishing, cabinet knobs, tiled backsplash, all patching and painting. We’re somewhere between “hand it all off to a contractor” and “cast our own countertop out of concrete”. If you can swing a hammer and know your way around Home Depot, you’re as skilled as we were when we started this project!

To give you a sense of time, most of this project was completed over the course of 2 months (and we both work full time, so we did most of this in our evenings and weekends).

If you’re reading this in 2014, good news: I’ve recently updated these articles to tell you how our renovated kitchen has held up over the past 2 years!

Budget DIY Kitchen Remodel To-Do List

  1. Tear out cabinets – Completed 2/2012!
  2. Strip varnish off cabinet doorsCompleted 2/2012!
  3. Sand cabinet doorsCompleted 2/2012!
  4. Prime cabinet doorsCompleted 2/2012!
  5. Final coat of paint on cabinet doors – Completed 2/2012!
  6. Paint the pantry door – Completed 2/2012!
  7. Install a powerful range hood – Completed 3/2012!
  8. Tear out mix of vinyl and hardwood flooring – Completed 3/2012!
  9. Laminate flooring professionally installed – Completed 4/2012!
  10. Remove popcorn ceiling – Completed 4/2012!
  11. Replace countertop, sink, and faucet – Completed 4/2012!
  12. Update lighting in the ceiling recess – Completed 1/2013! (Yes, we took an 8-month break from the kitchen project)
  13. Add pull knobs to kitchen cabinets and drawers – Completed 1/2013!
  14. Patch the ceiling hole adjacent to range hood duct – Completed 1/2013!
  15. Tile a new 6″ backsplash – Completed 4/2013! 

Kitchen remodel total cost:

  • Countertop, sink, faucet – About $2600
  • Range hood & installation – $1000
  • Electrical fixes – $200
  • Tiled backsplash – About $350
  • Cabinet refinishing supplies – $150
  • Ceiling lights, patching – About $50
  • Popcorn ceiling removal – About $300 for kitchen’s part of it, but we had popcorn removed in several rooms at once
  • Laminate Flooring – About $900 for the kitchen’s part, but we did the whole downstairs

All told, we spent about $6,000 on this kitchen remodel. Some things, like the flooring and popcorn ceiling removal, were actually done to many rooms (not just the kitchen).

What to prioritize in a kitchen remodel?

Make a list of what really irritates you in your kitchen. Maybe everything irritates you, but if you can pick just 3 or 4 things it’ll help you focus your budget.

In my kitchen, those things were:

  • The too-small 2-bowl sink. I went with a gigantic stainless steel undermount sink.
  • Overwhelming “orange and yellow” color palette
  • Bare fluorescent bulbs on the ceiling  – Total eyesore
  • Weak ventilation – I really wanted a rangehood.

When in doubt, prioritize usability. Make your kitchen enjoyable to use with a big sink and flexible faucet. Also, your choice of materials matters a lot – a few $ difference per square foot for a thing like flooring or a countertop doesn’t sound like much until you look at the full price. We were constantly trying to strike a balance between quality and savings.

Things I wanted but didn’t get:

  • A better layout – it was just too expensive to gut the whole kitchen
  • Remove the drop ceiling – too expensive for another 8″ of ceiling
  • New range/oven – Maybe later, the one I have now works fine, even if it’s worn out and not as stylish as a new one

We also didn’t replace any appliances. So many kitchen remodels involve chucking an entire set of perfectly good appliances just to get more modern features or a stainless steel finish. If your appliances are like ours and they work fine, consider replacing them when they break, not when they’re perfectly fine, and you’ll find a kitchen remodel much more affordable.

Can you DIY your kitchen renovation?

Renovating your own kitchen is hell. Everybody loves “before and after”, but not many people like to show off the ugly in-between. A DIY renovation of this scope is not for the weak. But I’m guessing if you’re reading this blog, you’re not a pansy who outsources everything short of dressing yourself in the morning to someone else. If you love rolling up your sleeves and saving thousands of dollars, you might have what it takes!

But here’s some fair warning. Our kitchen – no, most of our downstairs floor – looked like this for over 2 months. 

kitchen_renovation

For various stretches of time, we lived with holes in the wall, torn up floor (for a month!), and tools on every horizontal surface. 

kitchen_torn_up_floor

Oh, and at least a few things won’t go as you planned. Your floor will be harder to remove than you’d thought, the electrical won’t be set up the way you need it to be, an installer will get delayed. Be ready for some surprises! I warn you, do not undertake your own DIY kitchen renovation project unless you know you work well with your partner and possess an almost insanely badass work ethic. Tough work lies ahead. :)

Let’s get started!

Okay then! On that happy note, let’s get going!!!

It’s time to UPDATE THIS KITCHEN!!  YEAH LET’S DO IT, RAWWWRRR!!!! AND LET’S DO IT ON A TINY BUDGET!!! 

Will I ruin my cabinets?  Will I glue my hand to the counter? Follow along with our budget kitchen renovation and find out! Next stop, cabinet tear-out!